0417 HK AWS Hands-on Lab Series 2019 for Enterprise Data Protection in Enterprises – Veeam Availability for AWS N2WS Lab guide.pdf
•
1 j'aime•860 vues

Would you like to experience setting up a secure, durable AWS cloud platform and deploy Veeam to protect the data in it? In this hands-on workshop co-hosted by AWS and Veeam, we will explore how Veeam Availability for AWS allows businesses to holistically manage their data protection both on premises and in AWS.

Recommandé
Recommandé
Contenu connexe
Tendances
Tendances (19)
Similaire à 0417 HK AWS Hands-on Lab Series 2019 for Enterprise Data Protection in Enterprises – Veeam Availability for AWS N2WS Lab guide.pdf
Similaire à 0417 HK AWS Hands-on Lab Series 2019 for Enterprise Data Protection in Enterprises – Veeam Availability for AWS N2WS Lab guide.pdf (20)
Plus de Amazon Web Services
Plus de Amazon Web Services (20)
0417 HK AWS Hands-on Lab Series 2019 for Enterprise Data Protection in Enterprises – Veeam Availability for AWS N2WS Lab guide.pdf
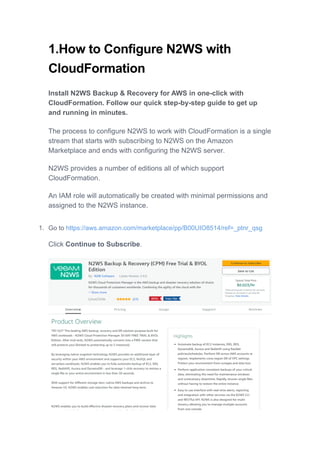
- 1. 1.How to Configure N2WS with CloudFormation Install N2WS Backup & Recovery for AWS in one-click with CloudFormation. Follow our quick step-by-step guide to get up and running in minutes. The process to configure N2WS to work with CloudFormation is a single stream that starts with subscribing to N2WS on the Amazon Marketplace and ends with configuring the N2WS server. N2WS provides a number of editions all of which support CloudFormation. An IAM role will automatically be created with minimal permissions and assigned to the N2WS instance. 1. Go to https://aws.amazon.com/marketplace/pp/B00UIO8514/ref=_ptnr_qsg Click Continue to Subscribe.
- 2. Click Continue to Configuration and then click Accept Terms. In the Fulfillment Option drop-down list, select CloudFormation. Select the relevant Software Version and Region and then click Continue to Launch.
- 3. In the Launch this software page, select Launch CloudFormation in the Choose Action list and then click Launch.
- 4. The Create stack/Select Template page opens. Under Choose a template, choose Specify an Amazon S3 template URL. Select an Amazon S3 template URL and click Next. The Specify Details page opens. Input the Stack name. Select t2.micro for the instance type.
- 5. Complete the Stack Details and Parameters. For Inbound Access CIDR, security groups act as a firewall for associated instances, controlling both inbound and outbound traffic at the instance level. Configuring Inbound Access CIDR allows you to add rules to a security group that enable you to connect to your Linux instance from your IP address using SSH: • If your IPv4 address is 203.0.113.25, specify 203.0.113.25/32 to list this single IPv4 address in CIDR notation. If your company allocates addresses within a range, specify the entire range, such as 203.0.113.0/24. • If you specify 0.0.0.0/0, it will enable all IPv4 addresses to access your instance using SSH. For further details, refer to “Adding a Rule for Inbound SSH Traffic to a Linux Instance” at https://docs.aws.amazon.com/AWSEC2/latest/UserGuide/authorizing -access-to-an-instance.html
- 6. Click Next. The Options page opens. Complete the Options and click Next. The Review page opens.
- 7. Select the I acknowledge that AWS CloudFormation might create IAM resources check box. Click Create. The CloudFormation Create Stack Events page opens. Select the new stack. The Instances page opens. Select the instance. Copy the Instance ID value shown in the Description tab and click Launch Instance. The N2WS Server Configuration page opens.
- 8. 2.N2WS Server Instance Configuration In this lesson, we'll walk through how to quickly set up N2WS Backup & Recovery for the very first time. N2WS has a browser-based management console. N2WS supports Mozilla Firefox, Google Chrome, Safari and IE (Version 9+). Note: For N2WS to work, Java Script needs to be enabled on your browser. After launching the N2WS AWS instance, use AWS Management Console or any other management tool to obtain the address of the new instance: Figure 2-1 Note: Use the address provided to you by N2WS to connect to the N2WS Server using the HTTPS protocol in your browser (https://<server address>). When a new N2WS Server boots for the first time, it will automatically create a self-signed SSL certificate. After initial configuration, it is possible to upload a different certificate. Since the certificate is unique to this server, it is perfectly safe to use. However, since the certificate is self-signed, you will need to approve it as an exception for the browser:
- 9. Figure 2-2 The example in Figure 2-2 is from Firefox Quantum. After you click Advanced (1) and add an exception for this server (2), you get the first screen of the N2WS configuration application. N2WS Server Configuration At the first screen you will be asked to type or paste the instance ID of this new N2WS instance. This step is required in order to verify that you are indeed the owner of this instance:
- 10. Figure 2-3 On the next screen the 5-step N2WS configuration procedure begins. Step 1: Approve the N2WS license agreement Review the user license terms, select the check box and click next. Figure 2-4 Step 2: Configure the N2WS “root” account password and user information
- 11. Figure 2-5 To start a free trial, leave the License list with the default. If you purchased a license directly from N2W Software, choose one of the License options, according to the instructions you received. Note: If anyone in your organization already installed a N2WS Free Trial in the past on the same AWS account, you may receive an error message when connecting to N2WS. Contact support@n2ws.com to resolve. Note: If you are using one of the N2WS paid products on AWS Marketplace, you will not see the License field. Additionally, you will need to enter a user name, an optional valid email address, and enter a password and verify it. If this is an upgrade, the username must remain as it was prior to the upgrade, but the password can be modified. Note: Passwords: N2WS does not enforce password rules. However, it is recommended to use passwords that are difficult to guess and to change them regularly. When you have completed entering the details for Step 2, click next. Step 3: Time zone Step 4: Register the account with N2W Software
- 12. Figure 2-6 Registration is mandatory for free trials and optional for paid products. N2W Software recommends that all customers register, as it will enable us to provide faster support. N2W Software guarantees not to share your contact information with anyone. If you have a Reference Code, enter it in the Ref Code box. WARNING: Use English characters only in registration. Non-English characters (e.g. German, French) will cause the operation to fail. Click Configure System when finished. The registration operation takes approximately 30 seconds after which the success screen appears:
- 13. Figure 2-9 When you see the screen in Figure 2-9, you know that the system was configured successfully. You can then click the link to start using the system. It will take a few seconds for the application to start. If, for any reason, you are not directed automatically to the application logon screen, reboot the instance from the management console: Figure 2-10 You are now ready to log on with the credentials you created in the first screen and begin using N2WS. Note: Logging on for the first time with a trial edition can take up to 5 minutes as N2WS must connect and get approved by our licensing service.
- 14. Figure 2-11 The “Please wait …” message should go away in a few minutes. Allow 4-5 minutes and then refresh the screen.
- 15. 3. Creating a Simple Backup Policy In this section we'll show you how to start backing up EC2 instances by creating a simple backup policy. Adding an AWS Account After logging on to the system for the first time, you will see the main screen: Figure 3-1 It is currently empty. The first thing you will need to do is to associate an AWS account so you can start backing up EC2 instances. Depending on the edition of N2WS you registered to, you can associate one or more AWS accounts. Click the Accounts button in the top panel and then click Add New Account. Figure 3-2
- 16. Figure 3-3 In the Add New Account screen (Figure 3-3): 1. In the Name box, type the name you would like to associate to your primary AWS account. In the Account Type list, select Backup. DR accounts relate to cross- account backup and recovery and are out of the scope of this guide. See the N2WS Backup and Recovery (CPM) User Guide. In the Authentication list, select your desired type of authentication. You can either choose to use your AWS access key and secret key or N2WS Instance IAM Role, which is recommended. These credentials are saved in the N2WS database. However, the secret key is kept in an encrypted form. There is no way these credentials will ever
- 17. appear in clear text format anywhere. See “Security Concerns and Best Practices” in the N2WS Backup & Recovery (CPM) User Guide. In the Scan Resources, select Enabled to turn on the capability for this account to scan resources. In the Capture VPCs list, select Disabled to turn off automatic capturing of VPCs for this account. Creating a simple backup schedule Click the Home button to go back to the main screen and then click the Schedules tab. Currently, the list of schedules is empty. Figure 3-4 You will now create the first schedule. Click New Schedule and then enter a schedule name and description:
- 18. Figure 3-5 You can also set the start time of this schedule and the frequency. Available units are minutes, hours, days, weeks and months. The default End Time is never. Click the End Timelink to modify.
- 19. Creating a simple backup policy Click the Home button to go back to the main screen and then click the Policies tab. Currently, the list of policies is empty. You will now create the first policy. Click New Policy. In the Policy page, enter a policy name and description: Figure 3-6 Other fields in this screen (Figure 3-6) include:
- 20. Account – Each policy can be associated with one AWS account. Auto Target Removal – Whether to auto-remove resources that no longer exist. Generations to Save – Number of backups of this policy you want to keep. Older backups will be automatically deleted. Status – By default a policy is enabled. Schedules – Select the schedule you just created. When finished, click Apply and select the Policies tab. Figure 3-7 When looking at this screen, you can see there are several things you can do with a policy. To edit the basic policy definition, click the link of the policy’s name. To configure the policy, you have three buttons: Backup Targets – Defines the actual resource objects this policy will back up. More Options – Defines Linux scripts and settings for the definition of a successful backup and retry parameters. DR – Defines disaster recovery options. Click the Backup Targets button:
- 21. Figure 3-8 As you can see in Figure 3-8, there are numerous types of objects you can back up: Instances – Back up EC2 instances, including their metadata, and optionally some or all of their data volumes. This is the most common backup target. Volumes – Back up EBS volumes independently, whether or not they are attached to an instance, and regardless of which instance they are attached to. This can be useful to back up volumes which are not always attached to an instance, or volumes that move between instances, like cluster volumes. RDS Databases – Back up RDS DB instances. This will use RDS snapshots and can be useful for backing up RDS databases together with other types of objects, or for anyone who wishes to backup RDS databases using N2WS, in addition to or instead of using AWS automatic backup. Aurora Clusters – Aurora is similar to RDS but handles Aurora clusters. Redshift Clusters – Manage Redshift Cluster snapshots. DynamoDB Tables – Back up DynamoDB Tables. To add an instance, for example, to the policy:
- 22. Click Add Instances. The list of instances (see Figure 3-9) you have in the policy’s account appears. The Choose Region list allows you to switch between different regions. You can use the free text search, column-based sorting, or pagination if there are a lot of instances and you are seeking a specific one. Note: Although you can add backup objects from different regions in the same policy, in many cases it is not a good practice to do so. Figure 3-9 Select an instance you want to back up and click Add Selected. This will add the requested instance to the screen in the background and remove it from the popup window, although it does not close the popup. You can add as many instances as you want up to the limit of your licence. Click Close when finished. Back in the Backup Targets screen, you can see the instance on the list of instances. You have buttons to remove it from the policy and a Configure button.
- 23. By default, all EBS volumes which are attached to this instance will be backed up. If a volume gets detached from or attached to the instance, it will not interfere with the normal operations of the policy. In every backup, N2WS will check which volumes are attached to the instance and take snapshots of them. Click Home and go to the Policies tab again. In the Schedules column of the policy, click the backup times link. You will see the planned backups for this policy. The backups will start automatically at the time configured previously in the schedule. If you want to initiate an immediate backup, click run ASAP in the Operations column. N2WS will report that the backup policy will now run. The process can be monitored in Status column of the Backup Monitor tab. Consult the N2WS Backup & Recovery (CPM) User Guide to see how to create application consistency for Linux and Windows servers.
- 24. 4. Performing a Basic Recovery In this lesson example, we walk you through how to perform a basic recovery of a Linux EBS-based instance. N2WS backs up the requested objects at the requested times. When you return to the main console after a while, you can view the backups in the Backup Monitor tab: Figure 4-1 For each backup, you can see exact start and finish times, and status. Click View in the Snapshots column and see the individual EBS snapshots of all the volumes. Click Open in the Log column to view the log of this backup with all the details. In order to recover from a particular backup (typically the most recent successful backup), click the Recover button in the Actions column: Figure 4-2
- 25. In the Recovery Panel screen (Figure 4-3), you can see all the instances that this backup contains. Should this policy include also EBS volumes, RDS databases, Redshift Clusters or DynamoDB Tables, you will have a link to recover them as well. In order to recover an instance, click the Instance button. The Volumes Only button is for recovering only the EBS volumes of the instance without actually creating a new instance. You will now see the Instance Recovery page:
- 26. Click Advanced Options for additional recovery parameters. Figure 4-3 Most of the options when launching EC2 instances are available here and may be modified. The currently selected defaults are exactly the options the original backed-up instance had at the time of the backup, including the tags associated with it. Clicking the Recover Instance button will recover an instance exactly like the original one. Important: If you intend to test the recovery of an instance in the same region as the originally backed up instance, you will need to change the IP in order to avoid an IP conflict. This can be mitigated by leaving the VPC Assign IP box blank:
- 27. A further option worth mentioning here is Launch from. This sets the option for the image the new instance will be launched from. In case of an instance-store-based instance, the only option would be to launch from an image. The default will be the original image, although it can be changed. In case it is a Linux EBS-based instance, as in this example, and the backup includes the snapshot of the boot device, you can choose between launching from an image (the original image or another), and launching from the snapshot, which is the default. If you choose to launch from a snapshot, a new image (AMI) will be created, and you can choose whether you want to keep the image after the recovery is complete or deregister it. You can even choose not to perform the recovery now, and only create the image, to recover from it later. If Capture VPC Environments was enabled in General Settings, the Advanced Optionssection will also contain a Clone Original VPC option next to the VPC box.
- 28. The Clone Original VPC option allows you to recover the instance to a clone of a selected VPC environment. See the N2WS Backup & Recover (CPM) User Guide for details on “Recovering to a Cloned Original VPC”. After you click Recover Instance and confirm, you will be directed back to the recovery panel page, and will get a message about the operation success: Figure 4-4 The message will include the instance ID of the new instance, and now you can go and verify the successful recovery in the AWS Management Console. The recovered instance is exactly the same as the original one, with all its EBS volumes. The End