Hands-on Lab- Amazon DynamoDB Basics
•
2 j'aime•680 vues

by Rajeev Srinivasan, Strategic Solutions Architect, AWS Database Week at the AWS Loft is an opportunity to learn about Amazon’s broad and deep family of managed database services. These services provide easy, scalable, reliable, and cost-effective ways to manage your data in the cloud. We explain the fundamentals and take a technical deep dive into Amazon RDS and Amazon Aurora relational databases, Amazon DynamoDB non-relational databases, Amazon Neptune graph databases, and Amazon ElastiCache managed Redis, along with options for database migration, caching, search and more. You'll will learn how to get started, how to support applications, and how to scale.

Recommandé
Recommandé
Contenu connexe
Plus de Amazon Web Services
Plus de Amazon Web Services (20)
Hands-on Lab- Amazon DynamoDB Basics
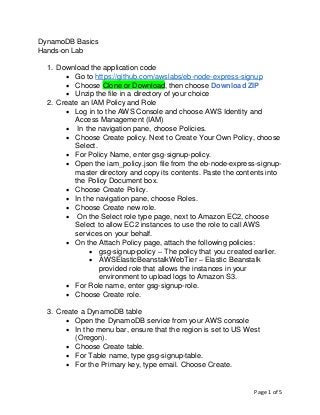
- 1. Page 1 of 5 DynamoDB Basics Hands-on Lab 1. Download the application code • Go to https://github.com/awslabs/eb-node-express-signup • Choose Clone or Download, then choose Download ZIP • Unzip the file in a directory of your choice 2. Create an IAM Policy and Role • Log in to the AWS Console and choose AWS Identity and Access Management (IAM) • In the navigation pane, choose Policies. • Choose Create policy. Next to Create Your Own Policy, choose Select. • For Policy Name, enter gsg-signup-policy. • Open the iam_policy.json file from the eb-node-express-signup- master directory and copy its contents. Paste the contents into the Policy Document box. • Choose Create Policy. • In the navigation pane, choose Roles. • Choose Create new role. • On the Select role type page, next to Amazon EC2, choose Select to allow EC2 instances to use the role to call AWS services on your behalf. • On the Attach Policy page, attach the following policies: • gsg-signup-policy – The policy that you created earlier. • AWSElasticBeanstalkWebTier – Elastic Beanstalk provided role that allows the instances in your environment to upload logs to Amazon S3. • For Role name, enter gsg-signup-role. • Choose Create role. 3. Create a DynamoDB table • Open the DynamoDB service from your AWS console • In the menu bar, ensure that the region is set to US West (Oregon). • Choose Create table. • For Table name, type gsg-signup-table. • For the Primary key, type email. Choose Create.
- 2. Page 2 of 5 4. In the eb-node-express-signup-master folder that you extracted from the sample archive, open the app_config.json file. • Change the value for STARTUP_SIGNUP_TABLE to gsg- signup-table: "STARTUP_SIGNUP_TABLE": "gsg-signup-table", • Change the value of AWS_REGION to us-west-2 for US West (Oregon) Region "AWS_REGION": "us-west-2", • Save your edits to the file. You can leave the file open, because we'll make one more change to it in the next step. 5. Set up Amazon SNS notifications • Open the Amazon SNS service on your AWS console • Choose Create topic. • For Topic name, type gsg-signup-notifications. Choose Create topic. • Choose Create subscription. • For Protocol, choose Email • For Endpoint, enter your email address. (You’ll get an email whenever someone signs up to the service.) • Choose Create Subscription. • To confirm the subscription, Amazon SNS sends you an email named AWS Notification — Subscription Confirmation. Open the link in the email to confirm your subscription. • Add the unique identifier for the SNS topic to the configuration file for the app • On the topic details page, copy the string from Topic ARN. Note that each Amazon Resource Name (ARN) has the following syntax: arn:aws:service:region:accountid:resourceType/resourcePath • Open the app_config.json file in a text editor, if it's not already open. • Insert the ARN of your SNS topic.
- 3. Page 3 of 5 "NEW_SIGNUP_TOPIC": "arn:aws:sns:us-west-2:123456789012:gsg-signup-notifications",
- 4. Page 4 of 5 • Your final configuration file should look similar to the following. Save your edits to the file and close the file. { "AWS_REGION": "us-west-2", "STARTUP_SIGNUP_TABLE": "gsg-signup-app", "NEW_SIGNUP_TOPIC": "arn:aws:sns:us-west-2:123456789012:gsg-signup-notifications" } 6. Create an Elastic Beanstalk Environment • Open the Elastic Beanstalk service on your AWS console • For Platform, choose Node.js. • For Application code, choose Sample application. • Choose Review and launch. • On the Security card, choose Modify. • For IAM instance profile, choose the role that you created earlier (gsg-signup-role). • Choose Create app. 7. Create the source bundle • Open the application folder eb-node-express-signup-master. • Select all the items in the folder, including the subfolders. Do not select the top-level folder. • The signup application includes a hidden folder named .ebextensions that contains a configuration file that configures Node.js platform settings. You may need to configure your file browser to show hidden files to see this folder. • Right-choose the selected items and select the option to compress them, such as Send to > Compressed (zipped) Folder (Windows) or Compress Items (macOS). 8. Deploy the Signup Application • Return to the environment that you created in the Elastic Beanstalk console. • Choose Upload and Deploy.
- 5. Page 5 of 5 • Choose Browse and upload the source bundle that you created in the previous section. • Choose Deploy. 9. When the deployment is finished and the environment health is listed as Green, open the URL of the app. Enter some data. 10. Look at the DynamoDB console to see the data represented in the database. • Extra Credit: make your DynamoDB table a global table, replicating to the region of your choice