Hands-on Lab Enhancing Databases with Search
•
0 likes•810 views

by SanJay Dhar, Solutions Architect, AWS Database Week at the AWS Loft is an opportunity to learn about Amazon’s broad and deep family of managed database services. These services provide easy, scalable, reliable, and cost-effective ways to manage your data in the cloud. We explain the fundamentals and take a technical deep dive into Amazon RDS and Amazon Aurora relational databases, Amazon DynamoDB non-relational databases, Amazon Neptune graph databases, and Amazon ElastiCache managed Redis, along with options for database migration, caching, search and more. You'll will learn how to get started, how to support applications, and how to scale.
![We’ll be using a copy of this database implemented in RDS PostgreSQL.
All user-created environments in this lab are eligible for AWS Free Tier. If you are not eligible
for Free Tier, the environment used will generate a charge of approximately US$0.03 per hour.
Step 1: Create an Amazon Elasticsearch Service Domain
• Using a web browser, login to the AWS Console at https://aws.amazon.com/
• Chose the Elasticsearch Service
• Choose the region you will use for this lab (the database cluster is located in us-west-2
[Oregon]), but you can use any AWS commercial region
• Click Create a new domain
• Give the domain a name. Choose Elasticsearch version 5.5 and click Next
• Set an Instance count of 1, Instance type of t2.small.elasticsearch, and leave all other
settings at their default. Click Next
• Choose Public access. For Access policy, Select the Allow open access to the domain
template, then acknowledge you accept the risk in the confirmation window. (Note that
these are not advisable settings for production environments, but they are useful for a
lab exercise.) Click Next
• Review the domain settings and click Confirm
Step 2: Create an EC2 Instance
• Using a web browser, login to the AWS Console at https://aws.amazon.com/
• Be sure you are using the same region you used for the Elasticsearch domain
• Choose the EC2 service, then Launch Instance
• Select the Ubuntu Server 16.04 LTS (HVM), SSD Volume Type AMI
• Select a general purpose t2.micro instance type, then click Next
• Leave the default Instance Details and click Next
• Use the default Storage and click Next
• Leave the Tags blank and click Next
• Use the default Storage and click Next
• Configure a Security Group to allow access to PostgreSQL. Choose Add Rule, then select
a Type of PostgreSQL and a Source of Anywhere. (Note that these are not advisable
settings for production environments, but they are useful for a lab exercise.) Click
Review and Launch
• Review your settings, ignore the warning that your security group is open to the world.
Click Launch
• Select or create a keypair. If you are creating a new keypair, be sure to download the
.pem file. Check the box to acknowledge you have access to the private key file (.pem)
and click Launch Instance](data:image/gif;base64,R0lGODlhAQABAIAAAAAAAP///yH5BAEAAAAALAAAAAABAAEAAAIBRAA7)
Recommended
Recommended
More Related Content
More from Amazon Web Services
More from Amazon Web Services (20)
Hands-on Lab Enhancing Databases with Search
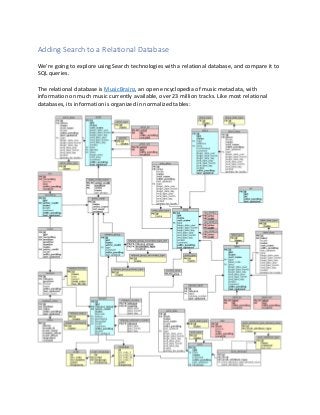
- 1. Adding Search to a Relational Database We’re going to explore using Search technologies with a relational database, and compare it to SQL queries. The relational database is MusicBrainz, an open encyclopedia of music metadata, with information on much music currently available, over 23 million tracks. Like most relational databases, its information is organized in normalized tables:
- 2. We’ll be using a copy of this database implemented in RDS PostgreSQL. All user-created environments in this lab are eligible for AWS Free Tier. If you are not eligible for Free Tier, the environment used will generate a charge of approximately US$0.03 per hour. Step 1: Create an Amazon Elasticsearch Service Domain • Using a web browser, login to the AWS Console at https://aws.amazon.com/ • Chose the Elasticsearch Service • Choose the region you will use for this lab (the database cluster is located in us-west-2 [Oregon]), but you can use any AWS commercial region • Click Create a new domain • Give the domain a name. Choose Elasticsearch version 5.5 and click Next • Set an Instance count of 1, Instance type of t2.small.elasticsearch, and leave all other settings at their default. Click Next • Choose Public access. For Access policy, Select the Allow open access to the domain template, then acknowledge you accept the risk in the confirmation window. (Note that these are not advisable settings for production environments, but they are useful for a lab exercise.) Click Next • Review the domain settings and click Confirm Step 2: Create an EC2 Instance • Using a web browser, login to the AWS Console at https://aws.amazon.com/ • Be sure you are using the same region you used for the Elasticsearch domain • Choose the EC2 service, then Launch Instance • Select the Ubuntu Server 16.04 LTS (HVM), SSD Volume Type AMI • Select a general purpose t2.micro instance type, then click Next • Leave the default Instance Details and click Next • Use the default Storage and click Next • Leave the Tags blank and click Next • Use the default Storage and click Next • Configure a Security Group to allow access to PostgreSQL. Choose Add Rule, then select a Type of PostgreSQL and a Source of Anywhere. (Note that these are not advisable settings for production environments, but they are useful for a lab exercise.) Click Review and Launch • Review your settings, ignore the warning that your security group is open to the world. Click Launch • Select or create a keypair. If you are creating a new keypair, be sure to download the .pem file. Check the box to acknowledge you have access to the private key file (.pem) and click Launch Instance
- 3. Step 3: Install PostgreSQL and Python tools • From the AWS Console, choose the EC2 service. Click Running instances, then select the instance you created in Step 2. Note the Public DNS of your instance. • Login to your EC2 instance o If you have a terminal application (such as Mac Terminal or Linux XTerm), connect with an ssh command: ssh –i <your keyfile.pem> ubuntu@<your EC2 public DNS> o If you are using Microsoft Windows and don’t already have a terminal application, use PuTTY following the instructions at http://docs.aws.amazon.com/AWSEC2/latest/UserGuide/putty.html • From your Linux terminal, install PostgreSQL and Python tools and update your server software sudo add-apt-repository "deb http://apt.postgresql.org/pub/repos/apt/ xenial-pgdg main" wget --quiet -O - https://www.postgresql.org/media/keys/ACCC4CF8.asc | sudo apt-key add - sudo apt-get update sudo apt-get install postgresql-9.6 postgresql-server-dev-9.6 postgresql-contrib-9.6 sudo apt install python python-psycopg2 sudo apt upgrade Step 4: Connect to PostgreSQL Musicbrainz and run queries • We’ll be using a copy of Musicbrainz hosted on RDS PostgreSQL: Hostname: searchlab.cxpjiluhh0c9.us-west-2.rds.amazonaws.com User name: musicbrainz Password: musicbrainz • From your Linux terminal, connect to the database psql -h searchlab.cxpjiluhh0c9.us-west-2.rds.amazonaws.com -U musicbrainz (see credentials above for the password) • From the psql prompt in your Linux terminal, run some queries o To count the number of tracks in the database: SELECT COUNT(*) FROM track; o To see recent releases from The Beatles: SELECT track.name AS track, medium.name AS recording, artist_credit.name AS artist, release_country.date_year AS year, area.name AS country FROM (((((track INNER JOIN artist_credit ON track.artist_credit = artist_credit.id) INNER JOIN medium ON track.medium = medium.id)
- 4. INNER JOIN release ON medium.release = release.id) INNER JOIN release_country ON release_country.release = release.id) INNER JOIN area ON release_country.country = area.id) WHERE release_country.date_year > 2016 AND artist_credit.name = 'The Beatles'; o Explore the database, choosing other artists (perhaps using LIKE for a fuzzy search), date ranges, or other constraints o Export to a file all US tracks released after 2000 that are part of an album o tracks.txt SELECT track.name AS track, medium.name AS recording, artist_credit.name AS artist, release_country.date_year AS year, area.name AS country FROM (((((track INNER JOIN artist_credit ON track.artist_credit = artist_credit.id) INNER JOIN medium ON track.medium = medium.id) INNER JOIN release ON medium.release = release.id) INNER JOIN release_country ON release_country.release = release.id) INNER JOIN area ON release_country.country = area.id) WHERE release_country.date_year > 2000 AND medium.name <> '' AND area.name = 'United States'; o Exit psql using CTRL-D o From the Linux prompt, verify that you have created the tracks.txt file ls -lh tracks.txt You should see a file of 170 – 200MB containing the results of your query. Step 5: Convert data to JSON and Ingest with Elasticsearch • From your Linux terminal, run Python python • From the python prompt, convert the data in tracks.txt to JSON: import csv import json f = open('tracks.txt','rU') csv.register_dialect('piper', delimiter='|') reader = csv.DictReader(f,dialect = 'piper',fieldnames = ("track","recording","artist","year","country")) title = reader.fieldnames csv_rows = [] for row in reader: csv_rows.extend(['{"index": {"_index":"track", "_type":"track"}}']) csv_rows.extend([{title[x]:row[title[x]] for x in range(len(title))}]) out = json.dumps(csv_rows) out = out.replace(" ","") out = out.replace("","") out = out.strip('[]') out = out.replace('"{"','n{"') out = out.replace('", {','n{') out = out.replace('"},','"}') f = open('tracks.json','w') f.write(out) • Exit python using CTRL-D
- 5. • From the Linux prompt, verify that you have created the tracks.json file ls -lh tracks.json Since the conversion to JSON removed a lot of white space, tracks.json is much smaller than tracks.txt • The first five lines of tracks.json are “junk” – header lines from the database query output. From the Linux prompt, remove them with: sed '1,5d' tracks.json > tracks.tmp ; mv tracks.tmp tracks.json • Amazon Elasticsearch Service limits bulk imports to 10MB. Since we have more data than that, we will need to split tracks.json into smaller files. From the Linux prompt, run: mkdir tracks cd tracks split -l 80000 ../tracks.json This will create a set of files that each have 80,000 lines, so the right size to ingest! • From the AWS Console, choose the Elasticsearch Service and choose your domain. Copy your Elasticsearch Endpoint (note that this is a different URL than your Kibana link!) • From the Linux prompt, run a batch to send each file to Elasticsearch: for x in `ls`; do curl -s -XPOST 'https://<your Elasticsearch Service endpoint>/track/track/_bulk' --data-binary @$x; done While this is running, go to the AWS Console for Elasticsearch Service. You’ll be able to see your Searchable Documents count increasing in the Dashboard. Step 6: Use Kibana to run searches • From the AWS Console, choose the Elasticsearch Service and choose your domain. Click on the Kibana link to open a new browser tab. • Since this is your first use of Kibana for your domain, you will need to perform some initial setup. o As the search index, enter * (an asterisk) o As the timeseries, choose “None” from the drop-down menu o Click Continue • On the menu panel on the left, choose Discover. Run some searches! o If you want to explore the JSON interface, choose Dev Tools to send queries through the RESTful console