HK-AWS Hands-on Lab-Series-2019-for-Enterprise:-Data-Protection-in-Enterprises–Veeam-Availability-for-AWS-AWS-Account-Guide
•
0 j'aime•1,064 vues

Would you like to experience setting up a secure, durable AWS cloud platform and deploy Veeam to protect the data in it? In this hands-on workshop co-hosted by AWS and Veeam, we will explore how Veeam Availability for AWS allows businesses to holistically manage their data protection both on premises and in AWS.

Recommandé
Recommandé
Contenu connexe
Tendances
Tendances (17)
Similaire à HK-AWS Hands-on Lab-Series-2019-for-Enterprise:-Data-Protection-in-Enterprises–Veeam-Availability-for-AWS-AWS-Account-Guide
Similaire à HK-AWS Hands-on Lab-Series-2019-for-Enterprise:-Data-Protection-in-Enterprises–Veeam-Availability-for-AWS-AWS-Account-Guide (20)
Plus de Amazon Web Services
Plus de Amazon Web Services (20)
HK-AWS Hands-on Lab-Series-2019-for-Enterprise:-Data-Protection-in-Enterprises–Veeam-Availability-for-AWS-AWS-Account-Guide
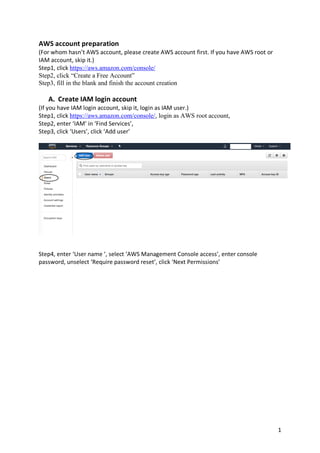
- 1. 1 AWS account preparation (For whom hasn’t AWS account, please create AWS account first. If you have AWS root or IAM account, skip it.) Step1, click https://aws.amazon.com/console/ Step2, click “Create a Free Account” Step3, fill in the blank and finish the account creation A. Create IAM login account (If you have IAM login account, skip it, login as IAM user.) Step1, click https://aws.amazon.com/console/, login as AWS root account, Step2, enter ‘IAM’ in ‘Find Services’, Step3, click ‘Users’, click ‘Add user’ Step4, enter ‘User name ‘, select ‘AWS Management Console access’, enter console password, unselect ‘Require password reset’, click ‘Next Permissions’
- 2. 2 Step5, click ‘create group’ Step6, enter in the ’Group name’, select ‘Policy name‘ of ‘AdministratorAccess’, click ‘Create group ‘ Step7, select the group you just created, and click ‘Next:tags’
- 3. 3 Step8, click ’Next:Review’ Step9, click ‘Create user’ Step10, click your account name in the tool bar, you will see the pulldown menu, click ‘My Account‘ Step11, mark down the account id for IAM login.
- 4. 4 Step12, click your account name in the tool bar, you will see the pulldown menu, click ‘Sign Out’ B. Login as IAM user Step1, click https://aws.amazon.com/console/, click ‘Sign In to the Console’, click ‘Sign in to a different account, Step2, enter your account id, click ‘Next’ Step3, enter IAM user name and password, click ‘Sign In’ C. Create VPC Step1, enter ‘IAM’ in ‘Find Services’ Step2, in the lab, we can choose Singapore region for test, verify in the tools bar, if it didn’t list ‘Singapore’, click it and select ‘Singapore’
- 5. 5 Step3, click ‘Launch VPC’ Step4, select ‘VPC with Single Public Subnet’, click ‘Select’ Step5, enter in ‘VPC name’, click ‘Create VPC’ Step6, click ‘ok’ D. Create EC2 Linux, key pair Step1, click ‘Services’, enter ‘EC2’ in ‘Find Services’
- 6. 6 Step2, click ‘Create Instance’, and make sure current region is ‘Singapore’ Step3, select ‘Amazon Linux’ for ‘Free tier eligible’ Step4, select ‘General purpose’, make sure the type is ‘t2 micro’, it’s ‘Free tier eligible’, click ‘Next: Configure Instance Details’ Step5, Select the ‘Network’ which you just created VPC public network, select ‘Enable’ in ‘Auto-assign Public IP’, click ‘Next: Add Storage’,
- 7. 7 Step6, click ‘Next: Add Tags’ Step7, click ‘Next: Configure Security Group’
- 8. 8 Step8, verify allow SSH access from 0.0.0.0/0, ignore the warning for the lab test purpose, click ‘Review and Launch’ Step9, click ‘Launch’
- 9. 9 Step10, select ‘Create a new key pair’, enter the ‘Key pair name’, Click ‘Download the Key Pair’, click ‘Launch Instances’ Make sure you can see the below message of launch status
- 10. 10 E. Create S3 bucket Step1, click ‘Services’, enter ‘S3’ in ‘Find Services’ Step2, click ‘Create bucket’ Step3, enter your ‘Bucket name’, select Region Singapore, click ‘Next’ Step4, in ‘Default encryption’, select ‘Automatically encrypt objects when they are stored in S3’, make sure it’s AES-256, click “Next” Step5, keep default setting, click ‘next’
- 11. 11 Step6, click ‘Create bucket’ Your buckets ARN will be arn:aws:s3:::<bucket-name>