SlideShare une entreprise Scribd logo
1  sur  3
DIY Yogurt – So Easy!

                                                           Did        you       know
                                                            that anyone can easily
                                                             make       their    own
                                                             yogurt? And given that
                                                             many store bought
                                                             yogurts have harmful
                                                             food       dyes      and
                                                             preservatives in them,
                                                             there is good reason to
                                                             make      DIY    yogurt.
                                                             Contrary to common
                                                             belief, you don’t need
                                                             a     special    yogurt-
                                                             making machine. And
                                                             you don’t need a cow
                                                             or goat, either. All you
                                                             really need are a few
                                                            common kitchen tools
                                                           and ingredients. Try it!

1. Gather together:

½ gallon of milk – any type will do as long as it’s not ultra-pasteurized (a.k.a., UHT,
or ultra-heat-treated)

1 tablespoon pure vanilla extract (optional)

½ cup sweetener of your choice (real honey or pure maple syrup are good
choices)
½ cup store bought yogurt (or yogurt starter, which can be purchased online)

Heavy pot

Cooking thermometer

2 three-quart glass jars (canning jars are perfect and least likely to break)

Another pot (for boiling water)

Mixing bowl

Spoon

2. Pour the milk into the pot. Add the honey or maple syrup and (if using) the
vanilla extract.

3. Over medium to medium-high heat, warm the milk until it reaches 180 degrees
F. It should bubble a bit and form a skin.

4. Remove the pot from the stove and let the milk cool to 120 degrees F. To speed
things up, you can place the pot in a sink of cold tap water.

5. Fill the second pot with water and bring to a
boil. Warm the jars with hot, running tap water,
then pour the boiling water over them to help
sterilize them. Pour out any water in the jars.

6. Pour 1 cup of the cooled milk into the mixing
bowl and add the yogurt or starter. Swirl with a
spoon. DON’T mix or stir.

7. Pour the milk and yogurt mixture back into
the pot. Swirl (again NOT mixing or stirring).

8. Pour the mixture into the jars. You should
already see chunks of yogurt. Divide these
chunks between the jars pretty evenly.

9. Screw the lids onto the jars and place them in the large pot. Pour enough hot
tap water into the pot that it comes to the rims of the jars. Allow to sit on the
counter for 10 – 18 hours, then remove the jars to the refrigerator. After chilling,
eat. The yogurt will last 1 – 2 weeks.

“But,” you may wonder, “what if I want flavors, like strawberry?” Just add a wee
bit of jam. Yes, really. Store bought yogurt is flavored with sugared fruit, so jam is
an easy DIY way of achieving a similar flavor.

Contenu connexe

Plus de Arnie Kaye Dillen (20)

History of vegetarianism
History of vegetarianismHistory of vegetarianism
History of vegetarianism
 
4 popular cakes choices
4 popular cakes choices4 popular cakes choices
4 popular cakes choices
 
Being a vegetarian
Being a vegetarianBeing a vegetarian
Being a vegetarian
 
Type of peanuts
Type of peanutsType of peanuts
Type of peanuts
 
7 things about oranges
7 things about oranges7 things about oranges
7 things about oranges
 
5 benefits of wine
5 benefits of wine5 benefits of wine
5 benefits of wine
 
Soup for thoughts
Soup for thoughtsSoup for thoughts
Soup for thoughts
 
Coffee causes low birth weight in babies
Coffee causes low birth weight in babiesCoffee causes low birth weight in babies
Coffee causes low birth weight in babies
 
The brain on chocolate
The brain on chocolateThe brain on chocolate
The brain on chocolate
 
A sample cancer diet menu
A sample cancer diet menuA sample cancer diet menu
A sample cancer diet menu
 
Things you may not know about barbecue
Things you may not know about barbecueThings you may not know about barbecue
Things you may not know about barbecue
 
Mother's day recipe
Mother's day recipeMother's day recipe
Mother's day recipe
 
Tips for traveling with mom
Tips for traveling with momTips for traveling with mom
Tips for traveling with mom
 
Strawberry festival
Strawberry festivalStrawberry festival
Strawberry festival
 
Brains as food
Brains as foodBrains as food
Brains as food
 
Alsatian vegetable soup
Alsatian vegetable soupAlsatian vegetable soup
Alsatian vegetable soup
 
Corn and basil pancakes
Corn and basil pancakesCorn and basil pancakes
Corn and basil pancakes
 
Baumkuchen
BaumkuchenBaumkuchen
Baumkuchen
 
Easter crafts for children
Easter crafts for childrenEaster crafts for children
Easter crafts for children
 
Easter eggs
Easter eggsEaster eggs
Easter eggs
 

Diy yogurt – so easy!

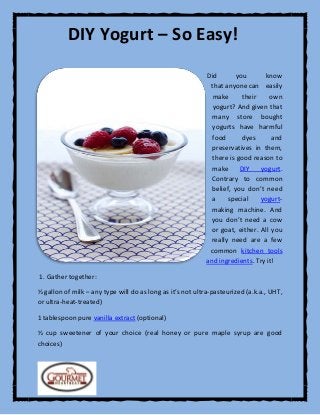
  • 1. DIY Yogurt – So Easy! Did you know that anyone can easily make their own yogurt? And given that many store bought yogurts have harmful food dyes and preservatives in them, there is good reason to make DIY yogurt. Contrary to common belief, you don’t need a special yogurt- making machine. And you don’t need a cow or goat, either. All you really need are a few common kitchen tools and ingredients. Try it! 1. Gather together: ½ gallon of milk – any type will do as long as it’s not ultra-pasteurized (a.k.a., UHT, or ultra-heat-treated) 1 tablespoon pure vanilla extract (optional) ½ cup sweetener of your choice (real honey or pure maple syrup are good choices)
  • 2. ½ cup store bought yogurt (or yogurt starter, which can be purchased online) Heavy pot Cooking thermometer 2 three-quart glass jars (canning jars are perfect and least likely to break) Another pot (for boiling water) Mixing bowl Spoon 2. Pour the milk into the pot. Add the honey or maple syrup and (if using) the vanilla extract. 3. Over medium to medium-high heat, warm the milk until it reaches 180 degrees F. It should bubble a bit and form a skin. 4. Remove the pot from the stove and let the milk cool to 120 degrees F. To speed things up, you can place the pot in a sink of cold tap water. 5. Fill the second pot with water and bring to a boil. Warm the jars with hot, running tap water, then pour the boiling water over them to help sterilize them. Pour out any water in the jars. 6. Pour 1 cup of the cooled milk into the mixing bowl and add the yogurt or starter. Swirl with a spoon. DON’T mix or stir. 7. Pour the milk and yogurt mixture back into the pot. Swirl (again NOT mixing or stirring). 8. Pour the mixture into the jars. You should already see chunks of yogurt. Divide these
  • 3. chunks between the jars pretty evenly. 9. Screw the lids onto the jars and place them in the large pot. Pour enough hot tap water into the pot that it comes to the rims of the jars. Allow to sit on the counter for 10 – 18 hours, then remove the jars to the refrigerator. After chilling, eat. The yogurt will last 1 – 2 weeks. “But,” you may wonder, “what if I want flavors, like strawberry?” Just add a wee bit of jam. Yes, really. Store bought yogurt is flavored with sugared fruit, so jam is an easy DIY way of achieving a similar flavor.