Creating wordpress website step by step easy
•Télécharger en tant que DOC, PDF•
1 j'aime•680 vues

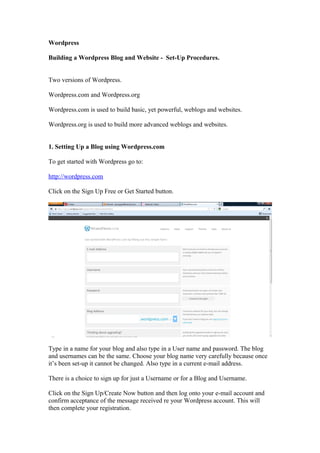
Creating website in wordpress step by step Type in a name for your blog and also type in a User name and password. The blog and usernames can be the same. Choose your blog name very carefully because once it’s been set-up it cannot be changed. Also type in a current e-mail address.

Recommandé
Contenu connexe
Tendances
Tendances (18)
Similaire à Creating wordpress website step by step easy
Similaire à Creating wordpress website step by step easy (20)
Plus de Azhar Eka P, ST. AGEN PROPERTI
Plus de Azhar Eka P, ST. AGEN PROPERTI (10)
Dernier
Dernier (20)
Creating wordpress website step by step easy
- 1. Wordpress Building a Wordpress Blog and Website - Set-Up Procedures. Two versions of Wordpress. Wordpress.com and Wordpress.org Wordpress.com is used to build basic, yet powerful, weblogs and websites. Wordpress.org is used to build more advanced weblogs and websites. 1. Setting Up a Blog using Wordpress.com To get started with Wordpress go to: http://wordpress.com Click on the Sign Up Free or Get Started button. Type in a name for your blog and also type in a User name and password. The blog and usernames can be the same. Choose your blog name very carefully because once it’s been set-up it cannot be changed. Also type in a current e-mail address. There is a choice to sign up for just a Username or for a Blog and Username. Click on the Sign Up/Create Now button and then log onto your e-mail account and confirm acceptance of the message received re your Wordpress account. This will then complete your registration.
- 2. You can then either log into your wordpress account through the e-mail or go to http://wordpress.com or http://yourblog.wordpress.com. Enter your e-mail address and password and log on. 2. The next step is to complete your personal or group profile on the website. Log on to wordpress using one of the following options: http://wordpress.com or http://yourblog.wordpress.com. For the purpose of this exercise we will be using the 2nd option. If accessed through the e-mail, a step by step process is followed to set up the blog. This isn’t always what users want. So go to http://yourblog.wordpress.com /wp-admin Login using your username and password.(see the logon screen above). This will take you into the Site Admin, where you will be able to update and amend your website. NB. The url website address will have changed to http://yourblog.wordpress.com/wp-admin/ In the menu down the left-hand side go to Users/My Profile
- 3. NB. At this point, it is time to think about who in the group is to be nominated, as the person who is looking after your website and whose details are to be entered. In My Public Profile you can now update your details NB. The username has already been selected and cannot be changed. Enter a first name. Enter a last name. Enter a full name. Display Your Name Publicly as: This can be anything you want. Eg. A nickname, short name etc. Enter your location. About you: Enter some details about yourself and your group. NB. Be aware of privacy here. Contacts: Enter your contact details in here. Eg. e-mail, telephone numbers etc. To add a photograph click on the ‘Add photo through Avatar’ button. Then in the new box that opens, click on the Browse button and locate the picture that you want to display. Click on Upload and the photo will then be downloaded to your site.
- 4. To change the photograph on your Gravatar, click on the Change Your Gravatar link on the right hand side of the page. There are several options and ways to change the picture. In the Links option you can put in any website/s that you like and they will be added to your profile. In the Verified External Services section you can add such social sites as Facebook or Twitter that will confirm who you say you are. When all of your details have been input/updated then click on the Update Profile button. This in effect will save the details you have just input onto the site. In Users/Personal Settings you can determine the colour, language etc. There is also a Fun(surprise me) option which puts something adventurous at the beginning of your blog. Eg. fireworks or ‘this blog is amazing’!
- 5. In Users/Personal Settings/Browser Connection. Tick the ‘always use HTTPS when visiting administration pages’ box. This will make your account more secure when using a non-secure internet connection. Eg. When using Wi-Fi in a public place such as a coffee shop or train station. You may also want to tick the Proofreading box in order for certain types of grammatical checks to be carried out before publishing any items/articles. Also tick the ‘Additional Post Content’ box as this will help to enrich the content of your blog etc. If you tick the ‘Enable Geotagging’ box (top right hand side of the page), your location will be given as to where the latest blog has been posted. The ‘Account Details’ section shows your username, e-mail address(for notifications), website linked to and there is also the option to change the logging on password. Don’t forget to click on the Save Changes button before leaving this section and moving onto a different option. 3 About Go to the Pages/All Pages section and click on ‘About’ in the list of pages. This page can then be updated/amended according to your preference etc.
- 6. 4 Creating Posts and Pages New Posts There are two ways of creating a new post on your site. Either click on the New Post button in the upper right-hand corner of the screen or in the left-hand side menu select Posts/Add New.
- 7. A New Post box and visual editor will appear where you can input the title and details of your post. Click on Publish to put the new post onto your site homepage. Or you can Save to Draft if you havn’t yet completed the post and want to add to it. To add an image/photograph to your Post, click on the Upload/Insert image, that looks like a camera/musical note, just above the Visual Editor box. To edit an existing post, run the cursor over the post to be amended. The options Edit/Quick Edit/Trash and View will appear. Click on Edit and then amend as and where required, then click on Update to save. New Pages On the left hand side menu bar click on Pages/Add New Give the page a title but make sure you keep this short. Put the content of the page in by using the Visual Editor box underneath the title. The Visual Editor is similar to those used in word, so it will be familiar to all of you. There will be some differences. On the right under Attributes a parent and template page can be selected. Click on the Publish button to make the page live. You can click on the Preview Changes button to check on the page added or changes made.
- 8. To edit an existing page, run the cursor over the post to be amended. The options Edit/Quick Edit/Trash and View will appear. Click on Edit and then amend as and where required, then click on Update to save. Adding Images Images can be uploaded from your computer, another website (url), gallery or media library. Uploading images from your computer. Click on the uploader button (approx.. halfway down), in the Add Media box. Click on Browse, select the file and then click on Upload. The photo/file will be uploaded. Categories To add a new Category, go to Posts/Categories/Add New Category. This can be anything like Events, Flora and Fauna, News, Newsflash, Links, Gallery (Photos), Contacts, Publication & Resources. Recommend these for the basic website design. 5 Configuring your blog settings To ensure that your blog best meets your needs and those of your visitors, the information that was entered when the site was initially set-up, can be customized to help use it more effectively. Go to the Settings section in the side menu and select General.
- 9. Scroll down the page and amend the settings as and where required. Site Title, Timezone and Week Starts On are especially important. For the other options in the Settings menu ie. Writing, Reading, Discussion, Media, Sharing etc. Work through the list and amend any of the settings as and where required. Reading up on each of these settings is recommended in order to get the maximum benefit. 6 Managing Comment Managing Comment allows you to review and approve each comment before it is made available to the public. In Settings/Discussion always make sure that the box is checked for the ‘An Administrator Must Always Approve the Comment’ option. This then prevents any unwanted or malicious comments being posted that may have legal implications. 7 Appearance of Blog Wordpress.com Themes To set the look (theme) of your website. The final choice will be displayed on the front page. Login as administrator, select Appearance/Themes in the menu down the left hand side.
- 10. There will then be displayed a variety of website templates from which to choose a suitable one for your site. There are lots of good quality free themes, but if prepared to pay for one, the benefits far outweigh the freebie ones. There is developer support plus the theme would be unique to your site and not shared as with a free one. The appearance and layout is also important. Some have 2 or 3 columns and ask how they are to be arranged. The theme can be fixed or fluid. Fixed is the norm where the display looks the same on any internet browser window. The fluid appearance fits with the size of your browser but in proportion to it, so doesn’t look odd or out of shape. By clicking on the Feature Filter button on the right hand side of the page, the criteria for the Theme can be selected and searched for. Ie. Green, Columns 2, 3, 4 or 5, Width, Features, Subject, Landing Page (portals eg Mantra). When a suitable theme is found, click on the Preview button to get an enlarged version. If this is liked and the one to appear on the site, then click on Activate and it will immediately be displayed on the website. There are of course, lots of free and premium website templates out there on the internet. So if a suitable one isn’t found in administrator then conduct a search on Wordpress.org or on the internet itself (search on google). Themes from other websites are easily to download and can be saved to a personal folder as a zip file. This file is then unzipped and saved into a folder of the same name.
- 11. Log into the website as administrator and go to Appearances/Themes, the downloaded, unzipped folder, containing the chosen theme, is located and uploaded to the site. Once this has been done, the theme can be selected and activated, this will then put it on the front page of the website.
- 12. Setting up a website using Wordpress.org Using lcn.com Set up an Account Click on ‘Log In’ found on the top right hand side of the front page. Click on ‘Create An Account’ under I am a New Customer.
- 13. The Create Your Account screen will appear below. Put in your details and then click on Create Account. Setting Up A Website The above screen appears with the options to Add Hosting and choose a Domain included. Click on Domains
- 14. At the bottom of the page in ‘Search for a new domain’, type in your prospective choice of website name. eg. davetesting1 and click on Search. Choose the domain that you want and the pricing plan and click on ‘Add to Basket’. This will put the domain into your basket ready for when you checkout. A Web Hosting package now needs to be chosen, so click on ‘Web Hosting’ on the menu bar at the top of the page. The Wordpress application can only be added with the Dynamic or Multisite Hosting Packages.
- 15. Select the package and pricing plan that best suits the group, club or business and then click on ‘Buy’. The Dynamic of Multisite Hosting packages must be selected in order to use Wordpress as the application software. Complete your Credit/Debit card details and click on Order now.
- 16. The above screen then appears and the message ‘we’re securing your domain’ appears. An e-mail will then be sent when the domain is secured.
- 17. Now it’s time to add the domain name to the Hosting package. Click on the Hosting Icon. The site now needs to be added to the hosting account. Click on ‘Add Site’.
- 18. Click on ‘From Your Account’ Select the domain and click on ‘Create Site’
- 19. The site will be created. The site has been created. There will also be options to Install an Application eg. Wordpress and set up an e-mail account. Now it is time to add ‘Wordpress’ to the site. Click on ‘Install an App’.
- 20. Click on ‘Choose an App’ Click on ‘Next’ at the side of Wordpress.
- 21. Click on Install Wordpress is being installed.
- 22. And is now installed. An e-mail is sent to your account informing that Wordpress has been installed along with the Username and Password. The site is now ready to use and administer. Log in using the logon and password. This logs into the Admin/Dashboard screen and the site is ready to be built.