SlideShare une entreprise Scribd logo
1  sur  316
Télécharger pour lire hors ligne
USER MANUAL
Materials Management
DOCUMENT CONTROL SHEET
GENERAL INFORMATION
Project name Document name Document location
Implementation Materials Management
DOCUMENT INFORMATION
Version Filename Date Author Reviewed
by
Changes from
previous version
V 1.0
USERMANUAL
USER PROCEDURE MANUAL
TABLE OF CONTENTS
Error! Bookmark not defined.
1 Procurement of Stock Materials_____________________________________________________ 10
1.1 Procurement of Stock Materials – Raw Material Local / Return__________10
1.1.1 Purpose ________________________________________________________________________ 10
1.1.2 Prerequisites ____________________________________________________________________ 10
1.1.3 Material Master Record ____________________________________________________________ 10
1.1.4 Vendor Master Record ____________________________________________________________ 24
1.1.5 Purchasing Info Record____________________________________________________________ 34
1.1.6 Source List______________________________________________________________________ 41
1.1.7 CIN Master Data _________________________________________________________________ 43
1.1.8 Excise Condition Record___________________________________________________________ 52
1.2 Request for Quotation (RFQ)______________________________________55
1.2.1 Use ___________________________________________________________________________ 56
1.2.2 Procedure ______________________________________________________________________ 56
1.2.3 Result _________________________________________________________________________ 61
1.2.4 Example________________________________________________________________________ 61
1.3 Message output: RFQ____________________________________________61
1.3.1 Use ___________________________________________________________________________ 61
1.3.2 Procedure ______________________________________________________________________ 61
1.4 Maintaining Quotation ___________________________________________64
1.4.1 Use ___________________________________________________________________________ 64
1.4.2 Procedure ______________________________________________________________________ 64
1.4.3 Result _________________________________________________________________________ 66
1.4.4 Example________________________________________________________________________ 66
1.5 Price Comparison _______________________________________________66
1.5.1 Use ___________________________________________________________________________ 67
1.5.2 Procedure ______________________________________________________________________ 67
1.5.3 Result _________________________________________________________________________ 68
1.6 Creating Purchase Requisition ____________________________________69
1.6.1 Use ___________________________________________________________________________ 69
1.6.2 Procedure ______________________________________________________________________ 69
1.6.3 Result _________________________________________________________________________ 70
1.6.4 Example________________________________________________________________________ 70
1.7 Release Purchase Requisition_____________________________________70
1.7.1 Procedure ______________________________________________________________________ 70
1.8. Assign and Process Purchase Requisition __________________________74
1.8.1 Use ______________________________________________________________________________ 74
1.8.2 Procedure ______________________________________________________________________ 74
1.8.3 Result _________________________________________________________________________ 76
1.9 Purchase Order_________________________________________________77
1.9.1 Use ___________________________________________________________________________ 77
1.9.2 Procedure ______________________________________________________________________ 77
1.9.3 Result _________________________________________________________________________ 82
1.9.4 Example________________________________________________________________________ 82
1.10. Release Purchase Order __________________________________________83
1.10.1. Procedure ______________________________________________________________________ 83
1.11Message Output__________________________________________________87
1.11.1 Use _____________________________________________________________________________ 87
1.11.2 Procedure ______________________________________________________________________ 87
1.12 Goods Receipt for Purchase Order_________________________________89
1.12.1 Use ___________________________________________________________________________ 89
1.12.2 Prerequisites ____________________________________________________________________ 89
1.12.3 Procedure ______________________________________________________________________ 89
1.12.4 Result _________________________________________________________________________ 99
Material document 5000000009 posted ______________________________________________________ 99
1.12.5 Example________________________________________________________________________ 99
1.13 Logistics Invoice Verification ____________________________________100
1.13.1 Use __________________________________________________________________________ 100
1.13.2 Procedure _____________________________________________________________________ 100
1.13.3 Result ________________________________________________________________________ 105
1.13.4 Example_______________________________________________________________________ 105
1.14 Returning Delivery _____________________________________________106
1.14.1 Use __________________________________________________________________________ 106
1.14.2 Procedure _____________________________________________________________________ 106
1.14.3 Result ________________________________________________________________________ 113
Return Delivery document created _________________________________________________________ 113
1.14.4 Example_______________________________________________________________________ 113
1.15 Excise Invoice Other Movements _________________________________114
1.15.1 Procedure _____________________________________________________________________ 114
1.15.2 Result ________________________________________________________________________ 116
1.15.3 Example_______________________________________________________________________ 116
1.16 Posting and Printing the Excise Invoice____________________________117
1.16.1 Use __________________________________________________________________________ 117
1.16.2 Prerequisites ___________________________________________________________________ 117
1.16.3 Procedure _____________________________________________________________________ 117
1.16.4 Result ________________________________________________________________________ 120
1.17 Credit Memo __________________________________________________121
1.17.1 Use __________________________________________________________________________ 121
1.17.2 Prerequisites ___________________________________________________________________ 121
1.17.3 Procedure _____________________________________________________________________ 121
1.17.4 Result ________________________________________________________________________ 127
1.17.5 Example_______________________________________________________________________ 127
1.18 Reversals / Cancellation of Invoice or Credit Memo __________________127
1.18.1 Use __________________________________________________________________________ 127
1.18.2 Prerequisites ___________________________________________________________________ 128
1.18.3 Procedure _____________________________________________________________________ 128
1.18.4 Result ________________________________________________________________________ 133
1.18.5 Example_______________________________________________________________________ 133
1.19 Reversals / Cancellation of Goods Receipt (GR)_____________________134
1.19.1 Use __________________________________________________________________________ 134
1.19.2 Prerequisites ___________________________________________________________________ 134
1.19.3 Procedure _____________________________________________________________________ 134
1.19.4 Result ________________________________________________________________________ 139
1.19.5 Example_______________________________________________________________________ 139
1.20 Reversing CENVAT Postings_____________________________________140
1.20.1 Purpose _______________________________________________________________________ 140
1.20.2 Prerequisites ___________________________________________________________________ 140
1.20.3 Procedure _____________________________________________________________________ 140
1.20.4 Result ________________________________________________________________________ 144
1.20.5 Example_______________________________________________________________________ 144
1.21 Canceling Excise Invoices_______________________________________145
1.21.1 Purpose _______________________________________________________________________ 145
1.21.2 Prerequisites ___________________________________________________________________ 145
1.21.3 Procedure _____________________________________________________________________ 145
1.21.4 Result ________________________________________________________________________ 150
1.21.5 Example_______________________________________________________________________ 150
2 Procurement of Imported Materials – Business Process Procedure________________________ 151
2.1 Procurement of Imported Materials _________________________________151
2.1.1 Purpose__________________________________________________________________________ 151
2.1.2 Prerequisites ___________________________________________________________________ 151
2.2 Creating Purchase Order __________________________________________152
2.2.1 Use _____________________________________________________________________________ 152
2.2.2 Prerequisites ___________________________________________________________________ 152
2.2.3 Procedure _____________________________________________________________________ 152
2.2.4 Result ________________________________________________________________________ 158
2.2.5 Example_______________________________________________________________________ 158
2.3 Release Purchase Order ________________________________________159
2.3.1 Procedure _____________________________________________________________________ 159
2.4 Message Output _______________________________________________162
2.4.1 Use __________________________________________________________________________ 162
2.4.2 Procedure _____________________________________________________________________ 162
2.5 CAPTURING BILL OF ENTRY ____________________________________163
2.5.1 Use __________________________________________________________________________ 163
2.5.2 Procedure _____________________________________________________________________ 164
2.5.3 Result ________________________________________________________________________ 171
2.5.4 Example_______________________________________________________________________ 171
2.6 Goods Receipt for Imported Purchase Order _______________________172
2.6.1 Use __________________________________________________________________________ 172
2.6.2 Procedure _____________________________________________________________________ 172
2.6.3 Result ________________________________________________________________________ 183
2.6.4 Example_______________________________________________________________________ 183
2.7 Logistics Invoice Verification for the Materials ______________________184
2.7.1 Use __________________________________________________________________________ 184
2.7.2 Procedure _____________________________________________________________________ 184
2.7.3 Result ________________________________________________________________________ 190
2.7.4 Example_______________________________________________________________________ 190
3 Procurement of Subcontracting Materials – Business Process Procedure __________________ 190
3.1 Procurement of Subcontracting Materials __________________________191
3.1.1 Purpose _______________________________________________________________________ 191
3.1.2 Prerequisites ___________________________________________________________________ 191
3.2 Creation of Subcontracting Purchase Order ________________________191
3.2.1 Use __________________________________________________________________________ 191
3.2.2 Prerequisites ___________________________________________________________________ 192
3.2.3 Procedure _____________________________________________________________________ 192
3.2.4 Result ________________________________________________________________________ 196
3.2.5 Example_______________________________________________________________________ 196
3.3 Message Output _______________________________________________197
3.3.1 Use __________________________________________________________________________ 197
3.3.2 Procedure _____________________________________________________________________ 197
3.4 Transfer of Components to Subcontractor _________________________199
3.4.1 Use __________________________________________________________________________ 199
3.4.2 Prerequisites ___________________________________________________________________ 199
3.4.3 Procedure _____________________________________________________________________ 199
3.4.4 Result ________________________________________________________________________ 201
3.4.5 Example_______________________________________________________________________ 201
3.5 Creation of Subcontracting Challan _______________________________202
3.5.1 Use __________________________________________________________________________ 202
3.5.2 Prerequisites ___________________________________________________________________ 202
3.5.3 Procedure _____________________________________________________________________ 202
3.5.4 Result ________________________________________________________________________ 204
3.5.5 Example_______________________________________________________________________ 204
3.6 Printing of Subcontracting Challan ________________________________205
3.6.1 Use _____________________________________________________________________________ 205
3.6.2 Procedure _____________________________________________________________________ 205
3.7 Goods Receipt for Purchase Order________________________________208
3.7.1 Use __________________________________________________________________________ 208
3.7.2 Prerequisites ___________________________________________________________________ 208
3.7.3 Procedure _____________________________________________________________________ 208
3.7.4 Result ________________________________________________________________________ 217
3.7.5 Example_______________________________________________________________________ 217
3.8 Reconciling Subcontracting Challan ______________________________218
3.8.1 Use __________________________________________________________________________ 218
3.8.2 Procedure _____________________________________________________________________ 218
3.8.3 Result ________________________________________________________________________ 220
3.8.4 Example_______________________________________________________________________ 220
3.9 Completing/Reversal/Re-credit Subcontracting Challan ______________220
3.9.1 Use __________________________________________________________________________ 220
3.9.2 Procedure _____________________________________________________________________ 221
3.9.3 Result ________________________________________________________________________ 221
3.9.4 Example_______________________________________________________________________ 222
3.10 Logistics Invoice Verification for Subcontracting Material ____________222
3.10.1 Use __________________________________________________________________________ 222
3.10.2 Procedure _____________________________________________________________________ 222
3.10.3 Result ________________________________________________________________________ 226
3.10.4 Example_______________________________________________________________________ 226
5. Procurement of External Services: Business Process Procedure ________________________ 227
5.1 Procurement of External Services – Procurement Process ____________227
5.1.1 Purpose _______________________________________________________________________ 227
5.1.2 Prerequisites ___________________________________________________________________ 227
5.2 Creating Service Master_________________________________________228
5.2.1 Use __________________________________________________________________________ 228
5.2.2 Procedure _____________________________________________________________________ 228
5.2.3 Result ________________________________________________________________________ 230
5.3 Creating Purchase Requisition ___________________________________231
5.3.1 Use __________________________________________________________________________ 231
5.3.2 Procedure _____________________________________________________________________ 231
5.3.3 Result ________________________________________________________________________ 235
5.3.4 Example_______________________________________________________________________ 235
5.4 Assign and Process Purchase Requisition _________________________236
5.4.1 Use __________________________________________________________________________ 236
5.4.2 Procedure _____________________________________________________________________ 236
5.4.3 Result ________________________________________________________________________ 239
5.6 Purchase Order__________________________________________________239
5.6.1 Use _____________________________________________________________________________ 239
5.6.2 Prerequisites ___________________________________________________________________ 240
5.6.3 Procedure _____________________________________________________________________ 240
5.6.4 Result ________________________________________________________________________ 242
5.6.5 Example_______________________________________________________________________ 243
5.7 For Releasing Purchase Order Refer User Manual of Stock Procurement 243
5.8 Message Output _______________________________________________243
5.8.1 Use __________________________________________________________________________ 243
5.8.2 Procedure _____________________________________________________________________ 243
5.9 Creation and Acceptance of Service Entry Sheet ____________________245
5.9.1 Use __________________________________________________________________________ 245
5.9.2 Procedure _____________________________________________________________________ 246
5.9.3 Result ________________________________________________________________________ 256
5.9.4 Example_______________________________________________________________________ 256
5.10 Logistics Invoice Verification ____________________________________257
5.10.1 Use __________________________________________________________________________ 257
5.10.2 Procedure _____________________________________________________________________ 257
5.10.3 Result ________________________________________________________________________ 261
5.10.4 Example_______________________________________________________________________ 261
6 Asset Procurement – Business Process Procedure. _____________________________________ 261
6.1 Purchase Order________________________________________________261
6.1.1 Use __________________________________________________________________________ 261
6.1.2 Procedure _____________________________________________________________________ 262
6.1.3 Result ________________________________________________________________________ 266
6.2 Release of Purchase Order ______________________________________266
6.2.1 Procedure _____________________________________________________________________ 266
6.3 Goods Receipt for Purchase Order________________________________266
6.3.2 Use __________________________________________________________________________ 266
6.3.3 Prerequisites ___________________________________________________________________ 266
6.3.4 Procedure _____________________________________________________________________ 266
6.2.3 Result ________________________________________________________________________ 269
6.4 Post Excise Invoice ____________________________________________269
6.4.1 Procedure ________________________________________________________________________ 269
6.4.2 Result ___________________________________________________________________________ 271
6.5 Logistics Invoice Verification ____________________________________272
6.5.1 Use __________________________________________________________________________ 272
6.5.2 Procedure _____________________________________________________________________ 272
6.5.3 Result ________________________________________________________________________ 275
7 Excise Periodic Processing – Business Process Procedure_______________________________ 276
7.1 Excise Periodic Processing______________________________________276
7.1.1 Purpose _______________________________________________________________________ 276
7.1.2 Prerequisites ___________________________________________________________________ 276
7.2 Excise Report - CENVAT Register_________________________________277
7.2.1 Use __________________________________________________________________________ 277
7.2.2 Prerequisites ___________________________________________________________________ 277
7.2.3 Procedure _____________________________________________________________________ 277
7.2.4 Result ________________________________________________________________________ 279
7.3 Excise Register Updation________________________________________________________ 280
7.3Updation of RG1 Register__________________________________________280
7.3.1 Use __________________________________________________________________________ 280
7.3.2 Prerequisites ___________________________________________________________________ 280
7.3.3 Procedure _____________________________________________________________________ 280
7.3.4 Result ________________________________________________________________________ 287
7.4 RG1 Register Extraction_________________________________________288
7.4.1 Use __________________________________________________________________________ 288
7.4.2 Prerequisites ___________________________________________________________________ 288
7.4.3 Procedure _____________________________________________________________________ 288
7.4.4 Result ________________________________________________________________________ 291
7.5 RG1 Register Print Utility________________________________________292
7.5.1 Use __________________________________________________________________________ 292
7.5.2 Prerequisites ___________________________________________________________________ 292
7.5.3 Procedure _____________________________________________________________________ 292
7.5.4 Result ________________________________________________________________________ 295
8. PLA Register Extraction ________________________________________________________ 295
8.1 PLA Register Extraction_________________________________________295
8.1.1 Use __________________________________________________________________________ 295
8.1.2 Prerequisites ___________________________________________________________________ 295
8.1.3 Procedure _____________________________________________________________________ 295
8.1.4 Result ________________________________________________________________________ 298
8.2 PLA Register Print Utility ________________________________________298
8.2.1 Use __________________________________________________________________________ 298
8.2.2 Prerequisites ___________________________________________________________________ 298
8.2.3 Procedure _____________________________________________________________________ 298
8.2.4 Result ________________________________________________________________________ 300
9. Reports _________________________________________________________________________ 300
7.1 Purchasing ___________________________________________________300
7.1.1 Purchasing Documents per Vendor (ME2L) ___________________________________________ 300
7.1.2 Purchasing Documents per Material (ME2M) __________________________________________ 302
7.1.3 Source List for Material (ME0M) ____________________________________________________ 303
7.1.4 Purchase Info Record per Material (ME1M) ___________________________________________ 303
7.1.5 Purchasing Values(MC$G) ________________________________________________________ 304
9.2 Inventory _____________________________________________________307
9.2.1 Material Document List (MB51)_____________________________________________________ 307
9.2.2 Diplay Warehouse Stock (MB52) ___________________________________________________ 309
9.3.3 Stock on Posting Date (MB5B)________________________________________________________ 310
9.3.4 Stock Overview (MMBE)_____________________________________________________________ 313
9.3.5 Stock in Transit (MB5T) _____________________________________________________________ 314
9.3.6 Slow Moving Items (MC46)___________________________________________________________ 315
Icons
Icon Meaning
Caution
Example
Note
Recommendation
Syntax
Abbreviations
R Required entry field
(used in the end-user procedures)
O Optional entry field
(used in the end-user procedures)
C Conditional field
(used in the end-user procedures)
1 Procurement of Stock Materials
1.1 Procurement of Stock Materials – Raw Material Local / Return
1.1.1 Purpose
This process describes the procurement process of raw materials from indigenous source of supply with Country
Version India (CIN) relevant process like processing of Excise Duty (ED) and Sales Tax (ST) process.
1.1.2 Prerequisites
The following scenario specific master data must be created for operation of this building block.
1. Material Master Record
2. Vendor Master Record
3. Purchase Info Record (Optional)
4. Source List (Optional)
5. CIN Master Data
6. Excise Condition Record (if Tax applicable for the Vendor-Material Combination)
1.1.3 Material Master Record
Menu Path
Logistics Materials Management Material Master Material Create
(General)
T Code
MM01 – Create
MM02 – Change
MM03 – Display
Press Enter to see the pop-up window.
Enter the Industry Sector
Enter the Material Type
Internal Number
assignment .
Select the required views and press Enter to input the organizational levels.
Press Enter to input the details of the Material.
1.1.3.1 Basic Data Views
Enter the Material
Description
Enter the Unit of Measure
and material Group
Enter the division if Stock
Transfer will happen for this
material
Blocking for Procurement or
BOM enter here
Enter the Gross and Net
Weight for the Finished Goods
Enter here if the material is
returnable packing as VERP and
non returnable packing as LEIH
Press Additional Data to maintain the Alternate Unit of Measures (for e.g. 1000G= 20Nos for the Semi finished
goods)
Enter any Basic Material is there
Press Additional Data to
maintain Alternate Unit of
Measures
Press Main data to go to the next view
1.1.3.2 Purchasing Views
If the Ordering Unit is other
than the Base UoM, enter the
Unit and make VAR. OUn as 1
Enter the Purchasing Value
Key as G1 (5% Delivery
Tolerance) or G2 (10%
Delivery Tolerance)
Enter the Purchasing Group –
Person/Group responsible to
procure this material
Select if QM is not active and
want to post to Inspection
Stock (Mainly used for
Spares)
Source list should be
maintained for this material
select the box.
Enter the No. of Days required
for GR Processing once the
material is arrived at factory.
Enter the PO Text normally
specification is maintained
1.1.3.3 MRP Views
Enter the appropriate MRP
Type)
Work Scheduling View:
1.1.3.4 Quality Management View
1.1.3.5 Accounting Views
Enter the appropriate Valuation
Class (Various Valuation
Classes given below)
If Price Control is V enter the
Moving Average price, S enter
the Standard Price
Enter the Price Control as V-Moving
Average and S-Standard
1.1.3.6 Costing Views
After entering all the details, press to save the Material.
Enter Respective Profit
Centre of Plant/Depot
1.1.4 Vendor Master Record
Menu Path
Logistics Materials Management Purchasing Master Data Vendor
Central
T Code
XK01 – Create
XK02 – Change
XK03 – Display
Press Enter to input the details of the vendor.
Vendor Account Groups:
VDOM Domestic Vendors
VIMP Import Vendors
VSRV Service Vendors
Vendor Number to be put manually
Enter Company Code
Enter Account Group (Various
Group given below)
Enter Purchasing Organisation
1.1.4.1 General Data
Click on the CIN Details to enter the
Vendor Excise and Sales Tax details
Enter all the details in the respective fields
Excise Indicator for Vendor as 1 –
100% Taxable
Enter all the details in the respective fields
Enter whether this vendor is approved or on Probation
Enter the detail in the respective field
No need to enter in the below screen.
1.1.4.2 Accounting Data
Reconciliation Accounts:
Enter the appropriate Reconciliation
Accounts (Various Accounts given below)
The below screen is explained in detail in FI User Manual:
Enter the appropriate Payment Terms and
Select the Chk double inv
Enter the appropriate Payment Methods
C – Cheque, E – Cash Payment, T – Bank Transfer
1.1.4.3 Purchasing Data
Schema group, Vendor:
DM Domestic Schema
IM Import Schema
Enter the Order Currency, Terms of
Payment and Incoterms
Enter the appropriate Schema group, Vendor
(Various groups given below)
1. Select GR-based Inv. Verf if Invoice
verification is done after GR
2.. Select the Srv-based Inv. Verf if Invoice
Verification is done after Service Entry sheet.
Press to save the Vendor master and the no is generated automatically.
1.1.5 Purchasing Info Record
Enter the Partner for the appropriate Partner
Functions
Menu Path
SAP Easy Access Logistics Materials Management Purchasing Master
Data Info Record Create
T Code
ME11 – Create
ME12 – Change
ME13 - Display
You use this component if you wish to store information on a vendor and a material as master data at purchasing
organization or plant level. You can create purchasing info records for different procurement types (standard,
subcontracting, pipeline, consignment).
Press enter the details in the Purchasing Info Record.
Enter the Info Category as
1. Standard – For normal Procurement (Domestic, Import, etc)
2. Sub-Contracting – For Sub-Contracting
If the message is displayed like this,
intimate the Quality Person to maintain
the QM Info Record (TCode: QI01)
No need to enter anything in the below screen as it copies all the data from the Vendor Master.
It is defaulted from the Material Master
but change for this Vendor-Material
combination if different.
Enter the Standard Quantity
Enter the appropriate Tax Code
It is defaulted from the Material Master
but change for this Vendor-Material
combination if different.
Enter the Net Price
It is defaulted from the Material Master
but change for this Vendor-Material
combination if different.
1.1.5.1 Result
Purchasing Info Record is created
1.1.5.2 Example
Purchasing Info Record 5300000384 is created.
1.1.6 Source List
Menu Path
SAP Easy Access Logistics Materials Management Purchasing Master
Data Source List Maintain
T Code
ME01 – Maintain
ME03 – Display
ME04 - Changes
Enter the Material No. and Plant
Result: Source List changed.
Maintain the Validity
Period till until which you
will procure this material
from this vendor
Enter the Vendor and
Purchasing Organisation
Select if the
Vendor is fixed
Select if the Vendor is blocked for
Procurement for this particular
material alone
Enter 1 to be included
in MRP Run
1.1.7 CIN Master Data
Menu Path J1ILN SAP Menu Indirect Taxes Master Data Excise Rate Maintenance
T Code J1ID
1.1.7.1 Chapter IDs
Select Chapter ID and Press
Press New Entries to go to the next screen.
Press New Entries to Create New Chapter ID
Press to save the data.
Enter the Chapter ID
Enter the Description as per
law
1.1.7.2 Material ID and chapter ID combination
Select Material and Chapter ID Combination and Press
Select the Material and Chapter-Id Combination
Press New Entries to Create New Material Number and Chapter ID
Press to save the data.
1.1.7.3 Vendor Excise Details
Enter the Material No. and Chapter ID Combination
Enter the material type based on
the Material Nature
Either you can maintain here or else in Vendor Master.
Select the Vendor Excise Details
Press New Entries to Create Vendor Master Excise
Press to save the data.
1.1.7.4 Excise Indicator for Plants
Select Excise Indicator for Plant and Press
Select the Excise Indicator for Plant
Press New Entries to Create Plant Excise
Press to save the data.
1.1.8 Excise Condition Record
1.1.8.1 Use
When you enter a purchasing document, for example, a purchase order, the R/3 System
automatically calculates the applicable excise duties using the condition technique.
1.1.8.2 Procedure
1. Access the transaction choosing one of the following navigation options:
SAP R/3 menu No Menu path available for this transaction
Transaction code FV11
2. Enter the appropriate Condition type (various condition types given in next page) and maintain the respective
values.
Enter the appropriate condition type
For Raw Material / Packing Material maintain the Plant/Vendor/Material Combination.
For Service Tax /Assets maintain the Plant/Material Group Combination.
.
Various combinations to maintain the
condition record
3. Press Ctrl+S or
4.
1.1.8.3 Result
Condition records saved.
1.2 Request for Quotation (RFQ)
Enter the Plant and Vendor
Enter the Material No. Enter the Value / amount
1.2.1 Use
Request for Quotation is used to float enquiries in market to obtain quotations from prospective vendors.
This transaction is optional for the process.
1.2.2 Procedure
1. Access the transaction choosing one of the following navigation options:
SAP R/3 menu Logistics Material Management Purchasing
RFQ/quotation Request for Quotation Create
Transaction code ME41
2. RFQ can be created with reference to Purchase Requisition, Outline Agreement (Contract) and another RFQ.
3. On the Create RFQ: Initial Screen, make the following entries:
1. Enter the RFQ type as “AN”
2. Enter the Quotation Deadline
3. Enter Purch. Organisation as 1101
4. Enter the respective Purchasing group
Press this button to enter the Collective
No and Vendor Reference
4. Choose (header details icon) on the toolbar, then on screen Create RFQ: Header Data, enter information
in the fields as specified in the table below:
Enter the Submission date
Enter the appropriate
Item category for Sub-
Contracting & Service
1. Enter the Material No
2. Enter the RFQ Quantity
3. Enter the Deliv. Date
4. Enter the Plant if it is Plant specific
Press this button to enter the vendor
code for which it has to be sent?
5. Choose (vendor address button) on the toolbar, then on screen Create RFQ: Vendor Address, enter
information in the fields as specified below:
Enter the Collective No to have a track of
all RFQs related to particular instance
Enter the Your Reference if any
reference given by the vendor
After entering the vendor code and pressing enter the details of vendor will be displayed automatically.
6. Press to Save the RFQ. This will refresh the Create RFQ: Vendor Address screen to allow creation of the
same RFQ data to a new vendor by following the steps outlined above.
1.2.3 Result
RFQ created
Similarly create for other vendor in the same screen and various RFQ Nos will be generated
1.2.4 Example
RFQ created under the number 6000000000.
1.3 Message output: RFQ
1.3.1 Use
A RFQ needs to be printed for transmitting to vendor. This transaction is optional for the process.
1.3.2 Procedure
1. Access the transaction choosing one of the following navigation options:
SAP R/3 menu Logistics Materials Management Purchasing
RFQ/Quotation Request for Quotation Messages
Print/Transmit
Transaction code ME9A
2. On the Message Output screen, make the following entries:
Enter the RFQ Nos to be printed
and Execute (F8)
Press this button to Execute
Select the check box For Printout click
this button which
will create Spool
Request.
For Direct Printout
click this button
For Print Preview
click this button
You will see out put as
1.4 Maintaining Quotation
1.4.1 Use
This transaction is used to maintain the quotation, which is submitted by vendors. Vendor communicates
price for material and as a result the RFQ (Request for Quotation) needs to be updated.
This transaction is optional for the process.
1.4.2 Procedure
1. Access the transaction choosing one of the following navigation options:
SAP R/3 menu Logistics Materials Management Purchasing
RFQ/quotation Quotation Maintain
Transaction code ME47
2. On the Maintain Quotation: Initial Screen, make the following entries:
3. Choose the Enter key, or choose green Enter icon to proceed.
4. View the screen “Maintain Quotation: Header Data” by Choosing on the Header data icon in the toolbar.
5. Enter information in the fields as specified in the table below. Some fields will not be available for input, as they
are reference fields only.
6. Once all necessary header data has been maintained, the user can then enter the price information in one of
two fashions:
a. Enter the price in the Net Price field on the Maintain Quotation: Item Overview screen by Choosing
overview icon on toolbar.
b. To enter more detailed information in addition to the net price, select the line item and choose the
Item Details icon. Choose the green Back arrow to return to the ‘Overview’ screen once data has
been maintained.
i. A vendor’s quoted price can be entered in one of two ways.
1. Press to select the line
2. Press to enter the conditions
Enter the Conditions given by vendor.
ii. Enter the net price per unit in the Net price field. This price includes the vendor's normal
discounts and surcharges only. Cash discounts (for prompt payment) and taxes are
calculated separately.
iii. Enter the gross price in the Net price field, and maintain the conditions for the item. Then
the system automatically replaces the entered gross price with the calculated net price. If
the net price for an item is entered for which pricing conditions have been maintained, the
system always replaces the price entered with the calculated net price.
iv. Enter the Tax Code for any relevant taxes (for example, Excise Duty, Sales Taxes etc.) in
the Tax code field. If a purchase order is created by referencing an RFQ, this code
facilitates the determination of the tax amount when the invoice is entered in the system.
v. After entering tax code, after choosing this system may give an information message
showing the effective price, Choose Enter to continue.
7. Once all quotation information has been successfully entered, save the data by Choosing on the Save button,
or Choose the <Ctrl + S> keys. A message will be displayed that the data has been saved.
1.4.3 Result
Quotation is maintained.
Maintain the same for other RFQs.
1.4.4 Example
Quotation for RFQ 6000000000 maintained.
1.5 Price Comparison
1.5.1 Use
Required to compare prices from all quotations received as a result of a competitive bidding process.
This transaction is optional for the process.
1.5.2 Procedure
1. Access the transaction choosing one of the following navigation options:
SAP R/3 menu Logistics Materials Management Purchasing
RFQ/Quotation Quotation Price Comparison
Transaction code ME49
2. On the Price Comparison List screen, make the following entries:
a. Choose the comparison values to be used:
i. Reference quotation: You can compare the quotations within the list with a sample quotation.
The system displays the percentage deviation between each quotation in the list and the
sample quotation.
ii. Mean/minimum value quotation: The price comparison list can also display a "fictitious"
quotation reflecting the average or minimum value of all quotations. Select either the "Mean
value" or "Minimum value" quotation field to choose the type of fictitious quotation.
iii. Percentage basis: The price comparison list displays the percentage of each item in relation to
the maximum, minimum, or average price. To determine the display type, enter one of the
following:
+: The highest value for each item is the 100% value
-: The lowest value for each item is the 100% value
_: The mean value for each item is the 100% value
b. Select the desired price computations:
Parameters included for Comparison
Enter the Purchasing Organisation
Enter the Quotations to be compared or
the Collective RFQ
i. Select the appropriate field to determine which of the following should be included in the
determination of the comparison price:
i. Include cash discounts
ii. Include delivery costs
iii. Determine effective price
3. Once all entries have been made, Choose the Execute.
4. On screen “Price Comparison List in Currency INR”, view the Price Comparison list.
5. To view any of the following information for a particular quote included in the comparison, Choose the RFQ
number with the mouse to select it, then Choose the appropriate icon/button on the menu toolbar:
6. Display Material: Allows the user to view the purchasing data in the material master record.
7. Display Vendor: Allows the user to view the vendor master record.
8. Additional Info: Allows the user to view payment terms, bid dates, currency information for all the vendor
quotations in the list.
9. If any information has been modified through the comparison list, save the RFQ before exiting. If changes have
been made and the user attempts to exit without saving, the system will return a message to verify action.
10. To exit the transaction, choose the green Back arrow, the yellow Exit arrow, or Choose the F3 button.
1.5.3 Result
Price Comparison List in Currency INR is displayed on the screen.
Rank is
generated
automatically
Mean and
Effective Price is
highlighted
1.6 Creating Purchase Requisition
1.6.1 Use
A Purchase Requisition is created to indicate purchase department to procure materials or services with
details like how much quantity is required, when required. Generally it is created automatically for Raw
materials and Packing Materials through MRP Run and Spares and Service related to Plant
Maintenance Purchase Requisition is generated automatically from Plant maintenance Order.
This transaction is optional for the process.
1.6.2 Procedure
1. Access the transaction choosing one of the following navigation options:
SAP R/3 menu Logistics Materials Management Purchasing Purchase
Requisition Create
Transaction code ME51N
2. On the Create Purchase Requisition screen, make the following entries:
Press or Ctrl+S to Save the Purchase Requisition.
1.6.3 Result
1.6.4 Example
Purchase requisition number 0010000000 created.
1.7 Release Purchase Requisition
1.7.1 Procedure
1. Access the transaction choosing one of the following navigation options:
SAP R/3 menu Logistics Materials Management Purchasing Purchase
Requisition Release Individual Release
Enter Material No. Enter required
Quantity
Enter the Desired Vendor if Vendor is known to
the person who is creating PR
Transaction code ME51N
Click Other Purchase Requisition
Enter PR No.
Click This Icon to Release PR
Click This Icon to Release
Click This Icon to Save
1.8. Assign and Process Purchase Requisition
1.8.1 Use
a) This section explains the functions provided by the SAP System for converting requisitions into
external purchasing documents (purchase orders, contract release orders, scheduling agreement
delivery schedules, RFQs), and the processing options thereby available to you:
• Assigning means defining the desired source for each purchase requisition item
o Further processing involves generating lists of requisitions that have been assigned or flagged as
outlined above, and the subsequent creation of RFQs, purchase orders, or lines of delivery
schedules under scheduling agreements.
Procedure
2. Access the transaction choosing one of the following navigation options:
SAP R/3 menu Logistics Materials Management Purchasing Purchase
Requisition Follow-On Functions Assign and Process
Transaction code ME57
3. The assignment of sources to and further processing of purchase requisitions are two distinct functions. You
can choose whether you wish to perform the functions in two separate steps or in just one.
4. Below are the Selection Parameters to restrict the process of PO from PR
5. Press or F8 to enter into the next screen.
1. Enter the appropriate
Purchasing Group
2. Enter the Scope of List as B1 for
PR generated through MRP Run
and A for remaining PR
3. Enter the appropriate Plant
1. Select the Assigned Purchase
Requisition (For Spares PR
normally the End User may have
entered the Vendor in the PR)
2. Select the appropriate Check
boxes for Processing the PR
6. O is explained in next chapter.
1.8.3 Result
The source is assigned to PR and can be processed for PO.
1. Select the check boxes
required PR which are to
be converted in to Pos.
1. If Source List is
available click this button
1. Since only one source is assigned in
Source list system assigns the source
automatically or else if more than one source
available a Pop-up window will be coming
where one vendor has to be selected.
After assigning the source
click on to this button to
process the PO or else save
for the assignment of source
1.9 Purchase Order
1.9.1 Use
A purchase order is a legal document used to record an individual purchase with the vendor. It also
provides the vendor with a reference document to link to shipping (goods receipt) and invoicing (invoice
verification) processes. The purchase order is a commitment to a vendor for a given material, in a
specified quantity at a predetermined price and delivery date.
This transaction is mandatory for the process.
Please ensure that Purchase Order Value does not exceed specified value and if the purchase order value
crosses this limit a release procedure is applied on this purchase order. To release the Purchase Order go
to ME28 for collective release and ME29N for individual release.
1.9.2 Procedure
1. Access the transaction choosing one of the following navigation options:
SAP R/3 menu Logistics Materials Management Purchasing Purchase
Order Create Vendor/Supplying Plant Known
Transaction code ME21N
2. If you want create purchase order with reference to the purchase requisition, on item details screen enter the
purchase requisition number and item number at Purch. Req. field. System will automatically adopt all the data
from requisition.
Click the
Purchasing
Requisitions
and Press
Adopt
Press this button to view
the Tax Calculation
Press this button to view
the message
Check the PO before
Saving
1.9.3 Result
Purchase Order is created.
1.9.4 Example
Standard PO created under the number 210000000.
1.10. Release Purchase Order
1.10.1. Procedure
Access the transaction choosing one of the following navigation options:
SAP R/3 menu Logistics Materials Management Purchasing Purchase
Order Release Individual Release
Transaction code ME29N
Click Other Purchase Order
Enter PO No.
Click This Icon to Release PR
Click This Icon to Release
Click This Icon to Save
1.11Message Output
1.11.1 Use
A Purchase Order needs to be printed for transmitting to vendor.
Procedure
2. Access the transaction choosing one of the following navigation options:
SAP R/3 menu Logistics Materials Management Purchasing Purchase
Order Messages Print/Transmit
Transaction code ME9F
3. On the Message Output screen, make the following entries
4. Choose to Execute.
5. On screen Message Output select the appropriate Document number and perform the following:
Choose Output Message and/or
Choose Display Message and/or
Choose Message Detail and/or
Choose Trial Printout.
1.12 Goods Receipt for Purchase Order
1.12.1 Use
Goods are received from the Vendor as a result of a Purchase Order at the receiving plant. A goods
movement is entered into the system referencing this PO and a goods receipt material document is
posted. Appropriate general ledger accounts are also posted and stocks are updated.
1.12.2 Prerequisites
Purchase Order
1.12.3 Procedure
1. Access the transaction choosing one of the following navigation options:
SAP R/3 menu Logistics Materials Management Inventory Management
Goods Movement Goods Receipt For Purchase Order
PO Number Known
Transaction code MIGO
2. On the Goods Receipt Purchase Order screen, make the following entries:
Enter the Purchase Order No and Press Enter
Check for correct movement
type whenever doing goods
movement
3. After pressing Enter system will fetch all the data from the Purchase Order as shown below:
Whichever material is in Blue those detail will be seen
in the Item detail
4. System defaults the balance quantity in PO, change the quantity to the received quantity:
Enter the Storage Location in which the
material to be placed.
Select Item Ok and Press Enter and the Excise tab
will appear both in Header and Item Level
Enter the Delivery Note
details of the vendor
Field name Description R/O/C User action and values Comment
Goods
Receipt
Goods Receipt R Select from drop down list
for action
Purchase
Order
Purchase Order R input the PO number which
generated above
4500000277
Movement
Type
101
Enter
Document
Date
Document Date R Enter document date
Delivery Note in Header O Delivery Number from
Vendor
Vendor Vendor R Defaulted from purchase
order
Grayed out
Posting Date Posting date R Enter posting date
Bill of lading Bill of lading O Enter bill of lading
Header text Header text O Enter header text
Close Header Detail data to enlarge the Detail data.
Select Material tab at Detailed Data.
Material Material tab R Defaulted from Purchase
Order
Grayed out
Select Quantity tab in Detail data.
Qty in unit of
entry
Quantity in unit of
entry
R Enter the quantity you have
received from vendor. As a
default system will give
purchase order quantity
Quantity
defaulted from
Purchase Order
Qty in
delivery note
Quantity in delivery
note
O Enter the quantity as per
vendor delivery challan
Select Where tab in Detail data.
Movement
type
Movement type R Defaulted from header
screen
Stock type Stock type R Defaulted from material
master or purchase order
Plant Plant R Defaulted from purchase
order
1000
Storage
location
Storage location R Defaulted from purchase
order if entered
1010
Goods
Recipient
Goods Recipient O Enter the name of person
who received goods
Unloading
point
Unloading point O
Text Text O Enter the text if required
Select Purchase Order tab in Detail data.
Purchase
Order
Purchase Order R Defaulted from header data Grayed out
Del.
completed
ind.
Delivery completion
indicator
O Defaulted by system if PO
Qty = GR Qty
Select Partner tab in Detail data.
Vendor Vendor name O Grayed out
For this material batch management is not active. Just for reference purpose the following
data is given.
Select Batch tab in Detail data.
This tab will come only if material is managed in batches.
Proceed with the following steps if material is batch managed only.
Batch Batch number R Enter batch number as date
for batch managed
materials
Vendor batch Vendor batch O Enter vendor batch number
for reference
5. Select the Check box Item OK, after entering all the data.
You will get Excise Invoice tab at Header Data for capturing vendor excise invoice details and for posting Part I
and Part II.
6. On the Excise Invoice tab at Header Data make the following entries.
Field name Description R/O/C User action and values Comment
Capture &
Post Excise
invoice
Capture & Post Excise
Invoice on Excise
Action
R Choose Capture & Post
Excise Invoice from drop
down list
Defaulted
Excise Group Excise Group R Defaulted by the system
Excise
Invoice
Excise invoice R Enter the vendor Excise
Invoice number
For example:
D013
Excise Inv.
Date
Excise Invoice Date R Enter the excise invoice
date of vendor
BED Basic Excise Duty R Defaulted from purchase
order
Grayed out
AED Additional Excise Duty R Defaulted form purchase
order
Grayed out
SED Special Excise Duty R Defaulted from purchase
order
Grayed out
NCCD NCCD R Defaulted from purchase
order
Grayed out
ECS Education Cess R Defaulted from purchase
order
Grayed out
System defaults
the Excise Duty
(BED & ECS)
and in case
Select Appropriate Excise settings
While posting in Case of dealer only
MRP
Indicator
MRP Indicator O Tick the check box
Note: If the Base Price in
PO is the inclusive of
both the Material Cost
and Excise Value choose
the check box
Close Header Detail data to enlarge the Detail data.
Select Excise Item tab at Detailed Data (at the last).
Chapter ID Chapter ID of material R Defaulted by the system
No action required
EI Quantity Excise Invoice
Quantity
R Defaulted by the system
from Goods Receipt
quantity
Base Value Base value of material R Defaulted by the system
BED Basic Excise Duty R Defaulted by the system
AED Additional Excise Duty O Defaulted by the system
NCCD NCCD O Defaulted by the system
SED Special Excise Duty O Defaulted by the system
ECS Education Cess O Defaulted by the system
Please cross check the BED, AED, SED, NCCD and ECS amount of item as per the Vendor
Excise Invoice, legally you cannot avail more than what mentioned in Vendor Excise Invoice. All
other information is defaulted by the system. Hence, no action required by the user.
6. Choose Check at the top of screen.
7. Choose Post to post the document.
Also See the account postings
Enter Excise Invoice No.
and Date vendor
1.12.4 Result
Material document 5000000009 posted
1.12.5 Example
Material document 5000000009 posted
1.13 Logistics Invoice Verification
1.13.1 Use
In this process of Logistics Invoice Verification all the Incoming Invoices are verified in terms of their
content, prices and arithmetic. When the invoice is posted, the invoice data is saved in the system. The
system updates the data saved in the invoice documents in Materials Management and Financial
Accounting.
1.13.2 Procedure
1. Access the transaction choosing one of the following navigation options:
SAP R/3 menu Logistics Materials Management Logistics invoice
Verification Document Entry Enter Invoice
Transaction code MIRO
2. If you are opening for the first time this transaction, system will ask for Company Code, please give 1000 to go
in side the transaction.
3. On the Enter Incoming Invoice: Company Code 1000 screen, make the following entries:
Enter Invoice Date
Change Defaulted V0 Tax
code and tick Calculate tax
tab
Enter the PO No.
If Part II entry is not done then system will not allow you to POST Invoice
Unless and until you post part2 system will not allow invoice verification
Field name Description R/O/C User action and values Comment
Enter the amount
Transaction Invoice R Select Invoice from drop
down list
Header Data Header data of Invoice R Defaulted by system
Basic tab Basic information tab R Select basic information tab
to give initial information
Invoice Date Invoice Date R Enter the Vendor invoice
date
Reference Invoice reference O Enter the vendor invoice
reference
For Example
USERMANUAL
Posting date Posting Date R Enter the posting date of
document
System will give
current date as
default
Amount Invoice Amount R Enter invoice gross amount
including taxes and duties
299,960.20
Amount
mentioned is
only an example
Currency R Enter the currency in which
the bill is presented by
vendor, if not entered by
user system will default the
document currency from
purchase order
INR
Calculate tax Check box calculate
tax
O Check this tick box, system
will calculate tax amount
Tax code R Select the tax code from
drop down list
V1
Bus.place/se
ctn
Business place or
section code
R Enter section code if Tax
deduction for source is
active for this vendor
Leave blank for
this process
Text Text O Enter text if required for
reference
Payment tab Payment tab R Select payment details tab
BaselineDt Base line date for
payment
R Enter the base line date for
payment
Will be defaulted
if payment terms
entered in PO
Pmnt terms Payment terms O Payment terms of
document, if entered will be
defaulted from purchase
order
Due on Payment due on O Will be calculated by
system
Grayed out
Discount Cash discount O Enter if cash discount is
offered by vendor
Hide Header data for getting full screen of items if required.
Purchase order /
Schedule Agreement
R Select Purchase order /
Schedule Agreement in the
reference document
category from drop down
list
Defaulted for
user
Purchase order
number
R Enter the first purchase
order number generated
above
Goods / service items R Select Goods / Service
items in indicator from drop
down list
Defaulted
Layout Layout of invoice
verification
R Select All information from
drop down list
Choose Enter
4. Choose Enter to complete the document feeding part.
5. To check the document credit and debit is balanced on the top right corner of your screen a traffic light is
displayed. Beside that Balance of the document is displayed.
Ensure that the Balance is ZERO before posting the document and the traffic light is green or yellow color.
6. If you want to see the accounting postings in simulation mode, Choose Simulation on middle of fourth row of
your screen.
7. Choose Save / Post, for posting the document.
Check Simulate Tab
1.13.3 Result
Logistics Invoice verification document is posted.
1.13.4 Example
Document no. 5105600102 created
1.14Returning Delivery
1.14.1 Use
A material has been received and it needs to be returned for various reasons (i.e. poor quality,
incomplete, damaged). The user can use this transaction to return the material to the vendor via the
original GR document.
This transaction itself is an independent transaction and it is not mandatory in J81 process. This Return
Delivery transaction is used only when material is rejected and needs to be returned to vendor.
If material is rejected by using QM process there is no need to this transaction. This transaction can be
used only without QM process materials.
This transaction is used basically when purchased material is needs to be sent back to vendor because of
various reasons like poor quality, incomplete items, damaged etc.
b)
Bore proceeding with return delivery to vendor please ensure that sufficient stock is available in storage
location and if batch managed in particular batch stocks also. Other wise system will give error message.
Before doing Return Delivery to vendor, check if you have already done Invoice Verification to that Goods
Receipt. If you have already done invoice verification please raise Credit Memo to the extent of Returns
quantity and then proceed with this process. Other wise system will give an error message.
How to create Credit Memo transaction is explained in the chapter mentioned 1.17 below.
1.14.2 Procedure
1. Access the transaction choosing one of the following navigation options:
SAP R/3 menu Logistics Materials Management Inventory Management
Goods Movement Goods Receipt For Purchase Order
PO Number Known
Transaction code MIGO
2. Select Return Delivery from drop down list to make Return Delivery to vendor.
3. On the Return Delivery Material Document screen, make the following entries:
Enter the quantity to be returned to vendor
Field name Description R/O/C User action and values Comment
Return
Delivery
Return Delivery R You have already selected
in above step 2
Material
Document
Material Document
number
R Select from drop down list
5000000189
Enter the material
document number which
you have made at the time
of Goods Receipt for
purchase order
Enter
Document
Date
Document Date R Enter document date
Delivery Note in Header O Delivery Number. Will be
defaulted if you have
already entered in original
document
Posting Date Posting date R Enter posting date
Enter the appropriate Reason for Movement
Select Blocked Stock to
Return the rejected Material
Bill of lading Bill of lading O Enter bill of lading.
Header text Header text O Enter header text
Via Delivery Via Delivery R Tick the check box
Close Header Detail data to enlarge the Detail data.
Select Material tab at Detailed Data.
Material Material tab R Defaulted from Purchase
Order
Grayed out
Select
Quantity tab
in Detail data.
Qty in unit of
entry
Quantity in unit of
entry
R Enter the quantity you want
to return to vendor. As a
default system will give
original Goods Receipt
quantity
5000
You can not
return more than
what you have
in stock
Qty in
delivery note
Quantity in delivery
note
O Enter the quantity
100000
Select
Where tab in
Detail data.
Movement
type
Movement type R Defaulted by the system
with 122 movement
Stock type Stock type R Enter stock type from drop
down list
Plant Plant R Defaulted from original
Goods Receipt
1000
Grayed out
Storage
location
Storage location R Enter the store location
from which you want to
return to vendor
Goods
Recipient
Goods Recipient O Enter the name of person
who received goods
Unloading
point
Unloading point O
Reason for
Movement
Reason for Movement R Select from the drop down
list the reason for this
movement of material
0001
Text Text O Enter the text if required
Select Purchase Order tab in Detail data.
Purchase
Order
Purchase Order R Defaulted from header data Grayed out
Del.
completed
ind.
Delivery completion
indicator
R Defaulted from purchase
order
Select Partner tab in Detail data.
Vendor Vendor name O Grayed out
Select Batch tab in Detail data.
This tab will come only if material is managed in batches.
Proceed with the following steps if material is batch managed only.
Batch Batch number R Enter batch number if
externally maintained by
you or system will allocate
batch number
Vendor batch Vendor batch O Enter vendor batch number
for reference
Enter the Goods Issue Indicator as IPD
Field name Description R/O/C User action and values Comment
Select Create
Excise
Invoice
Select Create Excise
Invoice
R Choose Create Excise
Invoice from drop down list
Select from drop
down list
Excise Group Excise Group R Defaulted by the system
Series Group Excise Series group R Defaulted by the system
Removal time Removal time of
goods
R System defaults current
time, change if required
BED Basic Excise Duty R Defaulted from purchase
order
Grayed out
AED Additional Excise Duty R Defaulted form purchase
order
Grayed out
SED Special Excise Duty R Defaulted from purchase
order
Grayed out
Close Header Detail data to enlarge the Detail data.
Select Excise Item tab at Detailed Data (at the last).
Chapter ID Chapter ID of material R Defaulted by the system
No action required
Enter the Sub type as PR
for Vendor Returns
EI Quantity Excise Invoice
Quantity
R Defaulted by the system
from return delivery
document
2
Base Value Base value of material R Defaulted by the system
BED Basic Excise Duty R Defaulted by the system
Goods Issue
Indicator
Goods Issue Indicator R Select from drop down list
IPD for this process
Please cross check the BED, AED, SED, NCCD and ECS amount of item as per the Vendor
Excise Invoice, legally you cannot avail more than what mentioned in Vendor Excise Invoice. All
other information is defaulted by the system. Hence, no action required by the user.
4. Choose Check at the top of screen.
5. Choose Post to post the document.
1.14.3 Result
Return Delivery document created
1.14.4 Example
Return Delivery Document No. 50000000011 created.
Note: Excise Invoice for Return delivery also will be generated in the back ground for this
transaction
1.15Excise Invoice Other Movements
1.15.1 Procedure
1. Access the activity choosing one of the following navigation options:
SAP CIN R/3
User menu
Indirect taxes Sales / Outbound Movements Excise Invoice
For Other Movements Excise Invoice for Other Movements
Transaction Code J1IS
2. On the Excise Invoice Other Movements – Main Menu screen, make the following entries:
3. Choose Display Excise Invoice icon to start the transaction
Enter the Sub type as PR
for Vendor Returns
Field name Description R/O/C User action and values Comment
Reference
Doc Number Document Number R Enter the return delivery
document number which
you have created in above
step
0000000126
Doc Year Document year R Enter the year of document
created
Example: 2006
Enter
1.15.2 Result
Excise invoice generated is displayed.
1.15.3 Example
Excise invoice 0000000014 generated and displayed.
1.16Posting and Printing the Excise Invoice
1.16.1 Use
Excise Invoice has to be printed and sent along with the material. This is legal requirement in India.
1.16.2 Prerequisites
Excise Invoice Document is generated and posted.
1.16.3 Procedure
1. Access the transaction choosing one of the following navigation options:
SAP CIN R/3
User menu
Indirect taxes Sales / Outbound Movements Excise Invoice
For Other Movements Post and Print
Transaction code J1IV
2. On the SAP screen, make the following entries:
3. If the document is not posted in step mentioned above, Choose Release to Accounting to post Financial
Accounting document.
This transaction is used to just printing of excise invoice.
4. Follow the steps mentioned below for taking print of Excise Invoice.
Field name Description R/O/C User action and values Comment
Excise
internal
reference
Select internal excise invoice number from drop down list, you can find it with reference to the
Excise Invoice number generated in above step 1100400070 for example with the combination of
Excise Group 10 and vendor code 10006.
Document
No.
Document Number R Enter the Excise Invoice
Document Number
generated in above step
For example: 127
Document
year
Document Year R Enter the document year
2006
5. To take printout, select Goto from the top main menu and select Print Document from the list. Or Choose
Control + P to get the access of Excise Invoice Printing screen.
6. Choose Execute icon to get list of excise invoice ready to be printed.
7. From the list select the excise invoice number by choosing the check box left side of number.
8. To take printout on printer Choose the Printer icon or Choose F8.
9. To display excise invoice on screen Choose Display icon or Choose F9.
10. System will give popup asking for pre-printed invoice serial number, Enter pre-printed excise invoice number.
In this process Choose 99 for testing purpose (since it is not expected to have pre-printed invoice for testing
purpose).
11. Select printer from the drop down list. Check box for Print Immediately and New spool request.
12. Choose Print Preview or Print icons to display on screen or to print on printer mentioned above.
13. If printer is connected system will print the document on printer.
1.16.4 Result
Excise Invoice is printed.
1.17Credit Memo
1.17.1 Use
In this process of Logistics Invoice Verification a credit memo is generated on vendor. Please be
careful that during the total process after making logistics invoice verification you have made
return delivery to vendor. To recover that money you need to do this credit memo transaction.
1.17.2 Prerequisites
• Logistic Invoice Verification is already made
1.17.3 Procedure
1. Access the transaction choosing one of the following navigation options:
SAP R/3 menu Logistics Materials Management Logistics invoice
Verification Document Entry Enter Invoice
Transaction code MIRO
2. If you are opening for the first time this transaction, system will ask for Company Code, please give 1000 to go
in side the transaction.
3. On the Enter Incoming Invoice: Company Code 1000 screen, make the following entries:
Put the Qty and Price to
be returned
Select Credit Memo in
this tab
Field name Description R/O/C User action and values Comment
Transaction Credit memo R Select Credit memo from
drop down list
Header Data Header data of Invoice R Defaulted by system
Basic tab Basic information tab R Select basic information tab
to give initial information
Invoice Date Invoice Date R Enter the Vendor invoice
date
Reference Invoice reference O Enter the vendor invoice
reference
Posting date Posting Date R Enter the posting date of
document
System will give
current date as
default
Amount Credit memo Amount R Enter invoice (credit memo)
gross amount including
taxes and duties
Currency R Enter the currency in which
the bill is presented by
vendor, if not entered by
user system will default the
document currency from
purchase order
Calculate tax Check box calculate
tax
O Check this tick box, system
will calculate tax amount
Tax code R Select the tax code from
drop down list
Bus.place/se
ctn
Business place or
section code
R Enter section code if Tax
deduction for source is
active for this vendor
Leave blank for
this process
Text Text O Enter text if required for
reference
Payment tab Payment tab R Select payment details tab
BaselineDt Base line date for
payment
R Enter the base line date for
payment
Will be defaulted
if payment terms
entered in PO
Pmnt terms Payment terms O Payment terms of
document, if entered will be
defaulted from purchase
order
Due on Payment due on O Will be calculated by
system
Grayed out
Discount Cash discount O Enter if cash discount is
offered by vendor
Hide Header data for getting full screen of items if required.
Purchase order / R Select Purchase order / Defaulted for
Schedule Agreement Schedule Agreement in the
reference document
category from drop down
list
user
Purchase order
number
R Enter the purchase order
number
Goods / service items R Select Goods / Service
items in indicator from drop
down list
Defaulted
Layout Layout of invoice
verification
R Select All information from
drop down list
Choose Enter
4. Choose Enter to complete the document feeding part.
5. To check the document credit and debit is balanced on the top right corner of your screen a traffic light is
displayed. Beside that Balance of the document is displayed.
Ensure that the Balance is ZERO before posting the document and the traffic light is green or yellow color.
6. If you want to see the accounting postings in simulation mode, Choose Simulation on middle of fourth row of
your screen.
7. Choose Save posting the document.
1.17.4 Result
Logistics Invoice verification document is posted.
1.17.5 Example
Document no. 5105600791 created
1.18Reversals / Cancellation of Invoice or Credit Memo
1.18.1 Use
Invoice documents in Invoice Verification are either invoices or credit memos. These documents can be
cancelled. There are two different cases:
• If an invoice is cancelled, the system automatically creates a credit memo.
• If a credit memo is cancelled, the system automatically creates an invoice.
The system takes the amount and quantity for the credit memo or invoice from the invoice or credit
memo to be cancelled, thus avoiding any differences between the invoice and the credit memo or the
credit memo and the invoice.
1.18.2 Prerequisites
An invoice document can only be cancelled if:
• it was posted in Logistics Invoice Verification
• It has not already been cancelled
• It is not a cancellation document for another document
When you cancel documents in Logistics Invoice Verification, the document line items are not
automatically cleared in Financial Accounting. We recommend that you periodically clear such
items (using daily background jobs, for example).
1.18.3 Procedure
1. Access the transaction choosing one of the following navigation options:
SAP R/3 menu Logistics Materials Management Logistics invoice
Verification Further Processing Cancel Invoice Document
Transaction code MR8M
2. The initial screen for reversal appears.
3. In the fields Invoice doc. number and Fiscal year, enter the data for the invoice document you want to cancel.
4. In the Reversal reason field, select the reason for cancelling the invoice. This allows you to differentiate
between different types of cancellations.
5. You can display the document to check. Choose Display document to do this. You can look at the items of the
document to be cancelled. Return to the initial screen by choosing Back.
Enter the reversal
reason
6. Choose Invoice document and reverse or Press Ctrl+S or .
1.18.4 Result
Document Reversed and Clear FI Documents Manually.
1.18.5 Example
Document Reversed with no. 5105600114.
1.19Reversals / Cancellation of Goods Receipt (GR)
1.19.1 Use
When any data entered incorrect during GR posting it has to be reversed. To do the cancellation of GR,
all the follow on documents should be reversed.
1.19.2 Prerequisites
A GR can only be cancelled if:
• Invoice Verification posted if any should be reversed.
1.19.3 Procedure
1. Access the transaction choosing one of the following navigation options:
SAP R/3 menu Logistics Materials Management Inventory Management
Goods Movement Goods Receipt For Purchase Order
PO Number Known
Transaction code MIGO
2. Choose Cancellation and enter the respective Material Document No. (GR No.)
3. Press enter so that all the data will be captured automatically by the system. If any comment is there to mention
it can be mentioned in the Head Text and Text which is available at the Item level.
4. Press Enter to continue and check all the details
5. Select the Check box Item OK, after entering all the data.
You will get Excise Invoice tab at Header Data and Item Details.
6. Choose Check at the top of screen.
7. Press Ctrl+S or to post the document
1.19.4 Result
Material document posted, please note the document number.
1.19.5 Example
Material document 5000000020 posted
1.20 Reversing CENVAT Postings
1.20.1 Purpose
When the Material Document is cancelled the CENVAT Posting should also be reversed or cancelled.
1.20.2 Prerequisites
Material Document (GR) should be reversed.
1.20.3 Procedure
1. Access the transaction choosing one of the following navigation options:
SAP R/3 menu Country India User Menu → Indirect Taxes → Procurement →
Excise Invoice → Incoming Excise Invoice → Central
Processing → Capture / Change / Cancel / Display / Post
Transaction code J1IEX
2. Select Post CENVAT.
3. Select Vendor Excise Invoice.
4. Enter the excise invoice number.
5. Press Enter to continue
6. Choose Simulate CENVAT
7. A dialog box appears, showing which postings the system will make to reverse the CENVAT.
8. Choose Post CENVAT.
1.20.4 Result
CENVAT Posting Reversed.
1.20.5 Example
CENVAT Posting Reversed with document no. 0000000008.
1.21 Canceling Excise Invoices
1.21.1 Purpose
When the Material Document is cancelled the CENVAT Posting should also be reversed or cancelled.
1.21.2 Prerequisites
• Material Document (GR) should be reversed.
• CENVAT Posting should be Reversed.
1.21.3 Procedure
1. Access the transaction choosing one of the following navigation options:
SAP R/3 menu Country India User Menu → Indirect Taxes → Procurement →
Excise Invoice → Incoming Excise Invoice → Central
Processing → Capture / Change / Cancel / Display / Post
Transaction code J1IEX
2. Select Cancel.
3. Select Vendor Excise Invoice.
4. Enter the excise invoice number.
5. Enter the Rejection Code.
6. Save the excise invoice.
Enter the Rejection Code
7. Press Yes to Cancel the Excise Invoice.
1.21.4 Result
Excise Invoice has been successfully cancelled.
1.21.5 Example
Excise Invoice 0000000008 / 2008 ( 1234 ) has been successfully cancelled.
2 Procurement of Imported Materials – Business Process Procedure
2.1 Procurement of Imported Materials
2.1.1 Purpose
This process Procurement of Imported Materials shows you how to handle the Countervailing duty
(CVD) on imports, which is levied in place of excise duty. Unlike other forms of customs duties, such as
basic customs duty or special customs duty, you can credit CVD paid on imports to your CENVAT
account.
Prerequisites
The following scenario specific master data must be created for operation of this building block and
subsequent dependent building blocks.
• Material Master record
(Refer User Manual – Procurement of Stock Materials (Domestic)
• Vendor Master record
Ensure that GR based IV is not selected in Purchasing Data.
(Refer User Manual – Procurement of Stock Materials (Domestic)
• CIN Master Data
(Refer User Manual – Procurement of Stock Materials (Domestic)
2.2 Creating Purchase Order
2.2.1 Use
A purchase order is a legal document used to record an individual purchase with the vendor. It
also provides the vendor with a reference document to link to goods receipt and invoice
verification processes. The purchase order is a commitment to a vendor for a given material, in
a specified quantity at a predetermined price and delivery date.
2.2.2 Prerequisites
Before starting the process, please ensure the following information:
• Commissioner of Customs is created as domestic vendor, for example: vendor code 600000
- RBI Commissioner in this process.
• In master record of main imported vendor GR-based invoice verification tick should not be
there on Purchasing Data screen of vendor master. And Schema group, Vendor is filled
with schema group ZI. For example vendor code 200000 in this process.
• These are basic master data changes with respect to this process only.
For all purchase order a release procedure is applied.
2.2.3 Procedure
5. Access the transaction choosing one of the following navigation options:
SAP R/3 menu Logistics Materials Management Purchasing Purchase
Order Create Vendor/Supplying Plant Known
Transaction code ME21N
6. On the Create Purchase Order screen, make the following entries:
7. For Basic Customs Duty(JCDB),CVD(JCV1),Addition Customs Duty(JADC),E-cess on CVD(JECV)
E-Cess (JEDB)
Don’t Put Tick in GR Based
Mention Tax code as V0
Put Doc Type as Import
Enter the Customs Duties in
respective Condition type fields
.
8. To change the vendor for condition type select JCDB condition type and Choose on Condition detail icon
located at left bottom side of your screen.
9. System will take to new Item – Conditions – Detail: screen. In this screen at right bottom of screen you can find
the vendor code 60000 the main imported vendor is defaulted here. You have to replace this vendor code with
respective vendors and Choose enter and green arrow to come back (F3) to condition tab of purchase order.
Select Each Condition Type related to
Customs and click this Details Button
10. Repeat the same for other condition types such as JCV1, JECV, JADC, and JEDB etc.
11. Purchase Order may be posted by Choosing on the Save icon.
Change DS200 to DS250(appropriate vendor)
for each condition types
2.2.4 Result
A message will be displayed stating that the purchase order was saved, with the purchase order
number, please note the purchase order number.
2.2.5 Example
Standard PO created under the number 3100000000.
2.3 Release Purchase Order
2.3.1 Procedure
1. Access the transaction choosing one of the following navigation options:
SAP R/3 menu Logistics Materials Management Purchasing Purchase
Order Release Individual Release
Transaction code ME29N
Click Other Purchase Order
Enter PO No
Click This Icon to Release PR
Click This Icon to Release
Click This Icon to Save
2.4Message Output
2.4.1 Use
A Purchase Order needs to be printed for transmitting to vendor.
2.4.2 Procedure
8. Access the transaction choosing one of the following navigation options:
SAP R/3 menu Logistics Materials Management Purchasing Purchase
Order Messages Print/Transmit
Transaction code ME9F
9. On the Message Output screen, make the following entries
10. Choose to Execute.
11. On screen Message Output select the appropriate Document number and perform the following:
Choose Output Message and/or
Choose Display Message and/or
Choose Message Detail and/or
Choose Trial Printout.
2.5 CAPTURING BILL OF ENTRY
2.5.1 Use
In this process of Logistics Invoice Verification all the Incoming Invoices are verified in terms of their
content, prices and arithmetic. When the invoice is posted, the invoice data is saved in the system. The
system updates the data saved in the invoice documents in Materials Management and Financial
Accounting.
2.5.2 Procedure
7. Access the transaction choosing one of the following navigation options:
SAP R/3 menu Logistics Materials Management Logistics invoice
Verification Document Entry Enter Invoice
Transaction code MIRO
8. If you are opening for the first time this transaction, system will ask for Company Code, please give 1000 to go
in side the transaction.
9. On the Enter Incoming Invoice: Company Code 1000 screen, make the following entries:
Choose Planned Delivery Costs
Enter the Amounts of the Customs Duties Manually in the Amount Column with referring to PO.
Field name Description R/O/C User action and values Comment
Transaction Invoice R Select Invoice from drop
down list
Header Data Header data of Invoice R Defaulted by system
Basic tab Basic information tab R Select basic information tab
to give initial information
Invoice Date Invoice Date R Enter the Vendor invoice
date
Reference Invoice reference O Enter the vendor invoice
reference
For Example
USERMANUAL
Posting date Posting Date R Enter the posting date of
document
System will give
current date as
default
Amount Invoice Amount R Enter invoice gross amount
including taxes and duties
39.80
Amount
mentioned is
only an example
Currency R Enter the currency in which
the bill is presented by
vendor, if not entered by
user system will default the
document currency from
purchase order
USD
Calculate tax Check box calculate
tax
O Check this tick box, system
will calculate tax amount
Tax code R Select the tax code from
drop down list
V0
Bus.place/se
ctn
Business place or
section code
R Enter section code if Tax
deduction for source is
active for this vendor
Leave blank for
this process
Text Text O Enter text if required for
reference
Payment tab Payment tab R Select payment details tab
BaselineDt Base line date for
payment
R Enter the base line date for
payment
Will be defaulted
if payment terms
entered in PO
Pmnt terms Payment terms O Payment terms of
document, if entered will be
defaulted from purchase
order
Due on Payment due on O Will be calculated by
system
Grayed out
Discount Cash discount O Enter if cash discount is
offered by vendor
Purchase order /
Schedule Agreement
R Select Purchase order /
Schedule Agreement in the
reference document
category from drop down
list
Defaulted for
user
Purchase order
number
R Enter the first purchase
order number generated
above
Planned Delivery
Costs
R Select Planned Delivery
Costs in indicator from
drop down list
Layout Layout of invoice
verification
R Select All information from
drop down list
Choose Enter
10. Choose Enter to complete the document feeding part.
11. To check the document credit and debit is balanced on the top right corner of your screen a traffic light is
displayed. Beside that Balance of the document is displayed.
Ensure that the Balance is ZERO before posting the document and the traffic light is green or yellow color.
12. If you want to see the accounting postings in simulation mode, Choose Simulation on middle of fourth row of
your screen.
13. Choose Display Currency which will lead to small pop-up window having the company code currency and
Document Currency, position the cursor on the INR to convert to Document Currency and press the details
button.
8. Choose Save / Post, for posting the document.
2.5.3 Result
Logistics Invoice verification document is posted.
2.5.4 Example
Document no. 5105600121created
2.6 Goods Receipt for Imported Purchase Order
2.6.1 Use
Goods are received from the Vendor as a result of a Purchase Order at the receiving plant. A goods
movement is entered into the system referencing this PO and a goods receipt material document is
posted. Appropriate general ledger accounts are also posted and stocks are updated.
2.6.2 Procedure
1. Access the transaction choosing one of the following navigation options:
SAP R/3 menu Logistics Materials Management Inventory Management
Goods Movement Goods Receipt For Purchase Order
PO Number Known
Transaction code MIGO
2. On the Goods Receipt Purchase Order screen, make the following entries:
Field name Description R/O/C User action and values Comment
Goods
Receipt
Goods Receipt R Select from drop down list
for action
Inbound
Delivery
Purchase Order R Enter the Purchase Order
No.generated above
3100000000
Movement
Type
101
Enter
Since this is imported purchase order and you have already done invoice verification for
planned delivery cost. System will give a new popup Excise Invoice item number screen (which
is not there in normal other process) asking for Commercial invoice number and year.
Please enter the invoice verification document number which you have done in above 5105600792
and year 2006.
3. Choose Enter where a small pop-up window will prompt to enter the Commercial Invoice No. and Year (i.e.,
the Invoice Verification posted for Bill of Entry)
4. After pressing Enter system will fetch all the data from the Purchase Order as shown below:
Enter the No generated for the posting of Bill of Entry
5. System defaults the balance quantity in Purchase Order.
Whichever material is in Blue those detail will be seen
in the Item detail
Enter the storage
location
Field name Description R/O/C User action and values Comment
Goods
Receipt
Goods Receipt R Select from drop down list
for action
Inbound
Delivery
Purchase Order R input the Purchase Order
number which generated
above
4500000059
Movement
Type
101
Enter
Document
Date
Document Date R Enter document date
Delivery Note in Header O Delivery Number from
Vendor
Vendor Vendor R Defaulted from purchase
order
Grayed out
Posting Date Posting date R Enter posting date
Bill of lading Bill of lading O Enter bill of lading
Select Item Ok and Press Enter and the Excise tab
will appear both in Header and Item Level
Header text Header text O Enter header text
Close Header Detail data to enlarge the Detail data.
Select Material tab at Detailed Data.
Material Material tab R Defaulted from Inbound
Delivery
Grayed out
Select Quantity tab in Detail data.
Qty in unit of
entry
Quantity in unit of
entry
R Enter the quantity you have
received from vendor. As a
default system will give
purchase order quantity
Quantity
defaulted from
Purchase Order
Qty in
delivery note
Quantity in delivery
note
O Enter the quantity as per
vendor delivery challan
Select Where tab in Detail data.
Movement
type
Movement type R Defaulted from header
screen
Stock type Stock type R Defaulted from material
master or purchase order
Plant Plant R Defaulted from purchase
order
1000
Storage
location
Storage location R Defaulted from Inbound
delivery if entered
1010
Goods
Recipient
Goods Recipient O Enter the name of person
who received goods
Unloading
point
Unloading point O
Text Text O Enter the text if required
Select Purchase Order tab in Detail data.
Purchase
Order
Purchase Order R Defaulted from header data Grayed out
Del.
completed
ind.
Delivery completion
indicator
O Defaulted by system if PO
Qty = GR Qty
Select Partner tab in Detail data.
Vendor Vendor name O Grayed out
For this material batch management is not active. Just for reference purpose the following
data is given.
Select Batch tab in Detail data.
This tab will come only if material is managed in batches.
Proceed with the following steps if material is batch managed only.
Batch Batch number R Enter batch number as date
for batch managed
materials
Vendor batch Vendor batch O Enter vendor batch number
for reference
7. Select the Check box Item OK, after entering all the data.
You will get Excise Invoice tab at Header Data for capturing vendor excise invoice details and for posting
Part I and Part II.
8. On the Excise Invoice tab at Header Data make the following entries.
Field name Description R/O/C User action and values Comment
Capture &
Post Excise
invoice
Capture & Post Excise
Invoice on Excise
Action
R Choose Capture & Post
Excise Invoice from drop
down list
Defaulted
Excise Group Excise Group R Defaulted by the system
Excise
Invoice
Excise invoice R Enter the vendor Excise
Invoice number
For example:
4500000059
Excise Inv.
Date
Excise Invoice Date R Enter the excise invoice
date of vendor
BED Basic Excise Duty R Defaulted from purchase
order
Grayed out
AED Additional Excise Duty R Defaulted form purchase
order
Grayed out
SED Special Excise Duty R Defaulted from purchase
order
Grayed out
NCCD NCCD R Defaulted from purchase
order
Grayed out
ECS Education Cess R Defaulted from purchase
order
Grayed out
Close Header Detail data to enlarge the Detail data.
Select Excise Item tab at Detailed Data (at the last).
Chapter ID Chapter ID of material R Defaulted by the system
No action required
EI Quantity Excise Invoice
Quantity
R Defaulted by the system
from Goods Receipt
quantity
Base Value Base value of material R Defaulted by the system
BED Basic Excise Duty R Defaulted by the system
AED Additional Excise Duty O Defaulted by the system
NCCD NCCD O Defaulted by the system
SED Special Excise Duty O Defaulted by the system
ECS Education Cess O Defaulted by the system
Please cross check the BED, ECS (CVD in this case) amount of item as per the bill of lading,
legally you can not avail more than what mentioned in Vendor Excise Invoice.
In case of imported purchase order in normal case system will default CVD and ECess (invoice
verification made on commissioner of customs) amount as BED and ECS i.e. CENVAT amount.
12. Choose Check at the top of screen.
13. Choose Post to post the document.
2.6.3 Result
Material document posted.
2.6.4 Example
Material document 5000000021 posted
You can see account posting here
2.7 Logistics Invoice Verification for the Materials
2.7.1 Use
In this process of Logistics Invoice Verification all the Incoming Invoices are verified in terms of their
content, prices and arithmetic. When the invoice is posted, the invoice data is saved in the system. The
system updates the data saved in the invoice documents in Materials Management and Financial
Accounting.
2.7.2 Procedure
1. Access the transaction choosing one of the following navigation options:
SAP R/3 menu Logistics Materials Management Logistics invoice
Verification Document Entry Enter Invoice
Transaction code MIRO
2. If you are opening for the first time this transaction, system will ask for Company Code, please give 1000 to go
in side the transaction.
3. On the Enter Incoming Invoice: Company Code 1000 screen, make the following entries:
Field name Description R/O/C User action and values Comment
Transaction Invoice R Select Invoice from drop
down list
Header Data Header data of Invoice R Defaulted by system
Basic tab Basic information tab R Select basic information tab
to give initial information
Invoice Date Invoice Date R Enter the Vendor invoice
date
Reference Invoice reference O Enter the vendor invoice
reference
For Example
1000
Posting date Posting Date R Enter the posting date of
document
System will give
current date as
default
Amount Invoice Amount R Enter invoice gross amount Amount
Select Goods
/Service Items
including taxes and duties
100
mentioned is
only an example
Currency R Enter the currency in which
the bill is presented by
vendor, if not entered by
user system will default the
document currency from
purchase order
USD
Calculate tax Check box calculate
tax
O Check this tick box, system
will calculate tax amount
Tax code R Select the tax code from
drop down list
V0
Bus.place/se
ctn
Business place or
section code
R Enter section code if Tax
deduction for source is
active for this vendor
Leave blank for
this process
Text Text O Enter text if required for
reference
Payment tab Payment tab R Select payment details tab
BaselineDt Base line date for
payment
R Enter the base line date for
payment
Will be defaulted
if payment terms
entered in PO
Pmnt terms Payment terms O Payment terms of
document, if entered will be
defaulted from purchase
order
Due on Payment due on O Will be calculated by
system
Grayed out
Discount Cash discount O Enter if cash discount is
offered by vendor
Hide Header data for getting full screen of items if required.
Purchase order /
Schedule Agreement
R Select Purchase order /
Schedule Agreement in the
reference document
category from drop down
list
Defaulted for
user
Purchase order
number
R Enter the first purchase
order number generated
above
Goods / service items R Select Goods / Service
items in indicator from drop
down list
Defaulted
Layout Layout of invoice
verification
R Select All information from
drop down list
Choose Enter
4. Choose Enter to complete the document feeding part.
5. To check the document credit and debit is balanced on the top right corner of your screen a traffic light is
displayed. Beside that Balance of the document is displayed.
Ensure that the Balance is ZERO before posting the document and the traffic light is green or yellow color.
6. If you want to see the accounting postings in simulation mode, Choose Simulation on middle of fourth row of
your screen.
Choose Display Currency to change in INR
7. Choose Display Currency which will lead to small pop-up window having the company code currency and
Document Currency, position the cursor on the INR to convert to Document Currency and press the details
button.
9. Choose Save / Post, for posting the document.
2.7.3 Result
Logistics Invoice verification document is posted.
2.7.4 Example
Document no. 5105600122 created
3 Procurement of Subcontracting Materials – Business Process Procedure
3.1Procurement of Subcontracting Materials
3.1.1 Purpose
In Indian subcontracting process when you issue materials to a subcontractor, you need to keep
track of what materials you have issued and when they have to be returned by subcontractor. The
reason for this close monitoring has to do with Indian tax law. Under excise law 57AC, when you
send materials to a subcontractor for processing, you are not required to pay any excise duty, even
though the materials have left your premises. However, if the materials have not been returned to
you within 180 days specified by the law, you will have to reverse any excise credit that you posted
when you have purchased the materials. When you send material out of your factory premises you
need to send with 57F4 Challan. In this process you are going to do the same.
3.1.2 Prerequisites
The following scenario specific master data must be created for operation of this building block and
subsequent dependent building blocks.
• Material Master record (Refer User Manual – Procurement of Stock Materials (Domestic))
• Vendor Master record (Refer User Manual – Procurement of Stock Materials (Domestic))
• Purchasing Info Record (Optional)
Ensure that Sub-Contracting as Info Category.
(Refer User Manual – Procurement of Stock Materials (Domestic))
• CIN Master Data (Refer User Manual – Procurement of Stock Materials (Domestic))
o Chapter IDs
o Material ID and chapter ID combination (Ensure Sub-Contract check box is selected for
the Materials that provided to vendor)
o CENVAT Determination
o Vendor Excise Details
o Excise Indicator for Plants
o Excise Indicator for Plant and Vendor
o Excise Tax Rates
3.2Creation of Subcontracting Purchase Order
3.2.1 Use
A purchase order is a legal document used to record an individual purchase with the vendor. It also
provides the vendor with a reference document to link to goods receipt and invoice verification
processes. The purchase order is a commitment to a vendor for a given subcontracting activity, in a
specified quantity at a predetermined price and delivery date.
3.2.2 Prerequisites
Components stock should be available for providing to subcontracting vendor.
3.2.3 Procedure
1. Access the transaction choosing one of the following navigation options:
SAP R/3 menu Logistics Materials Management Purchasing Purchase
Order Create Vendor/Supplying Plant Known
Transaction code ME21N
2. On the Create Purchase Order screen, make the following entries:
Select ZSC Document Type for
Subcontracting Order
Materials Management User Manual

Contenu connexe

Tendances

SAP STO config
SAP STO configSAP STO config
SAP STO configsamitchak
 
SAP Account determination MM-FI by Odaiah Pelley - 1
SAP Account determination MM-FI by Odaiah Pelley - 1SAP Account determination MM-FI by Odaiah Pelley - 1
SAP Account determination MM-FI by Odaiah Pelley - 1Intelligroup, Inc.
 
Accounting entries in sap
Accounting entries in sapAccounting entries in sap
Accounting entries in sapRajeev Kumar
 
Master data
Master dataMaster data
Master datababloo6
 
Sap mrp-configuration-pp
Sap mrp-configuration-ppSap mrp-configuration-pp
Sap mrp-configuration-ppLokesh Modem
 
201124772 sap-pp-pi-process-flow-docs
201124772 sap-pp-pi-process-flow-docs201124772 sap-pp-pi-process-flow-docs
201124772 sap-pp-pi-process-flow-docsAbhishek Sarkar
 
Sap mm configuration document ramesh kamishetty
Sap mm  configuration document ramesh kamishettySap mm  configuration document ramesh kamishetty
Sap mm configuration document ramesh kamishettyRamesh Kamishetty
 
Account Assignment Category
Account Assignment CategoryAccount Assignment Category
Account Assignment CategoryRameswara Vedula
 
S4 HANA New GL Configuration
S4 HANA New GL Configuration S4 HANA New GL Configuration
S4 HANA New GL Configuration Pradeep Hota
 
Sap sd-user-manual
Sap sd-user-manualSap sd-user-manual
Sap sd-user-manualamruta kumar
 
Stock transfer using stock transport order
Stock transfer using stock transport orderStock transfer using stock transport order
Stock transfer using stock transport orderSanthana Kishore
 
Material master views
Material master viewsMaterial master views
Material master viewsLokesh Modem
 
SAP MM Configuration - Real Project Documentation
SAP MM Configuration - Real Project DocumentationSAP MM Configuration - Real Project Documentation
SAP MM Configuration - Real Project Documentationsapdocs. info
 

Tendances (20)

SAP – Non Stock Materials (NLAG)
SAP – Non Stock Materials (NLAG)SAP – Non Stock Materials (NLAG)
SAP – Non Stock Materials (NLAG)
 
SAP STO config
SAP STO configSAP STO config
SAP STO config
 
SAP Account determination MM-FI by Odaiah Pelley - 1
SAP Account determination MM-FI by Odaiah Pelley - 1SAP Account determination MM-FI by Odaiah Pelley - 1
SAP Account determination MM-FI by Odaiah Pelley - 1
 
SAP Material master general document
SAP Material master   general documentSAP Material master   general document
SAP Material master general document
 
MRP Live on S/4 HANA
MRP Live on S/4 HANAMRP Live on S/4 HANA
MRP Live on S/4 HANA
 
Accounting entries in sap
Accounting entries in sapAccounting entries in sap
Accounting entries in sap
 
Master data
Master dataMaster data
Master data
 
Sap mrp-configuration-pp
Sap mrp-configuration-ppSap mrp-configuration-pp
Sap mrp-configuration-pp
 
201124772 sap-pp-pi-process-flow-docs
201124772 sap-pp-pi-process-flow-docs201124772 sap-pp-pi-process-flow-docs
201124772 sap-pp-pi-process-flow-docs
 
Sap mm configuration document ramesh kamishetty
Sap mm  configuration document ramesh kamishettySap mm  configuration document ramesh kamishetty
Sap mm configuration document ramesh kamishetty
 
Account Assignment Category
Account Assignment CategoryAccount Assignment Category
Account Assignment Category
 
Sap configuration-guide
Sap configuration-guideSap configuration-guide
Sap configuration-guide
 
S4 HANA New GL Configuration
S4 HANA New GL Configuration S4 HANA New GL Configuration
S4 HANA New GL Configuration
 
Sap sd-user-manual
Sap sd-user-manualSap sd-user-manual
Sap sd-user-manual
 
Stock transfer using stock transport order
Stock transfer using stock transport orderStock transfer using stock transport order
Stock transfer using stock transport order
 
Material master views
Material master viewsMaterial master views
Material master views
 
Mm module sap
Mm module sapMm module sap
Mm module sap
 
Output determination
Output determinationOutput determination
Output determination
 
Valuation & Split valuation in MM
Valuation & Split valuation in MMValuation & Split valuation in MM
Valuation & Split valuation in MM
 
SAP MM Configuration - Real Project Documentation
SAP MM Configuration - Real Project DocumentationSAP MM Configuration - Real Project Documentation
SAP MM Configuration - Real Project Documentation
 

En vedette

Su01 parameters fico_guntupalliharikrishna
Su01 parameters fico_guntupalliharikrishna Su01 parameters fico_guntupalliharikrishna
Su01 parameters fico_guntupalliharikrishna Hari Krishna
 
Creating SOA with Oracle Fusion Middleware 11g
Creating SOA with Oracle Fusion Middleware 11gCreating SOA with Oracle Fusion Middleware 11g
Creating SOA with Oracle Fusion Middleware 11gLonneke Dikmans
 
Lease assets by guntupalliharikrishna
Lease assets by guntupalliharikrishnaLease assets by guntupalliharikrishna
Lease assets by guntupalliharikrishnaHari Krishna
 
Fico interview questions and answers
Fico interview questions and answersFico interview questions and answers
Fico interview questions and answersProcessweaver Hr
 
Presenting SAP Fixed Assets Capitalization Best Practices
Presenting SAP Fixed Assets Capitalization Best PracticesPresenting SAP Fixed Assets Capitalization Best Practices
Presenting SAP Fixed Assets Capitalization Best Practiceswww.bettisworthassociates.com
 
Internal Orders Detailed config
Internal Orders Detailed configInternal Orders Detailed config
Internal Orders Detailed configImran M Arab
 
Financial and management accounting notes @ mba bk
Financial and management accounting notes @ mba bkFinancial and management accounting notes @ mba bk
Financial and management accounting notes @ mba bkBabasab Patil
 
Unit 4 international business 6th semester bbm notes pdf
Unit 4   international business 6th semester bbm notes pdfUnit 4   international business 6th semester bbm notes pdf
Unit 4 international business 6th semester bbm notes pdfIndependent
 
SAP Simple Finance Training
SAP Simple Finance TrainingSAP Simple Finance Training
SAP Simple Finance TrainingVenkat reddy
 
BI-population CMA-ES Algorithms with Surrogate Models and Line Searches
BI-population CMA-ES Algorithms with Surrogate Models and Line SearchesBI-population CMA-ES Algorithms with Surrogate Models and Line Searches
BI-population CMA-ES Algorithms with Surrogate Models and Line SearchesIlya Loshchilov
 
دورة مكافحة غسل الأموال وتمويل الإرهاب
دورة مكافحة غسل الأموال وتمويل الإرهابدورة مكافحة غسل الأموال وتمويل الإرهاب
دورة مكافحة غسل الأموال وتمويل الإرهابManagerial & Financial Training Centre
 
International Financial Managemnet
International Financial ManagemnetInternational Financial Managemnet
International Financial ManagemnetAugustin Bangalore
 
Solution Architecture And User And Customer Experience
Solution Architecture And User And Customer ExperienceSolution Architecture And User And Customer Experience
Solution Architecture And User And Customer ExperienceAlan McSweeney
 
JavaOne 2016 short highlights
JavaOne 2016 short highlightsJavaOne 2016 short highlights
JavaOne 2016 short highlightsArto Santala
 
Presenting Closing The Year with SAP's Project System & Investment Management
Presenting Closing The Year with SAP's Project System & Investment ManagementPresenting Closing The Year with SAP's Project System & Investment Management
Presenting Closing The Year with SAP's Project System & Investment Managementwww.bettisworthassociates.com
 

En vedette (20)

Su01 parameters fico_guntupalliharikrishna
Su01 parameters fico_guntupalliharikrishna Su01 parameters fico_guntupalliharikrishna
Su01 parameters fico_guntupalliharikrishna
 
SAP MM CIN Document by Debajyoti Das
SAP MM CIN Document by Debajyoti DasSAP MM CIN Document by Debajyoti Das
SAP MM CIN Document by Debajyoti Das
 
Creating SOA with Oracle Fusion Middleware 11g
Creating SOA with Oracle Fusion Middleware 11gCreating SOA with Oracle Fusion Middleware 11g
Creating SOA with Oracle Fusion Middleware 11g
 
Lease assets by guntupalliharikrishna
Lease assets by guntupalliharikrishnaLease assets by guntupalliharikrishna
Lease assets by guntupalliharikrishna
 
Manufacturer under GST Law
Manufacturer under GST LawManufacturer under GST Law
Manufacturer under GST Law
 
Fico interview questions and answers
Fico interview questions and answersFico interview questions and answers
Fico interview questions and answers
 
Presenting SAP Fixed Assets Capitalization Best Practices
Presenting SAP Fixed Assets Capitalization Best PracticesPresenting SAP Fixed Assets Capitalization Best Practices
Presenting SAP Fixed Assets Capitalization Best Practices
 
Supply chain
Supply chain Supply chain
Supply chain
 
Internal Orders Detailed config
Internal Orders Detailed configInternal Orders Detailed config
Internal Orders Detailed config
 
Financial and management accounting notes @ mba bk
Financial and management accounting notes @ mba bkFinancial and management accounting notes @ mba bk
Financial and management accounting notes @ mba bk
 
Unit 4 international business 6th semester bbm notes pdf
Unit 4   international business 6th semester bbm notes pdfUnit 4   international business 6th semester bbm notes pdf
Unit 4 international business 6th semester bbm notes pdf
 
CMA Part 1
CMA Part 1CMA Part 1
CMA Part 1
 
SAP Simple Finance Training
SAP Simple Finance TrainingSAP Simple Finance Training
SAP Simple Finance Training
 
BI-population CMA-ES Algorithms with Surrogate Models and Line Searches
BI-population CMA-ES Algorithms with Surrogate Models and Line SearchesBI-population CMA-ES Algorithms with Surrogate Models and Line Searches
BI-population CMA-ES Algorithms with Surrogate Models and Line Searches
 
دورة مكافحة غسل الأموال وتمويل الإرهاب
دورة مكافحة غسل الأموال وتمويل الإرهابدورة مكافحة غسل الأموال وتمويل الإرهاب
دورة مكافحة غسل الأموال وتمويل الإرهاب
 
International Financial Managemnet
International Financial ManagemnetInternational Financial Managemnet
International Financial Managemnet
 
SAP END USER TRAINING MM01& ME51 N
SAP END USER TRAINING   MM01&  ME51 NSAP END USER TRAINING   MM01&  ME51 N
SAP END USER TRAINING MM01& ME51 N
 
Solution Architecture And User And Customer Experience
Solution Architecture And User And Customer ExperienceSolution Architecture And User And Customer Experience
Solution Architecture And User And Customer Experience
 
JavaOne 2016 short highlights
JavaOne 2016 short highlightsJavaOne 2016 short highlights
JavaOne 2016 short highlights
 
Presenting Closing The Year with SAP's Project System & Investment Management
Presenting Closing The Year with SAP's Project System & Investment ManagementPresenting Closing The Year with SAP's Project System & Investment Management
Presenting Closing The Year with SAP's Project System & Investment Management
 

Similaire à Materials Management User Manual

Exercises C Fill In The Blank (In Pairs)
Exercises C Fill In The Blank (In Pairs)Exercises C Fill In The Blank (In Pairs)
Exercises C Fill In The Blank (In Pairs)EMBS2007
 
2013 academy chemical managemenet - march 13 handouts
2013 academy   chemical managemenet - march 13 handouts2013 academy   chemical managemenet - march 13 handouts
2013 academy chemical managemenet - march 13 handoutsdjscungi
 
Contoh format penulisan_portfolio_perkhemahan_i
Contoh format penulisan_portfolio_perkhemahan_iContoh format penulisan_portfolio_perkhemahan_i
Contoh format penulisan_portfolio_perkhemahan_iAisyalaila
 
Product work log template 2011 12
Product work log template 2011 12Product work log template 2011 12
Product work log template 2011 12JalenCamp
 
src
srcsrc
srcCCSE
 
Pauta de trabajos orales actualizado 2011
Pauta de trabajos orales actualizado 2011Pauta de trabajos orales actualizado 2011
Pauta de trabajos orales actualizado 2011Lukas Gallardo
 
Topic 4 Chapter 12.pdf
Topic 4 Chapter 12.pdfTopic 4 Chapter 12.pdf
Topic 4 Chapter 12.pdfJuanmaAlvarez2
 
26 Lab #1 Performing Reconnaissance and Probing Using Comm.docx
26  Lab #1 Performing Reconnaissance and Probing Using Comm.docx26  Lab #1 Performing Reconnaissance and Probing Using Comm.docx
26 Lab #1 Performing Reconnaissance and Probing Using Comm.docxtamicawaysmith
 
Portifólio
PortifólioPortifólio
PortifólioAadias
 
job analysis questionnaire
job analysis questionnairejob analysis questionnaire
job analysis questionnaireHarve Abella
 
Project plan template.pdf
Project plan template.pdfProject plan template.pdf
Project plan template.pdfainlac
 
IBDP Science Internal Investigation Proposal and Planning form
IBDP Science Internal Investigation Proposal and Planning formIBDP Science Internal Investigation Proposal and Planning form
IBDP Science Internal Investigation Proposal and Planning formSteven Gaynor
 
Data Collection & Analysis Plan Template for Measuring ROI
Data Collection & Analysis Plan Template for Measuring ROIData Collection & Analysis Plan Template for Measuring ROI
Data Collection & Analysis Plan Template for Measuring ROIShyam Sunder
 
Executive director performance_appraisal
Executive director performance_appraisalExecutive director performance_appraisal
Executive director performance_appraisalsaeed rasool
 
Template jc practical brief
Template jc practical briefTemplate jc practical brief
Template jc practical briefsiobhanpdst
 
Designing training for circulation student workers
Designing training for circulation student workersDesigning training for circulation student workers
Designing training for circulation student workersAndrea Boehme
 
Estructura preparacion de clase
Estructura preparacion de claseEstructura preparacion de clase
Estructura preparacion de claseJorge Vera
 

Similaire à Materials Management User Manual (20)

Change Control Form
Change Control FormChange Control Form
Change Control Form
 
Exercises C Fill In The Blank (In Pairs)
Exercises C Fill In The Blank (In Pairs)Exercises C Fill In The Blank (In Pairs)
Exercises C Fill In The Blank (In Pairs)
 
2013 academy chemical managemenet - march 13 handouts
2013 academy   chemical managemenet - march 13 handouts2013 academy   chemical managemenet - march 13 handouts
2013 academy chemical managemenet - march 13 handouts
 
Contoh format penulisan_portfolio_perkhemahan_i
Contoh format penulisan_portfolio_perkhemahan_iContoh format penulisan_portfolio_perkhemahan_i
Contoh format penulisan_portfolio_perkhemahan_i
 
Product work log template 2011 12
Product work log template 2011 12Product work log template 2011 12
Product work log template 2011 12
 
src
srcsrc
src
 
Pauta de trabajos orales actualizado 2011
Pauta de trabajos orales actualizado 2011Pauta de trabajos orales actualizado 2011
Pauta de trabajos orales actualizado 2011
 
English project
English projectEnglish project
English project
 
Topic 4 Chapter 12.pdf
Topic 4 Chapter 12.pdfTopic 4 Chapter 12.pdf
Topic 4 Chapter 12.pdf
 
26 Lab #1 Performing Reconnaissance and Probing Using Comm.docx
26  Lab #1 Performing Reconnaissance and Probing Using Comm.docx26  Lab #1 Performing Reconnaissance and Probing Using Comm.docx
26 Lab #1 Performing Reconnaissance and Probing Using Comm.docx
 
Portifólio
PortifólioPortifólio
Portifólio
 
job analysis questionnaire
job analysis questionnairejob analysis questionnaire
job analysis questionnaire
 
Project plan template.pdf
Project plan template.pdfProject plan template.pdf
Project plan template.pdf
 
IBDP Science Internal Investigation Proposal and Planning form
IBDP Science Internal Investigation Proposal and Planning formIBDP Science Internal Investigation Proposal and Planning form
IBDP Science Internal Investigation Proposal and Planning form
 
Data Collection & Analysis Plan Template for Measuring ROI
Data Collection & Analysis Plan Template for Measuring ROIData Collection & Analysis Plan Template for Measuring ROI
Data Collection & Analysis Plan Template for Measuring ROI
 
Executive director performance_appraisal
Executive director performance_appraisalExecutive director performance_appraisal
Executive director performance_appraisal
 
Template jc practical brief
Template jc practical briefTemplate jc practical brief
Template jc practical brief
 
Designing training for circulation student workers
Designing training for circulation student workersDesigning training for circulation student workers
Designing training for circulation student workers
 
Ch8 outline
Ch8 outlineCh8 outline
Ch8 outline
 
Estructura preparacion de clase
Estructura preparacion de claseEstructura preparacion de clase
Estructura preparacion de clase
 

Dernier

Choosing the Right CBSE School A Comprehensive Guide for Parents
Choosing the Right CBSE School A Comprehensive Guide for ParentsChoosing the Right CBSE School A Comprehensive Guide for Parents
Choosing the Right CBSE School A Comprehensive Guide for Parentsnavabharathschool99
 
Procuring digital preservation CAN be quick and painless with our new dynamic...
Procuring digital preservation CAN be quick and painless with our new dynamic...Procuring digital preservation CAN be quick and painless with our new dynamic...
Procuring digital preservation CAN be quick and painless with our new dynamic...Jisc
 
ISYU TUNGKOL SA SEKSWLADIDA (ISSUE ABOUT SEXUALITY
ISYU TUNGKOL SA SEKSWLADIDA (ISSUE ABOUT SEXUALITYISYU TUNGKOL SA SEKSWLADIDA (ISSUE ABOUT SEXUALITY
ISYU TUNGKOL SA SEKSWLADIDA (ISSUE ABOUT SEXUALITYKayeClaireEstoconing
 
Earth Day Presentation wow hello nice great
Earth Day Presentation wow hello nice greatEarth Day Presentation wow hello nice great
Earth Day Presentation wow hello nice greatYousafMalik24
 
Visit to a blind student's school🧑‍🦯🧑‍🦯(community medicine)
Visit to a blind student's school🧑‍🦯🧑‍🦯(community medicine)Visit to a blind student's school🧑‍🦯🧑‍🦯(community medicine)
Visit to a blind student's school🧑‍🦯🧑‍🦯(community medicine)lakshayb543
 
4.18.24 Movement Legacies, Reflection, and Review.pptx
4.18.24 Movement Legacies, Reflection, and Review.pptx4.18.24 Movement Legacies, Reflection, and Review.pptx
4.18.24 Movement Legacies, Reflection, and Review.pptxmary850239
 
Roles & Responsibilities in Pharmacovigilance
Roles & Responsibilities in PharmacovigilanceRoles & Responsibilities in Pharmacovigilance
Roles & Responsibilities in PharmacovigilanceSamikshaHamane
 
What is Model Inheritance in Odoo 17 ERP
What is Model Inheritance in Odoo 17 ERPWhat is Model Inheritance in Odoo 17 ERP
What is Model Inheritance in Odoo 17 ERPCeline George
 
ENGLISH 7_Q4_LESSON 2_ Employing a Variety of Strategies for Effective Interp...
ENGLISH 7_Q4_LESSON 2_ Employing a Variety of Strategies for Effective Interp...ENGLISH 7_Q4_LESSON 2_ Employing a Variety of Strategies for Effective Interp...
ENGLISH 7_Q4_LESSON 2_ Employing a Variety of Strategies for Effective Interp...JhezDiaz1
 
Inclusivity Essentials_ Creating Accessible Websites for Nonprofits .pdf
Inclusivity Essentials_ Creating Accessible Websites for Nonprofits .pdfInclusivity Essentials_ Creating Accessible Websites for Nonprofits .pdf
Inclusivity Essentials_ Creating Accessible Websites for Nonprofits .pdfTechSoup
 
ECONOMIC CONTEXT - LONG FORM TV DRAMA - PPT
ECONOMIC CONTEXT - LONG FORM TV DRAMA - PPTECONOMIC CONTEXT - LONG FORM TV DRAMA - PPT
ECONOMIC CONTEXT - LONG FORM TV DRAMA - PPTiammrhaywood
 
Judging the Relevance and worth of ideas part 2.pptx
Judging the Relevance  and worth of ideas part 2.pptxJudging the Relevance  and worth of ideas part 2.pptx
Judging the Relevance and worth of ideas part 2.pptxSherlyMaeNeri
 
Proudly South Africa powerpoint Thorisha.pptx
Proudly South Africa powerpoint Thorisha.pptxProudly South Africa powerpoint Thorisha.pptx
Proudly South Africa powerpoint Thorisha.pptxthorishapillay1
 
ANG SEKTOR NG agrikultura.pptx QUARTER 4
ANG SEKTOR NG agrikultura.pptx QUARTER 4ANG SEKTOR NG agrikultura.pptx QUARTER 4
ANG SEKTOR NG agrikultura.pptx QUARTER 4MiaBumagat1
 
Influencing policy (training slides from Fast Track Impact)
Influencing policy (training slides from Fast Track Impact)Influencing policy (training slides from Fast Track Impact)
Influencing policy (training slides from Fast Track Impact)Mark Reed
 

Dernier (20)

FINALS_OF_LEFT_ON_C'N_EL_DORADO_2024.pptx
FINALS_OF_LEFT_ON_C'N_EL_DORADO_2024.pptxFINALS_OF_LEFT_ON_C'N_EL_DORADO_2024.pptx
FINALS_OF_LEFT_ON_C'N_EL_DORADO_2024.pptx
 
Choosing the Right CBSE School A Comprehensive Guide for Parents
Choosing the Right CBSE School A Comprehensive Guide for ParentsChoosing the Right CBSE School A Comprehensive Guide for Parents
Choosing the Right CBSE School A Comprehensive Guide for Parents
 
YOUVE GOT EMAIL_FINALS_EL_DORADO_2024.pptx
YOUVE GOT EMAIL_FINALS_EL_DORADO_2024.pptxYOUVE GOT EMAIL_FINALS_EL_DORADO_2024.pptx
YOUVE GOT EMAIL_FINALS_EL_DORADO_2024.pptx
 
Procuring digital preservation CAN be quick and painless with our new dynamic...
Procuring digital preservation CAN be quick and painless with our new dynamic...Procuring digital preservation CAN be quick and painless with our new dynamic...
Procuring digital preservation CAN be quick and painless with our new dynamic...
 
ISYU TUNGKOL SA SEKSWLADIDA (ISSUE ABOUT SEXUALITY
ISYU TUNGKOL SA SEKSWLADIDA (ISSUE ABOUT SEXUALITYISYU TUNGKOL SA SEKSWLADIDA (ISSUE ABOUT SEXUALITY
ISYU TUNGKOL SA SEKSWLADIDA (ISSUE ABOUT SEXUALITY
 
Earth Day Presentation wow hello nice great
Earth Day Presentation wow hello nice greatEarth Day Presentation wow hello nice great
Earth Day Presentation wow hello nice great
 
Model Call Girl in Tilak Nagar Delhi reach out to us at 🔝9953056974🔝
Model Call Girl in Tilak Nagar Delhi reach out to us at 🔝9953056974🔝Model Call Girl in Tilak Nagar Delhi reach out to us at 🔝9953056974🔝
Model Call Girl in Tilak Nagar Delhi reach out to us at 🔝9953056974🔝
 
Visit to a blind student's school🧑‍🦯🧑‍🦯(community medicine)
Visit to a blind student's school🧑‍🦯🧑‍🦯(community medicine)Visit to a blind student's school🧑‍🦯🧑‍🦯(community medicine)
Visit to a blind student's school🧑‍🦯🧑‍🦯(community medicine)
 
4.18.24 Movement Legacies, Reflection, and Review.pptx
4.18.24 Movement Legacies, Reflection, and Review.pptx4.18.24 Movement Legacies, Reflection, and Review.pptx
4.18.24 Movement Legacies, Reflection, and Review.pptx
 
Roles & Responsibilities in Pharmacovigilance
Roles & Responsibilities in PharmacovigilanceRoles & Responsibilities in Pharmacovigilance
Roles & Responsibilities in Pharmacovigilance
 
What is Model Inheritance in Odoo 17 ERP
What is Model Inheritance in Odoo 17 ERPWhat is Model Inheritance in Odoo 17 ERP
What is Model Inheritance in Odoo 17 ERP
 
ENGLISH 7_Q4_LESSON 2_ Employing a Variety of Strategies for Effective Interp...
ENGLISH 7_Q4_LESSON 2_ Employing a Variety of Strategies for Effective Interp...ENGLISH 7_Q4_LESSON 2_ Employing a Variety of Strategies for Effective Interp...
ENGLISH 7_Q4_LESSON 2_ Employing a Variety of Strategies for Effective Interp...
 
Inclusivity Essentials_ Creating Accessible Websites for Nonprofits .pdf
Inclusivity Essentials_ Creating Accessible Websites for Nonprofits .pdfInclusivity Essentials_ Creating Accessible Websites for Nonprofits .pdf
Inclusivity Essentials_ Creating Accessible Websites for Nonprofits .pdf
 
ECONOMIC CONTEXT - LONG FORM TV DRAMA - PPT
ECONOMIC CONTEXT - LONG FORM TV DRAMA - PPTECONOMIC CONTEXT - LONG FORM TV DRAMA - PPT
ECONOMIC CONTEXT - LONG FORM TV DRAMA - PPT
 
Judging the Relevance and worth of ideas part 2.pptx
Judging the Relevance  and worth of ideas part 2.pptxJudging the Relevance  and worth of ideas part 2.pptx
Judging the Relevance and worth of ideas part 2.pptx
 
Proudly South Africa powerpoint Thorisha.pptx
Proudly South Africa powerpoint Thorisha.pptxProudly South Africa powerpoint Thorisha.pptx
Proudly South Africa powerpoint Thorisha.pptx
 
ANG SEKTOR NG agrikultura.pptx QUARTER 4
ANG SEKTOR NG agrikultura.pptx QUARTER 4ANG SEKTOR NG agrikultura.pptx QUARTER 4
ANG SEKTOR NG agrikultura.pptx QUARTER 4
 
YOUVE_GOT_EMAIL_PRELIMS_EL_DORADO_2024.pptx
YOUVE_GOT_EMAIL_PRELIMS_EL_DORADO_2024.pptxYOUVE_GOT_EMAIL_PRELIMS_EL_DORADO_2024.pptx
YOUVE_GOT_EMAIL_PRELIMS_EL_DORADO_2024.pptx
 
Influencing policy (training slides from Fast Track Impact)
Influencing policy (training slides from Fast Track Impact)Influencing policy (training slides from Fast Track Impact)
Influencing policy (training slides from Fast Track Impact)
 
Raw materials used in Herbal Cosmetics.pptx
Raw materials used in Herbal Cosmetics.pptxRaw materials used in Herbal Cosmetics.pptx
Raw materials used in Herbal Cosmetics.pptx
 

Materials Management User Manual

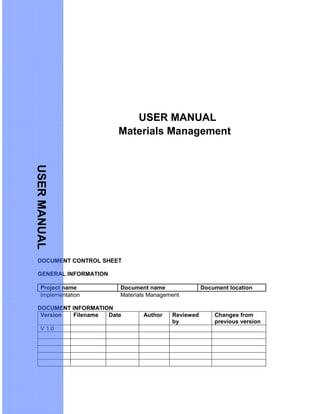
  • 1. USER MANUAL Materials Management DOCUMENT CONTROL SHEET GENERAL INFORMATION Project name Document name Document location Implementation Materials Management DOCUMENT INFORMATION Version Filename Date Author Reviewed by Changes from previous version V 1.0 USERMANUAL
  • 2.
  • 3. USER PROCEDURE MANUAL TABLE OF CONTENTS Error! Bookmark not defined. 1 Procurement of Stock Materials_____________________________________________________ 10 1.1 Procurement of Stock Materials – Raw Material Local / Return__________10 1.1.1 Purpose ________________________________________________________________________ 10 1.1.2 Prerequisites ____________________________________________________________________ 10 1.1.3 Material Master Record ____________________________________________________________ 10 1.1.4 Vendor Master Record ____________________________________________________________ 24 1.1.5 Purchasing Info Record____________________________________________________________ 34 1.1.6 Source List______________________________________________________________________ 41 1.1.7 CIN Master Data _________________________________________________________________ 43 1.1.8 Excise Condition Record___________________________________________________________ 52 1.2 Request for Quotation (RFQ)______________________________________55 1.2.1 Use ___________________________________________________________________________ 56 1.2.2 Procedure ______________________________________________________________________ 56 1.2.3 Result _________________________________________________________________________ 61 1.2.4 Example________________________________________________________________________ 61 1.3 Message output: RFQ____________________________________________61 1.3.1 Use ___________________________________________________________________________ 61 1.3.2 Procedure ______________________________________________________________________ 61 1.4 Maintaining Quotation ___________________________________________64 1.4.1 Use ___________________________________________________________________________ 64 1.4.2 Procedure ______________________________________________________________________ 64 1.4.3 Result _________________________________________________________________________ 66 1.4.4 Example________________________________________________________________________ 66 1.5 Price Comparison _______________________________________________66 1.5.1 Use ___________________________________________________________________________ 67 1.5.2 Procedure ______________________________________________________________________ 67 1.5.3 Result _________________________________________________________________________ 68 1.6 Creating Purchase Requisition ____________________________________69 1.6.1 Use ___________________________________________________________________________ 69 1.6.2 Procedure ______________________________________________________________________ 69 1.6.3 Result _________________________________________________________________________ 70 1.6.4 Example________________________________________________________________________ 70 1.7 Release Purchase Requisition_____________________________________70 1.7.1 Procedure ______________________________________________________________________ 70 1.8. Assign and Process Purchase Requisition __________________________74 1.8.1 Use ______________________________________________________________________________ 74 1.8.2 Procedure ______________________________________________________________________ 74 1.8.3 Result _________________________________________________________________________ 76 1.9 Purchase Order_________________________________________________77 1.9.1 Use ___________________________________________________________________________ 77 1.9.2 Procedure ______________________________________________________________________ 77 1.9.3 Result _________________________________________________________________________ 82 1.9.4 Example________________________________________________________________________ 82 1.10. Release Purchase Order __________________________________________83
  • 4. 1.10.1. Procedure ______________________________________________________________________ 83 1.11Message Output__________________________________________________87 1.11.1 Use _____________________________________________________________________________ 87 1.11.2 Procedure ______________________________________________________________________ 87 1.12 Goods Receipt for Purchase Order_________________________________89 1.12.1 Use ___________________________________________________________________________ 89 1.12.2 Prerequisites ____________________________________________________________________ 89 1.12.3 Procedure ______________________________________________________________________ 89 1.12.4 Result _________________________________________________________________________ 99 Material document 5000000009 posted ______________________________________________________ 99 1.12.5 Example________________________________________________________________________ 99 1.13 Logistics Invoice Verification ____________________________________100 1.13.1 Use __________________________________________________________________________ 100 1.13.2 Procedure _____________________________________________________________________ 100 1.13.3 Result ________________________________________________________________________ 105 1.13.4 Example_______________________________________________________________________ 105 1.14 Returning Delivery _____________________________________________106 1.14.1 Use __________________________________________________________________________ 106 1.14.2 Procedure _____________________________________________________________________ 106 1.14.3 Result ________________________________________________________________________ 113 Return Delivery document created _________________________________________________________ 113 1.14.4 Example_______________________________________________________________________ 113 1.15 Excise Invoice Other Movements _________________________________114 1.15.1 Procedure _____________________________________________________________________ 114 1.15.2 Result ________________________________________________________________________ 116 1.15.3 Example_______________________________________________________________________ 116 1.16 Posting and Printing the Excise Invoice____________________________117 1.16.1 Use __________________________________________________________________________ 117 1.16.2 Prerequisites ___________________________________________________________________ 117 1.16.3 Procedure _____________________________________________________________________ 117 1.16.4 Result ________________________________________________________________________ 120 1.17 Credit Memo __________________________________________________121 1.17.1 Use __________________________________________________________________________ 121 1.17.2 Prerequisites ___________________________________________________________________ 121 1.17.3 Procedure _____________________________________________________________________ 121 1.17.4 Result ________________________________________________________________________ 127 1.17.5 Example_______________________________________________________________________ 127 1.18 Reversals / Cancellation of Invoice or Credit Memo __________________127 1.18.1 Use __________________________________________________________________________ 127 1.18.2 Prerequisites ___________________________________________________________________ 128 1.18.3 Procedure _____________________________________________________________________ 128 1.18.4 Result ________________________________________________________________________ 133 1.18.5 Example_______________________________________________________________________ 133 1.19 Reversals / Cancellation of Goods Receipt (GR)_____________________134 1.19.1 Use __________________________________________________________________________ 134 1.19.2 Prerequisites ___________________________________________________________________ 134 1.19.3 Procedure _____________________________________________________________________ 134 1.19.4 Result ________________________________________________________________________ 139 1.19.5 Example_______________________________________________________________________ 139 1.20 Reversing CENVAT Postings_____________________________________140
  • 5. 1.20.1 Purpose _______________________________________________________________________ 140 1.20.2 Prerequisites ___________________________________________________________________ 140 1.20.3 Procedure _____________________________________________________________________ 140 1.20.4 Result ________________________________________________________________________ 144 1.20.5 Example_______________________________________________________________________ 144 1.21 Canceling Excise Invoices_______________________________________145 1.21.1 Purpose _______________________________________________________________________ 145 1.21.2 Prerequisites ___________________________________________________________________ 145 1.21.3 Procedure _____________________________________________________________________ 145 1.21.4 Result ________________________________________________________________________ 150 1.21.5 Example_______________________________________________________________________ 150 2 Procurement of Imported Materials – Business Process Procedure________________________ 151 2.1 Procurement of Imported Materials _________________________________151 2.1.1 Purpose__________________________________________________________________________ 151 2.1.2 Prerequisites ___________________________________________________________________ 151 2.2 Creating Purchase Order __________________________________________152 2.2.1 Use _____________________________________________________________________________ 152 2.2.2 Prerequisites ___________________________________________________________________ 152 2.2.3 Procedure _____________________________________________________________________ 152 2.2.4 Result ________________________________________________________________________ 158 2.2.5 Example_______________________________________________________________________ 158 2.3 Release Purchase Order ________________________________________159 2.3.1 Procedure _____________________________________________________________________ 159 2.4 Message Output _______________________________________________162 2.4.1 Use __________________________________________________________________________ 162 2.4.2 Procedure _____________________________________________________________________ 162 2.5 CAPTURING BILL OF ENTRY ____________________________________163 2.5.1 Use __________________________________________________________________________ 163 2.5.2 Procedure _____________________________________________________________________ 164 2.5.3 Result ________________________________________________________________________ 171 2.5.4 Example_______________________________________________________________________ 171 2.6 Goods Receipt for Imported Purchase Order _______________________172 2.6.1 Use __________________________________________________________________________ 172 2.6.2 Procedure _____________________________________________________________________ 172 2.6.3 Result ________________________________________________________________________ 183 2.6.4 Example_______________________________________________________________________ 183 2.7 Logistics Invoice Verification for the Materials ______________________184 2.7.1 Use __________________________________________________________________________ 184 2.7.2 Procedure _____________________________________________________________________ 184 2.7.3 Result ________________________________________________________________________ 190 2.7.4 Example_______________________________________________________________________ 190 3 Procurement of Subcontracting Materials – Business Process Procedure __________________ 190 3.1 Procurement of Subcontracting Materials __________________________191 3.1.1 Purpose _______________________________________________________________________ 191 3.1.2 Prerequisites ___________________________________________________________________ 191 3.2 Creation of Subcontracting Purchase Order ________________________191 3.2.1 Use __________________________________________________________________________ 191 3.2.2 Prerequisites ___________________________________________________________________ 192
  • 6. 3.2.3 Procedure _____________________________________________________________________ 192 3.2.4 Result ________________________________________________________________________ 196 3.2.5 Example_______________________________________________________________________ 196 3.3 Message Output _______________________________________________197 3.3.1 Use __________________________________________________________________________ 197 3.3.2 Procedure _____________________________________________________________________ 197 3.4 Transfer of Components to Subcontractor _________________________199 3.4.1 Use __________________________________________________________________________ 199 3.4.2 Prerequisites ___________________________________________________________________ 199 3.4.3 Procedure _____________________________________________________________________ 199 3.4.4 Result ________________________________________________________________________ 201 3.4.5 Example_______________________________________________________________________ 201 3.5 Creation of Subcontracting Challan _______________________________202 3.5.1 Use __________________________________________________________________________ 202 3.5.2 Prerequisites ___________________________________________________________________ 202 3.5.3 Procedure _____________________________________________________________________ 202 3.5.4 Result ________________________________________________________________________ 204 3.5.5 Example_______________________________________________________________________ 204 3.6 Printing of Subcontracting Challan ________________________________205 3.6.1 Use _____________________________________________________________________________ 205 3.6.2 Procedure _____________________________________________________________________ 205 3.7 Goods Receipt for Purchase Order________________________________208 3.7.1 Use __________________________________________________________________________ 208 3.7.2 Prerequisites ___________________________________________________________________ 208 3.7.3 Procedure _____________________________________________________________________ 208 3.7.4 Result ________________________________________________________________________ 217 3.7.5 Example_______________________________________________________________________ 217 3.8 Reconciling Subcontracting Challan ______________________________218 3.8.1 Use __________________________________________________________________________ 218 3.8.2 Procedure _____________________________________________________________________ 218 3.8.3 Result ________________________________________________________________________ 220 3.8.4 Example_______________________________________________________________________ 220 3.9 Completing/Reversal/Re-credit Subcontracting Challan ______________220 3.9.1 Use __________________________________________________________________________ 220 3.9.2 Procedure _____________________________________________________________________ 221 3.9.3 Result ________________________________________________________________________ 221 3.9.4 Example_______________________________________________________________________ 222 3.10 Logistics Invoice Verification for Subcontracting Material ____________222 3.10.1 Use __________________________________________________________________________ 222 3.10.2 Procedure _____________________________________________________________________ 222 3.10.3 Result ________________________________________________________________________ 226 3.10.4 Example_______________________________________________________________________ 226 5. Procurement of External Services: Business Process Procedure ________________________ 227 5.1 Procurement of External Services – Procurement Process ____________227 5.1.1 Purpose _______________________________________________________________________ 227 5.1.2 Prerequisites ___________________________________________________________________ 227 5.2 Creating Service Master_________________________________________228 5.2.1 Use __________________________________________________________________________ 228 5.2.2 Procedure _____________________________________________________________________ 228
  • 7. 5.2.3 Result ________________________________________________________________________ 230 5.3 Creating Purchase Requisition ___________________________________231 5.3.1 Use __________________________________________________________________________ 231 5.3.2 Procedure _____________________________________________________________________ 231 5.3.3 Result ________________________________________________________________________ 235 5.3.4 Example_______________________________________________________________________ 235 5.4 Assign and Process Purchase Requisition _________________________236 5.4.1 Use __________________________________________________________________________ 236 5.4.2 Procedure _____________________________________________________________________ 236 5.4.3 Result ________________________________________________________________________ 239 5.6 Purchase Order__________________________________________________239 5.6.1 Use _____________________________________________________________________________ 239 5.6.2 Prerequisites ___________________________________________________________________ 240 5.6.3 Procedure _____________________________________________________________________ 240 5.6.4 Result ________________________________________________________________________ 242 5.6.5 Example_______________________________________________________________________ 243 5.7 For Releasing Purchase Order Refer User Manual of Stock Procurement 243 5.8 Message Output _______________________________________________243 5.8.1 Use __________________________________________________________________________ 243 5.8.2 Procedure _____________________________________________________________________ 243 5.9 Creation and Acceptance of Service Entry Sheet ____________________245 5.9.1 Use __________________________________________________________________________ 245 5.9.2 Procedure _____________________________________________________________________ 246 5.9.3 Result ________________________________________________________________________ 256 5.9.4 Example_______________________________________________________________________ 256 5.10 Logistics Invoice Verification ____________________________________257 5.10.1 Use __________________________________________________________________________ 257 5.10.2 Procedure _____________________________________________________________________ 257 5.10.3 Result ________________________________________________________________________ 261 5.10.4 Example_______________________________________________________________________ 261 6 Asset Procurement – Business Process Procedure. _____________________________________ 261 6.1 Purchase Order________________________________________________261 6.1.1 Use __________________________________________________________________________ 261 6.1.2 Procedure _____________________________________________________________________ 262 6.1.3 Result ________________________________________________________________________ 266 6.2 Release of Purchase Order ______________________________________266 6.2.1 Procedure _____________________________________________________________________ 266 6.3 Goods Receipt for Purchase Order________________________________266 6.3.2 Use __________________________________________________________________________ 266 6.3.3 Prerequisites ___________________________________________________________________ 266 6.3.4 Procedure _____________________________________________________________________ 266 6.2.3 Result ________________________________________________________________________ 269 6.4 Post Excise Invoice ____________________________________________269 6.4.1 Procedure ________________________________________________________________________ 269 6.4.2 Result ___________________________________________________________________________ 271 6.5 Logistics Invoice Verification ____________________________________272 6.5.1 Use __________________________________________________________________________ 272 6.5.2 Procedure _____________________________________________________________________ 272
  • 8. 6.5.3 Result ________________________________________________________________________ 275 7 Excise Periodic Processing – Business Process Procedure_______________________________ 276 7.1 Excise Periodic Processing______________________________________276 7.1.1 Purpose _______________________________________________________________________ 276 7.1.2 Prerequisites ___________________________________________________________________ 276 7.2 Excise Report - CENVAT Register_________________________________277 7.2.1 Use __________________________________________________________________________ 277 7.2.2 Prerequisites ___________________________________________________________________ 277 7.2.3 Procedure _____________________________________________________________________ 277 7.2.4 Result ________________________________________________________________________ 279 7.3 Excise Register Updation________________________________________________________ 280 7.3Updation of RG1 Register__________________________________________280 7.3.1 Use __________________________________________________________________________ 280 7.3.2 Prerequisites ___________________________________________________________________ 280 7.3.3 Procedure _____________________________________________________________________ 280 7.3.4 Result ________________________________________________________________________ 287 7.4 RG1 Register Extraction_________________________________________288 7.4.1 Use __________________________________________________________________________ 288 7.4.2 Prerequisites ___________________________________________________________________ 288 7.4.3 Procedure _____________________________________________________________________ 288 7.4.4 Result ________________________________________________________________________ 291 7.5 RG1 Register Print Utility________________________________________292 7.5.1 Use __________________________________________________________________________ 292 7.5.2 Prerequisites ___________________________________________________________________ 292 7.5.3 Procedure _____________________________________________________________________ 292 7.5.4 Result ________________________________________________________________________ 295 8. PLA Register Extraction ________________________________________________________ 295 8.1 PLA Register Extraction_________________________________________295 8.1.1 Use __________________________________________________________________________ 295 8.1.2 Prerequisites ___________________________________________________________________ 295 8.1.3 Procedure _____________________________________________________________________ 295 8.1.4 Result ________________________________________________________________________ 298 8.2 PLA Register Print Utility ________________________________________298 8.2.1 Use __________________________________________________________________________ 298 8.2.2 Prerequisites ___________________________________________________________________ 298 8.2.3 Procedure _____________________________________________________________________ 298 8.2.4 Result ________________________________________________________________________ 300 9. Reports _________________________________________________________________________ 300 7.1 Purchasing ___________________________________________________300 7.1.1 Purchasing Documents per Vendor (ME2L) ___________________________________________ 300 7.1.2 Purchasing Documents per Material (ME2M) __________________________________________ 302 7.1.3 Source List for Material (ME0M) ____________________________________________________ 303 7.1.4 Purchase Info Record per Material (ME1M) ___________________________________________ 303 7.1.5 Purchasing Values(MC$G) ________________________________________________________ 304 9.2 Inventory _____________________________________________________307 9.2.1 Material Document List (MB51)_____________________________________________________ 307 9.2.2 Diplay Warehouse Stock (MB52) ___________________________________________________ 309
  • 9. 9.3.3 Stock on Posting Date (MB5B)________________________________________________________ 310 9.3.4 Stock Overview (MMBE)_____________________________________________________________ 313 9.3.5 Stock in Transit (MB5T) _____________________________________________________________ 314 9.3.6 Slow Moving Items (MC46)___________________________________________________________ 315 Icons Icon Meaning Caution Example Note Recommendation Syntax Abbreviations R Required entry field (used in the end-user procedures) O Optional entry field (used in the end-user procedures) C Conditional field (used in the end-user procedures)
  • 10. 1 Procurement of Stock Materials 1.1 Procurement of Stock Materials – Raw Material Local / Return 1.1.1 Purpose This process describes the procurement process of raw materials from indigenous source of supply with Country Version India (CIN) relevant process like processing of Excise Duty (ED) and Sales Tax (ST) process. 1.1.2 Prerequisites The following scenario specific master data must be created for operation of this building block. 1. Material Master Record 2. Vendor Master Record 3. Purchase Info Record (Optional) 4. Source List (Optional) 5. CIN Master Data 6. Excise Condition Record (if Tax applicable for the Vendor-Material Combination) 1.1.3 Material Master Record Menu Path Logistics Materials Management Material Master Material Create (General) T Code MM01 – Create MM02 – Change MM03 – Display
  • 11. Press Enter to see the pop-up window. Enter the Industry Sector Enter the Material Type Internal Number assignment .
  • 12. Select the required views and press Enter to input the organizational levels.
  • 13. Press Enter to input the details of the Material. 1.1.3.1 Basic Data Views Enter the Material Description Enter the Unit of Measure and material Group Enter the division if Stock Transfer will happen for this material Blocking for Procurement or BOM enter here Enter the Gross and Net Weight for the Finished Goods Enter here if the material is returnable packing as VERP and non returnable packing as LEIH
  • 14. Press Additional Data to maintain the Alternate Unit of Measures (for e.g. 1000G= 20Nos for the Semi finished goods) Enter any Basic Material is there Press Additional Data to maintain Alternate Unit of Measures
  • 15. Press Main data to go to the next view
  • 16. 1.1.3.2 Purchasing Views If the Ordering Unit is other than the Base UoM, enter the Unit and make VAR. OUn as 1 Enter the Purchasing Value Key as G1 (5% Delivery Tolerance) or G2 (10% Delivery Tolerance) Enter the Purchasing Group – Person/Group responsible to procure this material Select if QM is not active and want to post to Inspection Stock (Mainly used for Spares) Source list should be maintained for this material select the box. Enter the No. of Days required for GR Processing once the material is arrived at factory.
  • 17. Enter the PO Text normally specification is maintained
  • 18. 1.1.3.3 MRP Views Enter the appropriate MRP Type)
  • 19.
  • 22. 1.1.3.5 Accounting Views Enter the appropriate Valuation Class (Various Valuation Classes given below) If Price Control is V enter the Moving Average price, S enter the Standard Price Enter the Price Control as V-Moving Average and S-Standard
  • 23. 1.1.3.6 Costing Views After entering all the details, press to save the Material. Enter Respective Profit Centre of Plant/Depot
  • 24. 1.1.4 Vendor Master Record Menu Path Logistics Materials Management Purchasing Master Data Vendor Central T Code XK01 – Create XK02 – Change XK03 – Display Press Enter to input the details of the vendor. Vendor Account Groups: VDOM Domestic Vendors VIMP Import Vendors VSRV Service Vendors Vendor Number to be put manually Enter Company Code Enter Account Group (Various Group given below) Enter Purchasing Organisation
  • 26. Click on the CIN Details to enter the Vendor Excise and Sales Tax details
  • 27. Enter all the details in the respective fields Excise Indicator for Vendor as 1 – 100% Taxable
  • 28. Enter all the details in the respective fields
  • 29. Enter whether this vendor is approved or on Probation Enter the detail in the respective field
  • 30. No need to enter in the below screen. 1.1.4.2 Accounting Data
  • 31. Reconciliation Accounts: Enter the appropriate Reconciliation Accounts (Various Accounts given below)
  • 32. The below screen is explained in detail in FI User Manual: Enter the appropriate Payment Terms and Select the Chk double inv Enter the appropriate Payment Methods C – Cheque, E – Cash Payment, T – Bank Transfer
  • 33. 1.1.4.3 Purchasing Data Schema group, Vendor: DM Domestic Schema IM Import Schema Enter the Order Currency, Terms of Payment and Incoterms Enter the appropriate Schema group, Vendor (Various groups given below) 1. Select GR-based Inv. Verf if Invoice verification is done after GR 2.. Select the Srv-based Inv. Verf if Invoice Verification is done after Service Entry sheet.
  • 34. Press to save the Vendor master and the no is generated automatically. 1.1.5 Purchasing Info Record Enter the Partner for the appropriate Partner Functions
  • 35. Menu Path SAP Easy Access Logistics Materials Management Purchasing Master Data Info Record Create T Code ME11 – Create ME12 – Change ME13 - Display You use this component if you wish to store information on a vendor and a material as master data at purchasing organization or plant level. You can create purchasing info records for different procurement types (standard, subcontracting, pipeline, consignment). Press enter the details in the Purchasing Info Record. Enter the Info Category as 1. Standard – For normal Procurement (Domestic, Import, etc) 2. Sub-Contracting – For Sub-Contracting
  • 36. If the message is displayed like this, intimate the Quality Person to maintain the QM Info Record (TCode: QI01)
  • 37. No need to enter anything in the below screen as it copies all the data from the Vendor Master.
  • 38. It is defaulted from the Material Master but change for this Vendor-Material combination if different. Enter the Standard Quantity Enter the appropriate Tax Code It is defaulted from the Material Master but change for this Vendor-Material combination if different. Enter the Net Price
  • 39. It is defaulted from the Material Master but change for this Vendor-Material combination if different.
  • 40. 1.1.5.1 Result Purchasing Info Record is created 1.1.5.2 Example Purchasing Info Record 5300000384 is created.
  • 41. 1.1.6 Source List Menu Path SAP Easy Access Logistics Materials Management Purchasing Master Data Source List Maintain T Code ME01 – Maintain ME03 – Display ME04 - Changes Enter the Material No. and Plant
  • 42. Result: Source List changed. Maintain the Validity Period till until which you will procure this material from this vendor Enter the Vendor and Purchasing Organisation Select if the Vendor is fixed Select if the Vendor is blocked for Procurement for this particular material alone Enter 1 to be included in MRP Run
  • 43. 1.1.7 CIN Master Data Menu Path J1ILN SAP Menu Indirect Taxes Master Data Excise Rate Maintenance T Code J1ID 1.1.7.1 Chapter IDs Select Chapter ID and Press
  • 44. Press New Entries to go to the next screen. Press New Entries to Create New Chapter ID
  • 45. Press to save the data. Enter the Chapter ID Enter the Description as per law
  • 46. 1.1.7.2 Material ID and chapter ID combination Select Material and Chapter ID Combination and Press Select the Material and Chapter-Id Combination
  • 47. Press New Entries to Create New Material Number and Chapter ID
  • 48. Press to save the data. 1.1.7.3 Vendor Excise Details Enter the Material No. and Chapter ID Combination Enter the material type based on the Material Nature
  • 49. Either you can maintain here or else in Vendor Master. Select the Vendor Excise Details Press New Entries to Create Vendor Master Excise
  • 50. Press to save the data. 1.1.7.4 Excise Indicator for Plants
  • 51. Select Excise Indicator for Plant and Press Select the Excise Indicator for Plant Press New Entries to Create Plant Excise
  • 52. Press to save the data. 1.1.8 Excise Condition Record 1.1.8.1 Use When you enter a purchasing document, for example, a purchase order, the R/3 System automatically calculates the applicable excise duties using the condition technique.
  • 53. 1.1.8.2 Procedure 1. Access the transaction choosing one of the following navigation options: SAP R/3 menu No Menu path available for this transaction Transaction code FV11 2. Enter the appropriate Condition type (various condition types given in next page) and maintain the respective values. Enter the appropriate condition type
  • 54. For Raw Material / Packing Material maintain the Plant/Vendor/Material Combination. For Service Tax /Assets maintain the Plant/Material Group Combination. . Various combinations to maintain the condition record
  • 55. 3. Press Ctrl+S or 4. 1.1.8.3 Result Condition records saved. 1.2 Request for Quotation (RFQ) Enter the Plant and Vendor Enter the Material No. Enter the Value / amount
  • 56. 1.2.1 Use Request for Quotation is used to float enquiries in market to obtain quotations from prospective vendors. This transaction is optional for the process. 1.2.2 Procedure 1. Access the transaction choosing one of the following navigation options: SAP R/3 menu Logistics Material Management Purchasing RFQ/quotation Request for Quotation Create Transaction code ME41 2. RFQ can be created with reference to Purchase Requisition, Outline Agreement (Contract) and another RFQ. 3. On the Create RFQ: Initial Screen, make the following entries: 1. Enter the RFQ type as “AN” 2. Enter the Quotation Deadline 3. Enter Purch. Organisation as 1101 4. Enter the respective Purchasing group Press this button to enter the Collective No and Vendor Reference
  • 57. 4. Choose (header details icon) on the toolbar, then on screen Create RFQ: Header Data, enter information in the fields as specified in the table below: Enter the Submission date Enter the appropriate Item category for Sub- Contracting & Service 1. Enter the Material No 2. Enter the RFQ Quantity 3. Enter the Deliv. Date 4. Enter the Plant if it is Plant specific Press this button to enter the vendor code for which it has to be sent?
  • 58. 5. Choose (vendor address button) on the toolbar, then on screen Create RFQ: Vendor Address, enter information in the fields as specified below: Enter the Collective No to have a track of all RFQs related to particular instance Enter the Your Reference if any reference given by the vendor
  • 59. After entering the vendor code and pressing enter the details of vendor will be displayed automatically.
  • 60. 6. Press to Save the RFQ. This will refresh the Create RFQ: Vendor Address screen to allow creation of the same RFQ data to a new vendor by following the steps outlined above.
  • 61. 1.2.3 Result RFQ created Similarly create for other vendor in the same screen and various RFQ Nos will be generated 1.2.4 Example RFQ created under the number 6000000000. 1.3 Message output: RFQ 1.3.1 Use A RFQ needs to be printed for transmitting to vendor. This transaction is optional for the process. 1.3.2 Procedure 1. Access the transaction choosing one of the following navigation options: SAP R/3 menu Logistics Materials Management Purchasing RFQ/Quotation Request for Quotation Messages Print/Transmit Transaction code ME9A 2. On the Message Output screen, make the following entries:
  • 62. Enter the RFQ Nos to be printed and Execute (F8) Press this button to Execute Select the check box For Printout click this button which will create Spool Request. For Direct Printout click this button For Print Preview click this button
  • 63. You will see out put as
  • 64. 1.4 Maintaining Quotation 1.4.1 Use This transaction is used to maintain the quotation, which is submitted by vendors. Vendor communicates price for material and as a result the RFQ (Request for Quotation) needs to be updated. This transaction is optional for the process. 1.4.2 Procedure 1. Access the transaction choosing one of the following navigation options: SAP R/3 menu Logistics Materials Management Purchasing RFQ/quotation Quotation Maintain Transaction code ME47 2. On the Maintain Quotation: Initial Screen, make the following entries: 3. Choose the Enter key, or choose green Enter icon to proceed. 4. View the screen “Maintain Quotation: Header Data” by Choosing on the Header data icon in the toolbar. 5. Enter information in the fields as specified in the table below. Some fields will not be available for input, as they are reference fields only.
  • 65. 6. Once all necessary header data has been maintained, the user can then enter the price information in one of two fashions: a. Enter the price in the Net Price field on the Maintain Quotation: Item Overview screen by Choosing overview icon on toolbar. b. To enter more detailed information in addition to the net price, select the line item and choose the Item Details icon. Choose the green Back arrow to return to the ‘Overview’ screen once data has been maintained. i. A vendor’s quoted price can be entered in one of two ways. 1. Press to select the line 2. Press to enter the conditions Enter the Conditions given by vendor.
  • 66. ii. Enter the net price per unit in the Net price field. This price includes the vendor's normal discounts and surcharges only. Cash discounts (for prompt payment) and taxes are calculated separately. iii. Enter the gross price in the Net price field, and maintain the conditions for the item. Then the system automatically replaces the entered gross price with the calculated net price. If the net price for an item is entered for which pricing conditions have been maintained, the system always replaces the price entered with the calculated net price. iv. Enter the Tax Code for any relevant taxes (for example, Excise Duty, Sales Taxes etc.) in the Tax code field. If a purchase order is created by referencing an RFQ, this code facilitates the determination of the tax amount when the invoice is entered in the system. v. After entering tax code, after choosing this system may give an information message showing the effective price, Choose Enter to continue. 7. Once all quotation information has been successfully entered, save the data by Choosing on the Save button, or Choose the <Ctrl + S> keys. A message will be displayed that the data has been saved. 1.4.3 Result Quotation is maintained. Maintain the same for other RFQs. 1.4.4 Example Quotation for RFQ 6000000000 maintained. 1.5 Price Comparison
  • 67. 1.5.1 Use Required to compare prices from all quotations received as a result of a competitive bidding process. This transaction is optional for the process. 1.5.2 Procedure 1. Access the transaction choosing one of the following navigation options: SAP R/3 menu Logistics Materials Management Purchasing RFQ/Quotation Quotation Price Comparison Transaction code ME49 2. On the Price Comparison List screen, make the following entries: a. Choose the comparison values to be used: i. Reference quotation: You can compare the quotations within the list with a sample quotation. The system displays the percentage deviation between each quotation in the list and the sample quotation. ii. Mean/minimum value quotation: The price comparison list can also display a "fictitious" quotation reflecting the average or minimum value of all quotations. Select either the "Mean value" or "Minimum value" quotation field to choose the type of fictitious quotation. iii. Percentage basis: The price comparison list displays the percentage of each item in relation to the maximum, minimum, or average price. To determine the display type, enter one of the following: +: The highest value for each item is the 100% value -: The lowest value for each item is the 100% value _: The mean value for each item is the 100% value b. Select the desired price computations: Parameters included for Comparison Enter the Purchasing Organisation Enter the Quotations to be compared or the Collective RFQ
  • 68. i. Select the appropriate field to determine which of the following should be included in the determination of the comparison price: i. Include cash discounts ii. Include delivery costs iii. Determine effective price 3. Once all entries have been made, Choose the Execute. 4. On screen “Price Comparison List in Currency INR”, view the Price Comparison list. 5. To view any of the following information for a particular quote included in the comparison, Choose the RFQ number with the mouse to select it, then Choose the appropriate icon/button on the menu toolbar: 6. Display Material: Allows the user to view the purchasing data in the material master record. 7. Display Vendor: Allows the user to view the vendor master record. 8. Additional Info: Allows the user to view payment terms, bid dates, currency information for all the vendor quotations in the list. 9. If any information has been modified through the comparison list, save the RFQ before exiting. If changes have been made and the user attempts to exit without saving, the system will return a message to verify action. 10. To exit the transaction, choose the green Back arrow, the yellow Exit arrow, or Choose the F3 button. 1.5.3 Result Price Comparison List in Currency INR is displayed on the screen. Rank is generated automatically Mean and Effective Price is highlighted
  • 69. 1.6 Creating Purchase Requisition 1.6.1 Use A Purchase Requisition is created to indicate purchase department to procure materials or services with details like how much quantity is required, when required. Generally it is created automatically for Raw materials and Packing Materials through MRP Run and Spares and Service related to Plant Maintenance Purchase Requisition is generated automatically from Plant maintenance Order. This transaction is optional for the process. 1.6.2 Procedure 1. Access the transaction choosing one of the following navigation options: SAP R/3 menu Logistics Materials Management Purchasing Purchase Requisition Create Transaction code ME51N 2. On the Create Purchase Requisition screen, make the following entries:
  • 70. Press or Ctrl+S to Save the Purchase Requisition. 1.6.3 Result 1.6.4 Example Purchase requisition number 0010000000 created. 1.7 Release Purchase Requisition 1.7.1 Procedure 1. Access the transaction choosing one of the following navigation options: SAP R/3 menu Logistics Materials Management Purchasing Purchase Requisition Release Individual Release Enter Material No. Enter required Quantity Enter the Desired Vendor if Vendor is known to the person who is creating PR
  • 71. Transaction code ME51N Click Other Purchase Requisition Enter PR No.
  • 72. Click This Icon to Release PR Click This Icon to Release
  • 73. Click This Icon to Save
  • 74. 1.8. Assign and Process Purchase Requisition 1.8.1 Use a) This section explains the functions provided by the SAP System for converting requisitions into external purchasing documents (purchase orders, contract release orders, scheduling agreement delivery schedules, RFQs), and the processing options thereby available to you: • Assigning means defining the desired source for each purchase requisition item o Further processing involves generating lists of requisitions that have been assigned or flagged as outlined above, and the subsequent creation of RFQs, purchase orders, or lines of delivery schedules under scheduling agreements. Procedure 2. Access the transaction choosing one of the following navigation options: SAP R/3 menu Logistics Materials Management Purchasing Purchase Requisition Follow-On Functions Assign and Process Transaction code ME57
  • 75. 3. The assignment of sources to and further processing of purchase requisitions are two distinct functions. You can choose whether you wish to perform the functions in two separate steps or in just one. 4. Below are the Selection Parameters to restrict the process of PO from PR 5. Press or F8 to enter into the next screen. 1. Enter the appropriate Purchasing Group 2. Enter the Scope of List as B1 for PR generated through MRP Run and A for remaining PR 3. Enter the appropriate Plant 1. Select the Assigned Purchase Requisition (For Spares PR normally the End User may have entered the Vendor in the PR) 2. Select the appropriate Check boxes for Processing the PR
  • 76. 6. O is explained in next chapter. 1.8.3 Result The source is assigned to PR and can be processed for PO. 1. Select the check boxes required PR which are to be converted in to Pos. 1. If Source List is available click this button 1. Since only one source is assigned in Source list system assigns the source automatically or else if more than one source available a Pop-up window will be coming where one vendor has to be selected. After assigning the source click on to this button to process the PO or else save for the assignment of source
  • 77. 1.9 Purchase Order 1.9.1 Use A purchase order is a legal document used to record an individual purchase with the vendor. It also provides the vendor with a reference document to link to shipping (goods receipt) and invoicing (invoice verification) processes. The purchase order is a commitment to a vendor for a given material, in a specified quantity at a predetermined price and delivery date. This transaction is mandatory for the process. Please ensure that Purchase Order Value does not exceed specified value and if the purchase order value crosses this limit a release procedure is applied on this purchase order. To release the Purchase Order go to ME28 for collective release and ME29N for individual release. 1.9.2 Procedure 1. Access the transaction choosing one of the following navigation options: SAP R/3 menu Logistics Materials Management Purchasing Purchase Order Create Vendor/Supplying Plant Known Transaction code ME21N
  • 78. 2. If you want create purchase order with reference to the purchase requisition, on item details screen enter the purchase requisition number and item number at Purch. Req. field. System will automatically adopt all the data from requisition. Click the Purchasing Requisitions and Press Adopt Press this button to view the Tax Calculation
  • 79.
  • 80. Press this button to view the message
  • 81. Check the PO before Saving
  • 82. 1.9.3 Result Purchase Order is created. 1.9.4 Example Standard PO created under the number 210000000.
  • 83. 1.10. Release Purchase Order 1.10.1. Procedure Access the transaction choosing one of the following navigation options: SAP R/3 menu Logistics Materials Management Purchasing Purchase Order Release Individual Release Transaction code ME29N Click Other Purchase Order Enter PO No.
  • 84. Click This Icon to Release PR
  • 85. Click This Icon to Release Click This Icon to Save
  • 86.
  • 87. 1.11Message Output 1.11.1 Use A Purchase Order needs to be printed for transmitting to vendor. Procedure 2. Access the transaction choosing one of the following navigation options: SAP R/3 menu Logistics Materials Management Purchasing Purchase Order Messages Print/Transmit Transaction code ME9F 3. On the Message Output screen, make the following entries 4. Choose to Execute.
  • 88. 5. On screen Message Output select the appropriate Document number and perform the following: Choose Output Message and/or Choose Display Message and/or Choose Message Detail and/or Choose Trial Printout.
  • 89. 1.12 Goods Receipt for Purchase Order 1.12.1 Use Goods are received from the Vendor as a result of a Purchase Order at the receiving plant. A goods movement is entered into the system referencing this PO and a goods receipt material document is posted. Appropriate general ledger accounts are also posted and stocks are updated. 1.12.2 Prerequisites Purchase Order 1.12.3 Procedure 1. Access the transaction choosing one of the following navigation options: SAP R/3 menu Logistics Materials Management Inventory Management Goods Movement Goods Receipt For Purchase Order PO Number Known Transaction code MIGO 2. On the Goods Receipt Purchase Order screen, make the following entries: Enter the Purchase Order No and Press Enter Check for correct movement type whenever doing goods movement
  • 90. 3. After pressing Enter system will fetch all the data from the Purchase Order as shown below: Whichever material is in Blue those detail will be seen in the Item detail
  • 91. 4. System defaults the balance quantity in PO, change the quantity to the received quantity:
  • 92. Enter the Storage Location in which the material to be placed.
  • 93. Select Item Ok and Press Enter and the Excise tab will appear both in Header and Item Level Enter the Delivery Note details of the vendor
  • 94. Field name Description R/O/C User action and values Comment Goods Receipt Goods Receipt R Select from drop down list for action Purchase Order Purchase Order R input the PO number which generated above 4500000277 Movement Type 101 Enter Document Date Document Date R Enter document date Delivery Note in Header O Delivery Number from Vendor Vendor Vendor R Defaulted from purchase order Grayed out Posting Date Posting date R Enter posting date Bill of lading Bill of lading O Enter bill of lading Header text Header text O Enter header text Close Header Detail data to enlarge the Detail data. Select Material tab at Detailed Data. Material Material tab R Defaulted from Purchase Order Grayed out Select Quantity tab in Detail data. Qty in unit of entry Quantity in unit of entry R Enter the quantity you have received from vendor. As a default system will give purchase order quantity Quantity defaulted from Purchase Order Qty in delivery note Quantity in delivery note O Enter the quantity as per vendor delivery challan Select Where tab in Detail data. Movement type Movement type R Defaulted from header screen Stock type Stock type R Defaulted from material master or purchase order Plant Plant R Defaulted from purchase order 1000 Storage location Storage location R Defaulted from purchase order if entered 1010 Goods Recipient Goods Recipient O Enter the name of person who received goods
  • 95. Unloading point Unloading point O Text Text O Enter the text if required Select Purchase Order tab in Detail data. Purchase Order Purchase Order R Defaulted from header data Grayed out Del. completed ind. Delivery completion indicator O Defaulted by system if PO Qty = GR Qty Select Partner tab in Detail data. Vendor Vendor name O Grayed out For this material batch management is not active. Just for reference purpose the following data is given. Select Batch tab in Detail data. This tab will come only if material is managed in batches. Proceed with the following steps if material is batch managed only. Batch Batch number R Enter batch number as date for batch managed materials Vendor batch Vendor batch O Enter vendor batch number for reference 5. Select the Check box Item OK, after entering all the data. You will get Excise Invoice tab at Header Data for capturing vendor excise invoice details and for posting Part I and Part II. 6. On the Excise Invoice tab at Header Data make the following entries.
  • 96. Field name Description R/O/C User action and values Comment Capture & Post Excise invoice Capture & Post Excise Invoice on Excise Action R Choose Capture & Post Excise Invoice from drop down list Defaulted Excise Group Excise Group R Defaulted by the system Excise Invoice Excise invoice R Enter the vendor Excise Invoice number For example: D013 Excise Inv. Date Excise Invoice Date R Enter the excise invoice date of vendor BED Basic Excise Duty R Defaulted from purchase order Grayed out AED Additional Excise Duty R Defaulted form purchase order Grayed out SED Special Excise Duty R Defaulted from purchase order Grayed out NCCD NCCD R Defaulted from purchase order Grayed out ECS Education Cess R Defaulted from purchase order Grayed out System defaults the Excise Duty (BED & ECS) and in case Select Appropriate Excise settings While posting in Case of dealer only
  • 97. MRP Indicator MRP Indicator O Tick the check box Note: If the Base Price in PO is the inclusive of both the Material Cost and Excise Value choose the check box Close Header Detail data to enlarge the Detail data. Select Excise Item tab at Detailed Data (at the last). Chapter ID Chapter ID of material R Defaulted by the system No action required EI Quantity Excise Invoice Quantity R Defaulted by the system from Goods Receipt quantity Base Value Base value of material R Defaulted by the system BED Basic Excise Duty R Defaulted by the system AED Additional Excise Duty O Defaulted by the system NCCD NCCD O Defaulted by the system SED Special Excise Duty O Defaulted by the system ECS Education Cess O Defaulted by the system Please cross check the BED, AED, SED, NCCD and ECS amount of item as per the Vendor Excise Invoice, legally you cannot avail more than what mentioned in Vendor Excise Invoice. All other information is defaulted by the system. Hence, no action required by the user. 6. Choose Check at the top of screen. 7. Choose Post to post the document.
  • 98. Also See the account postings Enter Excise Invoice No. and Date vendor
  • 99. 1.12.4 Result Material document 5000000009 posted 1.12.5 Example Material document 5000000009 posted
  • 100. 1.13 Logistics Invoice Verification 1.13.1 Use In this process of Logistics Invoice Verification all the Incoming Invoices are verified in terms of their content, prices and arithmetic. When the invoice is posted, the invoice data is saved in the system. The system updates the data saved in the invoice documents in Materials Management and Financial Accounting. 1.13.2 Procedure 1. Access the transaction choosing one of the following navigation options: SAP R/3 menu Logistics Materials Management Logistics invoice Verification Document Entry Enter Invoice Transaction code MIRO 2. If you are opening for the first time this transaction, system will ask for Company Code, please give 1000 to go in side the transaction. 3. On the Enter Incoming Invoice: Company Code 1000 screen, make the following entries: Enter Invoice Date Change Defaulted V0 Tax code and tick Calculate tax tab Enter the PO No.
  • 101. If Part II entry is not done then system will not allow you to POST Invoice Unless and until you post part2 system will not allow invoice verification Field name Description R/O/C User action and values Comment Enter the amount
  • 102. Transaction Invoice R Select Invoice from drop down list Header Data Header data of Invoice R Defaulted by system Basic tab Basic information tab R Select basic information tab to give initial information Invoice Date Invoice Date R Enter the Vendor invoice date Reference Invoice reference O Enter the vendor invoice reference For Example USERMANUAL Posting date Posting Date R Enter the posting date of document System will give current date as default Amount Invoice Amount R Enter invoice gross amount including taxes and duties 299,960.20 Amount mentioned is only an example Currency R Enter the currency in which the bill is presented by vendor, if not entered by user system will default the document currency from purchase order INR Calculate tax Check box calculate tax O Check this tick box, system will calculate tax amount Tax code R Select the tax code from drop down list V1 Bus.place/se ctn Business place or section code R Enter section code if Tax deduction for source is active for this vendor Leave blank for this process Text Text O Enter text if required for reference Payment tab Payment tab R Select payment details tab BaselineDt Base line date for payment R Enter the base line date for payment Will be defaulted if payment terms entered in PO Pmnt terms Payment terms O Payment terms of document, if entered will be defaulted from purchase order Due on Payment due on O Will be calculated by system Grayed out
  • 103. Discount Cash discount O Enter if cash discount is offered by vendor Hide Header data for getting full screen of items if required. Purchase order / Schedule Agreement R Select Purchase order / Schedule Agreement in the reference document category from drop down list Defaulted for user Purchase order number R Enter the first purchase order number generated above Goods / service items R Select Goods / Service items in indicator from drop down list Defaulted Layout Layout of invoice verification R Select All information from drop down list Choose Enter 4. Choose Enter to complete the document feeding part. 5. To check the document credit and debit is balanced on the top right corner of your screen a traffic light is displayed. Beside that Balance of the document is displayed. Ensure that the Balance is ZERO before posting the document and the traffic light is green or yellow color. 6. If you want to see the accounting postings in simulation mode, Choose Simulation on middle of fourth row of your screen.
  • 104. 7. Choose Save / Post, for posting the document. Check Simulate Tab
  • 105. 1.13.3 Result Logistics Invoice verification document is posted. 1.13.4 Example Document no. 5105600102 created
  • 106. 1.14Returning Delivery 1.14.1 Use A material has been received and it needs to be returned for various reasons (i.e. poor quality, incomplete, damaged). The user can use this transaction to return the material to the vendor via the original GR document. This transaction itself is an independent transaction and it is not mandatory in J81 process. This Return Delivery transaction is used only when material is rejected and needs to be returned to vendor. If material is rejected by using QM process there is no need to this transaction. This transaction can be used only without QM process materials. This transaction is used basically when purchased material is needs to be sent back to vendor because of various reasons like poor quality, incomplete items, damaged etc. b) Bore proceeding with return delivery to vendor please ensure that sufficient stock is available in storage location and if batch managed in particular batch stocks also. Other wise system will give error message. Before doing Return Delivery to vendor, check if you have already done Invoice Verification to that Goods Receipt. If you have already done invoice verification please raise Credit Memo to the extent of Returns quantity and then proceed with this process. Other wise system will give an error message. How to create Credit Memo transaction is explained in the chapter mentioned 1.17 below. 1.14.2 Procedure 1. Access the transaction choosing one of the following navigation options: SAP R/3 menu Logistics Materials Management Inventory Management Goods Movement Goods Receipt For Purchase Order PO Number Known Transaction code MIGO 2. Select Return Delivery from drop down list to make Return Delivery to vendor. 3. On the Return Delivery Material Document screen, make the following entries:
  • 107. Enter the quantity to be returned to vendor
  • 108. Field name Description R/O/C User action and values Comment Return Delivery Return Delivery R You have already selected in above step 2 Material Document Material Document number R Select from drop down list 5000000189 Enter the material document number which you have made at the time of Goods Receipt for purchase order Enter Document Date Document Date R Enter document date Delivery Note in Header O Delivery Number. Will be defaulted if you have already entered in original document Posting Date Posting date R Enter posting date Enter the appropriate Reason for Movement Select Blocked Stock to Return the rejected Material
  • 109. Bill of lading Bill of lading O Enter bill of lading. Header text Header text O Enter header text Via Delivery Via Delivery R Tick the check box Close Header Detail data to enlarge the Detail data. Select Material tab at Detailed Data. Material Material tab R Defaulted from Purchase Order Grayed out Select Quantity tab in Detail data. Qty in unit of entry Quantity in unit of entry R Enter the quantity you want to return to vendor. As a default system will give original Goods Receipt quantity 5000 You can not return more than what you have in stock Qty in delivery note Quantity in delivery note O Enter the quantity 100000 Select Where tab in Detail data. Movement type Movement type R Defaulted by the system with 122 movement Stock type Stock type R Enter stock type from drop down list Plant Plant R Defaulted from original Goods Receipt 1000 Grayed out Storage location Storage location R Enter the store location from which you want to return to vendor Goods Recipient Goods Recipient O Enter the name of person who received goods Unloading point Unloading point O Reason for Movement Reason for Movement R Select from the drop down list the reason for this movement of material 0001 Text Text O Enter the text if required Select Purchase Order tab in Detail data. Purchase Order Purchase Order R Defaulted from header data Grayed out
  • 110. Del. completed ind. Delivery completion indicator R Defaulted from purchase order Select Partner tab in Detail data. Vendor Vendor name O Grayed out Select Batch tab in Detail data. This tab will come only if material is managed in batches. Proceed with the following steps if material is batch managed only. Batch Batch number R Enter batch number if externally maintained by you or system will allocate batch number Vendor batch Vendor batch O Enter vendor batch number for reference Enter the Goods Issue Indicator as IPD
  • 111. Field name Description R/O/C User action and values Comment Select Create Excise Invoice Select Create Excise Invoice R Choose Create Excise Invoice from drop down list Select from drop down list Excise Group Excise Group R Defaulted by the system Series Group Excise Series group R Defaulted by the system Removal time Removal time of goods R System defaults current time, change if required BED Basic Excise Duty R Defaulted from purchase order Grayed out AED Additional Excise Duty R Defaulted form purchase order Grayed out SED Special Excise Duty R Defaulted from purchase order Grayed out Close Header Detail data to enlarge the Detail data. Select Excise Item tab at Detailed Data (at the last). Chapter ID Chapter ID of material R Defaulted by the system No action required Enter the Sub type as PR for Vendor Returns
  • 112. EI Quantity Excise Invoice Quantity R Defaulted by the system from return delivery document 2 Base Value Base value of material R Defaulted by the system BED Basic Excise Duty R Defaulted by the system Goods Issue Indicator Goods Issue Indicator R Select from drop down list IPD for this process Please cross check the BED, AED, SED, NCCD and ECS amount of item as per the Vendor Excise Invoice, legally you cannot avail more than what mentioned in Vendor Excise Invoice. All other information is defaulted by the system. Hence, no action required by the user. 4. Choose Check at the top of screen. 5. Choose Post to post the document.
  • 113. 1.14.3 Result Return Delivery document created 1.14.4 Example Return Delivery Document No. 50000000011 created. Note: Excise Invoice for Return delivery also will be generated in the back ground for this transaction
  • 114. 1.15Excise Invoice Other Movements 1.15.1 Procedure 1. Access the activity choosing one of the following navigation options: SAP CIN R/3 User menu Indirect taxes Sales / Outbound Movements Excise Invoice For Other Movements Excise Invoice for Other Movements Transaction Code J1IS 2. On the Excise Invoice Other Movements – Main Menu screen, make the following entries: 3. Choose Display Excise Invoice icon to start the transaction Enter the Sub type as PR for Vendor Returns
  • 115. Field name Description R/O/C User action and values Comment Reference Doc Number Document Number R Enter the return delivery document number which you have created in above step 0000000126 Doc Year Document year R Enter the year of document created Example: 2006 Enter
  • 116. 1.15.2 Result Excise invoice generated is displayed. 1.15.3 Example Excise invoice 0000000014 generated and displayed.
  • 117. 1.16Posting and Printing the Excise Invoice 1.16.1 Use Excise Invoice has to be printed and sent along with the material. This is legal requirement in India. 1.16.2 Prerequisites Excise Invoice Document is generated and posted. 1.16.3 Procedure 1. Access the transaction choosing one of the following navigation options: SAP CIN R/3 User menu Indirect taxes Sales / Outbound Movements Excise Invoice For Other Movements Post and Print Transaction code J1IV 2. On the SAP screen, make the following entries: 3. If the document is not posted in step mentioned above, Choose Release to Accounting to post Financial Accounting document. This transaction is used to just printing of excise invoice. 4. Follow the steps mentioned below for taking print of Excise Invoice. Field name Description R/O/C User action and values Comment Excise internal reference Select internal excise invoice number from drop down list, you can find it with reference to the Excise Invoice number generated in above step 1100400070 for example with the combination of Excise Group 10 and vendor code 10006. Document No. Document Number R Enter the Excise Invoice Document Number generated in above step For example: 127 Document year Document Year R Enter the document year 2006
  • 118. 5. To take printout, select Goto from the top main menu and select Print Document from the list. Or Choose Control + P to get the access of Excise Invoice Printing screen. 6. Choose Execute icon to get list of excise invoice ready to be printed.
  • 119. 7. From the list select the excise invoice number by choosing the check box left side of number. 8. To take printout on printer Choose the Printer icon or Choose F8.
  • 120. 9. To display excise invoice on screen Choose Display icon or Choose F9. 10. System will give popup asking for pre-printed invoice serial number, Enter pre-printed excise invoice number. In this process Choose 99 for testing purpose (since it is not expected to have pre-printed invoice for testing purpose). 11. Select printer from the drop down list. Check box for Print Immediately and New spool request. 12. Choose Print Preview or Print icons to display on screen or to print on printer mentioned above. 13. If printer is connected system will print the document on printer. 1.16.4 Result Excise Invoice is printed.
  • 121. 1.17Credit Memo 1.17.1 Use In this process of Logistics Invoice Verification a credit memo is generated on vendor. Please be careful that during the total process after making logistics invoice verification you have made return delivery to vendor. To recover that money you need to do this credit memo transaction. 1.17.2 Prerequisites • Logistic Invoice Verification is already made 1.17.3 Procedure 1. Access the transaction choosing one of the following navigation options: SAP R/3 menu Logistics Materials Management Logistics invoice Verification Document Entry Enter Invoice Transaction code MIRO 2. If you are opening for the first time this transaction, system will ask for Company Code, please give 1000 to go in side the transaction. 3. On the Enter Incoming Invoice: Company Code 1000 screen, make the following entries:
  • 122. Put the Qty and Price to be returned Select Credit Memo in this tab
  • 123.
  • 124. Field name Description R/O/C User action and values Comment
  • 125. Transaction Credit memo R Select Credit memo from drop down list Header Data Header data of Invoice R Defaulted by system Basic tab Basic information tab R Select basic information tab to give initial information Invoice Date Invoice Date R Enter the Vendor invoice date Reference Invoice reference O Enter the vendor invoice reference Posting date Posting Date R Enter the posting date of document System will give current date as default Amount Credit memo Amount R Enter invoice (credit memo) gross amount including taxes and duties Currency R Enter the currency in which the bill is presented by vendor, if not entered by user system will default the document currency from purchase order Calculate tax Check box calculate tax O Check this tick box, system will calculate tax amount Tax code R Select the tax code from drop down list Bus.place/se ctn Business place or section code R Enter section code if Tax deduction for source is active for this vendor Leave blank for this process Text Text O Enter text if required for reference Payment tab Payment tab R Select payment details tab BaselineDt Base line date for payment R Enter the base line date for payment Will be defaulted if payment terms entered in PO Pmnt terms Payment terms O Payment terms of document, if entered will be defaulted from purchase order Due on Payment due on O Will be calculated by system Grayed out Discount Cash discount O Enter if cash discount is offered by vendor Hide Header data for getting full screen of items if required. Purchase order / R Select Purchase order / Defaulted for
  • 126. Schedule Agreement Schedule Agreement in the reference document category from drop down list user Purchase order number R Enter the purchase order number Goods / service items R Select Goods / Service items in indicator from drop down list Defaulted Layout Layout of invoice verification R Select All information from drop down list Choose Enter 4. Choose Enter to complete the document feeding part. 5. To check the document credit and debit is balanced on the top right corner of your screen a traffic light is displayed. Beside that Balance of the document is displayed. Ensure that the Balance is ZERO before posting the document and the traffic light is green or yellow color. 6. If you want to see the accounting postings in simulation mode, Choose Simulation on middle of fourth row of your screen. 7. Choose Save posting the document.
  • 127. 1.17.4 Result Logistics Invoice verification document is posted. 1.17.5 Example Document no. 5105600791 created 1.18Reversals / Cancellation of Invoice or Credit Memo 1.18.1 Use Invoice documents in Invoice Verification are either invoices or credit memos. These documents can be cancelled. There are two different cases:
  • 128. • If an invoice is cancelled, the system automatically creates a credit memo. • If a credit memo is cancelled, the system automatically creates an invoice. The system takes the amount and quantity for the credit memo or invoice from the invoice or credit memo to be cancelled, thus avoiding any differences between the invoice and the credit memo or the credit memo and the invoice. 1.18.2 Prerequisites An invoice document can only be cancelled if: • it was posted in Logistics Invoice Verification • It has not already been cancelled • It is not a cancellation document for another document When you cancel documents in Logistics Invoice Verification, the document line items are not automatically cleared in Financial Accounting. We recommend that you periodically clear such items (using daily background jobs, for example). 1.18.3 Procedure 1. Access the transaction choosing one of the following navigation options: SAP R/3 menu Logistics Materials Management Logistics invoice Verification Further Processing Cancel Invoice Document Transaction code MR8M 2. The initial screen for reversal appears.
  • 129. 3. In the fields Invoice doc. number and Fiscal year, enter the data for the invoice document you want to cancel. 4. In the Reversal reason field, select the reason for cancelling the invoice. This allows you to differentiate between different types of cancellations.
  • 130. 5. You can display the document to check. Choose Display document to do this. You can look at the items of the document to be cancelled. Return to the initial screen by choosing Back. Enter the reversal reason
  • 131. 6. Choose Invoice document and reverse or Press Ctrl+S or .
  • 132.
  • 133. 1.18.4 Result Document Reversed and Clear FI Documents Manually. 1.18.5 Example Document Reversed with no. 5105600114.
  • 134. 1.19Reversals / Cancellation of Goods Receipt (GR) 1.19.1 Use When any data entered incorrect during GR posting it has to be reversed. To do the cancellation of GR, all the follow on documents should be reversed. 1.19.2 Prerequisites A GR can only be cancelled if: • Invoice Verification posted if any should be reversed. 1.19.3 Procedure 1. Access the transaction choosing one of the following navigation options: SAP R/3 menu Logistics Materials Management Inventory Management Goods Movement Goods Receipt For Purchase Order PO Number Known Transaction code MIGO
  • 135. 2. Choose Cancellation and enter the respective Material Document No. (GR No.)
  • 136. 3. Press enter so that all the data will be captured automatically by the system. If any comment is there to mention it can be mentioned in the Head Text and Text which is available at the Item level.
  • 137. 4. Press Enter to continue and check all the details 5. Select the Check box Item OK, after entering all the data. You will get Excise Invoice tab at Header Data and Item Details. 6. Choose Check at the top of screen.
  • 138. 7. Press Ctrl+S or to post the document
  • 139. 1.19.4 Result Material document posted, please note the document number. 1.19.5 Example Material document 5000000020 posted
  • 140. 1.20 Reversing CENVAT Postings 1.20.1 Purpose When the Material Document is cancelled the CENVAT Posting should also be reversed or cancelled. 1.20.2 Prerequisites Material Document (GR) should be reversed. 1.20.3 Procedure 1. Access the transaction choosing one of the following navigation options: SAP R/3 menu Country India User Menu → Indirect Taxes → Procurement → Excise Invoice → Incoming Excise Invoice → Central Processing → Capture / Change / Cancel / Display / Post Transaction code J1IEX
  • 141. 2. Select Post CENVAT. 3. Select Vendor Excise Invoice. 4. Enter the excise invoice number. 5. Press Enter to continue
  • 142. 6. Choose Simulate CENVAT 7. A dialog box appears, showing which postings the system will make to reverse the CENVAT.
  • 143. 8. Choose Post CENVAT.
  • 144. 1.20.4 Result CENVAT Posting Reversed. 1.20.5 Example CENVAT Posting Reversed with document no. 0000000008.
  • 145. 1.21 Canceling Excise Invoices 1.21.1 Purpose When the Material Document is cancelled the CENVAT Posting should also be reversed or cancelled. 1.21.2 Prerequisites • Material Document (GR) should be reversed. • CENVAT Posting should be Reversed. 1.21.3 Procedure 1. Access the transaction choosing one of the following navigation options: SAP R/3 menu Country India User Menu → Indirect Taxes → Procurement → Excise Invoice → Incoming Excise Invoice → Central Processing → Capture / Change / Cancel / Display / Post Transaction code J1IEX 2. Select Cancel. 3. Select Vendor Excise Invoice.
  • 146. 4. Enter the excise invoice number.
  • 147. 5. Enter the Rejection Code.
  • 148. 6. Save the excise invoice. Enter the Rejection Code
  • 149. 7. Press Yes to Cancel the Excise Invoice.
  • 150. 1.21.4 Result Excise Invoice has been successfully cancelled. 1.21.5 Example Excise Invoice 0000000008 / 2008 ( 1234 ) has been successfully cancelled.
  • 151. 2 Procurement of Imported Materials – Business Process Procedure 2.1 Procurement of Imported Materials 2.1.1 Purpose This process Procurement of Imported Materials shows you how to handle the Countervailing duty (CVD) on imports, which is levied in place of excise duty. Unlike other forms of customs duties, such as basic customs duty or special customs duty, you can credit CVD paid on imports to your CENVAT account. Prerequisites The following scenario specific master data must be created for operation of this building block and subsequent dependent building blocks. • Material Master record (Refer User Manual – Procurement of Stock Materials (Domestic) • Vendor Master record Ensure that GR based IV is not selected in Purchasing Data. (Refer User Manual – Procurement of Stock Materials (Domestic) • CIN Master Data (Refer User Manual – Procurement of Stock Materials (Domestic)
  • 152. 2.2 Creating Purchase Order 2.2.1 Use A purchase order is a legal document used to record an individual purchase with the vendor. It also provides the vendor with a reference document to link to goods receipt and invoice verification processes. The purchase order is a commitment to a vendor for a given material, in a specified quantity at a predetermined price and delivery date. 2.2.2 Prerequisites Before starting the process, please ensure the following information: • Commissioner of Customs is created as domestic vendor, for example: vendor code 600000 - RBI Commissioner in this process. • In master record of main imported vendor GR-based invoice verification tick should not be there on Purchasing Data screen of vendor master. And Schema group, Vendor is filled with schema group ZI. For example vendor code 200000 in this process. • These are basic master data changes with respect to this process only. For all purchase order a release procedure is applied. 2.2.3 Procedure 5. Access the transaction choosing one of the following navigation options: SAP R/3 menu Logistics Materials Management Purchasing Purchase Order Create Vendor/Supplying Plant Known Transaction code ME21N 6. On the Create Purchase Order screen, make the following entries:
  • 153. 7. For Basic Customs Duty(JCDB),CVD(JCV1),Addition Customs Duty(JADC),E-cess on CVD(JECV) E-Cess (JEDB) Don’t Put Tick in GR Based Mention Tax code as V0 Put Doc Type as Import
  • 154. Enter the Customs Duties in respective Condition type fields
  • 155. . 8. To change the vendor for condition type select JCDB condition type and Choose on Condition detail icon located at left bottom side of your screen. 9. System will take to new Item – Conditions – Detail: screen. In this screen at right bottom of screen you can find the vendor code 60000 the main imported vendor is defaulted here. You have to replace this vendor code with respective vendors and Choose enter and green arrow to come back (F3) to condition tab of purchase order. Select Each Condition Type related to Customs and click this Details Button
  • 156.
  • 157. 10. Repeat the same for other condition types such as JCV1, JECV, JADC, and JEDB etc. 11. Purchase Order may be posted by Choosing on the Save icon. Change DS200 to DS250(appropriate vendor) for each condition types
  • 158. 2.2.4 Result A message will be displayed stating that the purchase order was saved, with the purchase order number, please note the purchase order number. 2.2.5 Example Standard PO created under the number 3100000000.
  • 159. 2.3 Release Purchase Order 2.3.1 Procedure 1. Access the transaction choosing one of the following navigation options: SAP R/3 menu Logistics Materials Management Purchasing Purchase Order Release Individual Release Transaction code ME29N Click Other Purchase Order Enter PO No
  • 160. Click This Icon to Release PR
  • 161. Click This Icon to Release Click This Icon to Save
  • 162. 2.4Message Output 2.4.1 Use A Purchase Order needs to be printed for transmitting to vendor. 2.4.2 Procedure 8. Access the transaction choosing one of the following navigation options: SAP R/3 menu Logistics Materials Management Purchasing Purchase Order Messages Print/Transmit Transaction code ME9F 9. On the Message Output screen, make the following entries 10. Choose to Execute.
  • 163. 11. On screen Message Output select the appropriate Document number and perform the following: Choose Output Message and/or Choose Display Message and/or Choose Message Detail and/or Choose Trial Printout. 2.5 CAPTURING BILL OF ENTRY 2.5.1 Use
  • 164. In this process of Logistics Invoice Verification all the Incoming Invoices are verified in terms of their content, prices and arithmetic. When the invoice is posted, the invoice data is saved in the system. The system updates the data saved in the invoice documents in Materials Management and Financial Accounting. 2.5.2 Procedure 7. Access the transaction choosing one of the following navigation options: SAP R/3 menu Logistics Materials Management Logistics invoice Verification Document Entry Enter Invoice Transaction code MIRO 8. If you are opening for the first time this transaction, system will ask for Company Code, please give 1000 to go in side the transaction. 9. On the Enter Incoming Invoice: Company Code 1000 screen, make the following entries: Choose Planned Delivery Costs
  • 165. Enter the Amounts of the Customs Duties Manually in the Amount Column with referring to PO. Field name Description R/O/C User action and values Comment
  • 166. Transaction Invoice R Select Invoice from drop down list Header Data Header data of Invoice R Defaulted by system Basic tab Basic information tab R Select basic information tab to give initial information Invoice Date Invoice Date R Enter the Vendor invoice date Reference Invoice reference O Enter the vendor invoice reference For Example USERMANUAL Posting date Posting Date R Enter the posting date of document System will give current date as default Amount Invoice Amount R Enter invoice gross amount including taxes and duties 39.80 Amount mentioned is only an example Currency R Enter the currency in which the bill is presented by vendor, if not entered by user system will default the document currency from purchase order USD Calculate tax Check box calculate tax O Check this tick box, system will calculate tax amount Tax code R Select the tax code from drop down list V0 Bus.place/se ctn Business place or section code R Enter section code if Tax deduction for source is active for this vendor Leave blank for this process Text Text O Enter text if required for reference Payment tab Payment tab R Select payment details tab BaselineDt Base line date for payment R Enter the base line date for payment Will be defaulted if payment terms entered in PO Pmnt terms Payment terms O Payment terms of document, if entered will be defaulted from purchase order Due on Payment due on O Will be calculated by system Grayed out
  • 167. Discount Cash discount O Enter if cash discount is offered by vendor Purchase order / Schedule Agreement R Select Purchase order / Schedule Agreement in the reference document category from drop down list Defaulted for user Purchase order number R Enter the first purchase order number generated above Planned Delivery Costs R Select Planned Delivery Costs in indicator from drop down list Layout Layout of invoice verification R Select All information from drop down list Choose Enter 10. Choose Enter to complete the document feeding part. 11. To check the document credit and debit is balanced on the top right corner of your screen a traffic light is displayed. Beside that Balance of the document is displayed. Ensure that the Balance is ZERO before posting the document and the traffic light is green or yellow color. 12. If you want to see the accounting postings in simulation mode, Choose Simulation on middle of fourth row of your screen.
  • 168. 13. Choose Display Currency which will lead to small pop-up window having the company code currency and Document Currency, position the cursor on the INR to convert to Document Currency and press the details button.
  • 169.
  • 170.
  • 171. 8. Choose Save / Post, for posting the document. 2.5.3 Result Logistics Invoice verification document is posted. 2.5.4 Example Document no. 5105600121created
  • 172. 2.6 Goods Receipt for Imported Purchase Order 2.6.1 Use Goods are received from the Vendor as a result of a Purchase Order at the receiving plant. A goods movement is entered into the system referencing this PO and a goods receipt material document is posted. Appropriate general ledger accounts are also posted and stocks are updated. 2.6.2 Procedure 1. Access the transaction choosing one of the following navigation options: SAP R/3 menu Logistics Materials Management Inventory Management Goods Movement Goods Receipt For Purchase Order PO Number Known Transaction code MIGO 2. On the Goods Receipt Purchase Order screen, make the following entries: Field name Description R/O/C User action and values Comment Goods Receipt Goods Receipt R Select from drop down list for action Inbound Delivery Purchase Order R Enter the Purchase Order No.generated above 3100000000 Movement Type 101 Enter Since this is imported purchase order and you have already done invoice verification for planned delivery cost. System will give a new popup Excise Invoice item number screen (which is not there in normal other process) asking for Commercial invoice number and year. Please enter the invoice verification document number which you have done in above 5105600792 and year 2006.
  • 173. 3. Choose Enter where a small pop-up window will prompt to enter the Commercial Invoice No. and Year (i.e., the Invoice Verification posted for Bill of Entry)
  • 174. 4. After pressing Enter system will fetch all the data from the Purchase Order as shown below: Enter the No generated for the posting of Bill of Entry
  • 175. 5. System defaults the balance quantity in Purchase Order. Whichever material is in Blue those detail will be seen in the Item detail
  • 176.
  • 178. Field name Description R/O/C User action and values Comment Goods Receipt Goods Receipt R Select from drop down list for action Inbound Delivery Purchase Order R input the Purchase Order number which generated above 4500000059 Movement Type 101 Enter Document Date Document Date R Enter document date Delivery Note in Header O Delivery Number from Vendor Vendor Vendor R Defaulted from purchase order Grayed out Posting Date Posting date R Enter posting date Bill of lading Bill of lading O Enter bill of lading Select Item Ok and Press Enter and the Excise tab will appear both in Header and Item Level
  • 179. Header text Header text O Enter header text Close Header Detail data to enlarge the Detail data. Select Material tab at Detailed Data. Material Material tab R Defaulted from Inbound Delivery Grayed out Select Quantity tab in Detail data. Qty in unit of entry Quantity in unit of entry R Enter the quantity you have received from vendor. As a default system will give purchase order quantity Quantity defaulted from Purchase Order Qty in delivery note Quantity in delivery note O Enter the quantity as per vendor delivery challan Select Where tab in Detail data. Movement type Movement type R Defaulted from header screen Stock type Stock type R Defaulted from material master or purchase order Plant Plant R Defaulted from purchase order 1000 Storage location Storage location R Defaulted from Inbound delivery if entered 1010 Goods Recipient Goods Recipient O Enter the name of person who received goods Unloading point Unloading point O Text Text O Enter the text if required Select Purchase Order tab in Detail data. Purchase Order Purchase Order R Defaulted from header data Grayed out Del. completed ind. Delivery completion indicator O Defaulted by system if PO Qty = GR Qty Select Partner tab in Detail data. Vendor Vendor name O Grayed out For this material batch management is not active. Just for reference purpose the following data is given. Select Batch tab in Detail data.
  • 180. This tab will come only if material is managed in batches. Proceed with the following steps if material is batch managed only. Batch Batch number R Enter batch number as date for batch managed materials Vendor batch Vendor batch O Enter vendor batch number for reference 7. Select the Check box Item OK, after entering all the data. You will get Excise Invoice tab at Header Data for capturing vendor excise invoice details and for posting Part I and Part II. 8. On the Excise Invoice tab at Header Data make the following entries.
  • 181. Field name Description R/O/C User action and values Comment Capture & Post Excise invoice Capture & Post Excise Invoice on Excise Action R Choose Capture & Post Excise Invoice from drop down list Defaulted Excise Group Excise Group R Defaulted by the system Excise Invoice Excise invoice R Enter the vendor Excise Invoice number For example: 4500000059 Excise Inv. Date Excise Invoice Date R Enter the excise invoice date of vendor BED Basic Excise Duty R Defaulted from purchase order Grayed out AED Additional Excise Duty R Defaulted form purchase order Grayed out SED Special Excise Duty R Defaulted from purchase order Grayed out NCCD NCCD R Defaulted from purchase order Grayed out ECS Education Cess R Defaulted from purchase order Grayed out Close Header Detail data to enlarge the Detail data. Select Excise Item tab at Detailed Data (at the last). Chapter ID Chapter ID of material R Defaulted by the system No action required EI Quantity Excise Invoice Quantity R Defaulted by the system from Goods Receipt quantity Base Value Base value of material R Defaulted by the system BED Basic Excise Duty R Defaulted by the system AED Additional Excise Duty O Defaulted by the system NCCD NCCD O Defaulted by the system SED Special Excise Duty O Defaulted by the system ECS Education Cess O Defaulted by the system Please cross check the BED, ECS (CVD in this case) amount of item as per the bill of lading, legally you can not avail more than what mentioned in Vendor Excise Invoice. In case of imported purchase order in normal case system will default CVD and ECess (invoice verification made on commissioner of customs) amount as BED and ECS i.e. CENVAT amount.
  • 182. 12. Choose Check at the top of screen. 13. Choose Post to post the document.
  • 183. 2.6.3 Result Material document posted. 2.6.4 Example Material document 5000000021 posted You can see account posting here
  • 184. 2.7 Logistics Invoice Verification for the Materials 2.7.1 Use In this process of Logistics Invoice Verification all the Incoming Invoices are verified in terms of their content, prices and arithmetic. When the invoice is posted, the invoice data is saved in the system. The system updates the data saved in the invoice documents in Materials Management and Financial Accounting. 2.7.2 Procedure 1. Access the transaction choosing one of the following navigation options: SAP R/3 menu Logistics Materials Management Logistics invoice Verification Document Entry Enter Invoice Transaction code MIRO 2. If you are opening for the first time this transaction, system will ask for Company Code, please give 1000 to go in side the transaction. 3. On the Enter Incoming Invoice: Company Code 1000 screen, make the following entries:
  • 185. Field name Description R/O/C User action and values Comment Transaction Invoice R Select Invoice from drop down list Header Data Header data of Invoice R Defaulted by system Basic tab Basic information tab R Select basic information tab to give initial information Invoice Date Invoice Date R Enter the Vendor invoice date Reference Invoice reference O Enter the vendor invoice reference For Example 1000 Posting date Posting Date R Enter the posting date of document System will give current date as default Amount Invoice Amount R Enter invoice gross amount Amount Select Goods /Service Items
  • 186. including taxes and duties 100 mentioned is only an example Currency R Enter the currency in which the bill is presented by vendor, if not entered by user system will default the document currency from purchase order USD Calculate tax Check box calculate tax O Check this tick box, system will calculate tax amount Tax code R Select the tax code from drop down list V0 Bus.place/se ctn Business place or section code R Enter section code if Tax deduction for source is active for this vendor Leave blank for this process Text Text O Enter text if required for reference Payment tab Payment tab R Select payment details tab BaselineDt Base line date for payment R Enter the base line date for payment Will be defaulted if payment terms entered in PO Pmnt terms Payment terms O Payment terms of document, if entered will be defaulted from purchase order Due on Payment due on O Will be calculated by system Grayed out Discount Cash discount O Enter if cash discount is offered by vendor Hide Header data for getting full screen of items if required. Purchase order / Schedule Agreement R Select Purchase order / Schedule Agreement in the reference document category from drop down list Defaulted for user Purchase order number R Enter the first purchase order number generated above Goods / service items R Select Goods / Service items in indicator from drop down list Defaulted Layout Layout of invoice verification R Select All information from drop down list
  • 187. Choose Enter 4. Choose Enter to complete the document feeding part. 5. To check the document credit and debit is balanced on the top right corner of your screen a traffic light is displayed. Beside that Balance of the document is displayed. Ensure that the Balance is ZERO before posting the document and the traffic light is green or yellow color. 6. If you want to see the accounting postings in simulation mode, Choose Simulation on middle of fourth row of your screen. Choose Display Currency to change in INR
  • 188. 7. Choose Display Currency which will lead to small pop-up window having the company code currency and Document Currency, position the cursor on the INR to convert to Document Currency and press the details button.
  • 189. 9. Choose Save / Post, for posting the document.
  • 190. 2.7.3 Result Logistics Invoice verification document is posted. 2.7.4 Example Document no. 5105600122 created 3 Procurement of Subcontracting Materials – Business Process Procedure
  • 191. 3.1Procurement of Subcontracting Materials 3.1.1 Purpose In Indian subcontracting process when you issue materials to a subcontractor, you need to keep track of what materials you have issued and when they have to be returned by subcontractor. The reason for this close monitoring has to do with Indian tax law. Under excise law 57AC, when you send materials to a subcontractor for processing, you are not required to pay any excise duty, even though the materials have left your premises. However, if the materials have not been returned to you within 180 days specified by the law, you will have to reverse any excise credit that you posted when you have purchased the materials. When you send material out of your factory premises you need to send with 57F4 Challan. In this process you are going to do the same. 3.1.2 Prerequisites The following scenario specific master data must be created for operation of this building block and subsequent dependent building blocks. • Material Master record (Refer User Manual – Procurement of Stock Materials (Domestic)) • Vendor Master record (Refer User Manual – Procurement of Stock Materials (Domestic)) • Purchasing Info Record (Optional) Ensure that Sub-Contracting as Info Category. (Refer User Manual – Procurement of Stock Materials (Domestic)) • CIN Master Data (Refer User Manual – Procurement of Stock Materials (Domestic)) o Chapter IDs o Material ID and chapter ID combination (Ensure Sub-Contract check box is selected for the Materials that provided to vendor) o CENVAT Determination o Vendor Excise Details o Excise Indicator for Plants o Excise Indicator for Plant and Vendor o Excise Tax Rates 3.2Creation of Subcontracting Purchase Order 3.2.1 Use
  • 192. A purchase order is a legal document used to record an individual purchase with the vendor. It also provides the vendor with a reference document to link to goods receipt and invoice verification processes. The purchase order is a commitment to a vendor for a given subcontracting activity, in a specified quantity at a predetermined price and delivery date. 3.2.2 Prerequisites Components stock should be available for providing to subcontracting vendor. 3.2.3 Procedure 1. Access the transaction choosing one of the following navigation options: SAP R/3 menu Logistics Materials Management Purchasing Purchase Order Create Vendor/Supplying Plant Known Transaction code ME21N 2. On the Create Purchase Order screen, make the following entries: Select ZSC Document Type for Subcontracting Order