SlideShare une entreprise Scribd logo
1  sur  114
Transportation module

Transpor tation (LE-TRA)
          Purpose


Transportation is an essential element in the logistics chain. It affects both incoming and outgoing goods.
Effective transportation planning and processing ensure that shipments are dispatched without delay and
arrive on schedule. Transportation costs play an essential role in the calculation of the price of a product. It is
important to keep these transportation costs to a minimum so that the price of a product remains competitive.
Efficient transportation planning and processing helps to keep these costs down.

          Integration


As illustrated in the following graphic, you can use the SAP transportation functions to plan and process:
  •      Incoming shipments in Materials Management based on purchase orders and shipping notifications
  •      Out bound shipments in Sales and Distribution based on sales orders and deliveries
The graphic below illustrates this process:


Transportation planning and processing is based on the shipment document. This document facilitates the flow
of information from the shipper to the customer and to any service agents who are involved in the business
transaction.

          Features


The transportation component includes basic transportation processing functions:
  •     Transportation planning and shipment completion
  •     Shipment costs calculation
  •     Shipment costs settlement
  •     Shipment costs calculation for individual customers
  •     Billing of customer freight
  •     Service agent selection
  •     Management of means of transport and utilities
•     Follow-up and supervision of shipments
  •     Management of shipment costs
These transportation functions can handle planning and processing for both inbound and outbound shipments.
You can control and monitor the entire transportation process from the planning stage to goods issue at your
shipping point (for outbound shipments) or vendor location (for inbound shipments), through to goods receipt at
the customer location or your plant.
Other available functions include: shipment costs calculation and settlement with the service agent, transfer to
accounting, credit memo creation and invoice verification.


            This documentation describes procedures in outbound shipment processing. Unless specifically
            stated otherwise, the information here also applies to inbound shipment processing. Differences
            between the two will be pointed out where necessary.
            For more information about creating and processing inbound deliveries, see the Confirmations
            section of the documentation for Purchasing (MM-PUR).


About Transportation
The following text describes basic elements of shipment processing, which also include:

   •   the function of the organizational unit of transportation planning point
   •   the function of the shipment document
   •   output determination
   •   a compilation of the reports available in shipment processing

Transportation Planning Point
         Definition


You can now carry out transportation planning and shipment completion using a new organizational unit, the
transportation planning point. Basically, the transportation planning point consists of a group of employees
responsible for organizing transportation activities. Each shipment is assigned to a specific transportation
planning point for transportation planning and shipment completion. You must define the various transportation
planning points used in your organization in Customizing for Corporate Structure before they can be used to
perform transportation functions. You can define this organizational unit according to your company’s needs,
for example, according to geographical location or mode of transport.


               The transportation planning point is assigned to a company code, but is otherwise independent
               of other organizational units.


Procedures Valid for Entire Company Codes
         Use


It is not necessary to assign the transportation planning point to a company code for transportation planning
purposes. However, company code assignment is necessary for shipment costing and settlement. Internal
offsetting of costs between company codes (one company code takes care of transportation processing for all
the firm’s company codes, for example) is presently not available. These must be manually entered in the
financial accounting ledgers.

          Prerequisites


In order for this cross-company-code manual processing to be possible in financial accounting, cost distribution
for shipment costs must occur on the shipment cost item level rather than delivery level or delivery item level,
since in the latter two cases, the delivery’s company code would be adapted to the transportation planning
point’s company code.


               A company’s plant in Japan delivers goods to a plant in Houston. The plant in Japan takes care
               of the shipment costs until the goods reach the airport in Japan, and the Houston plant pays the
               rest of the shipment costs (Japan airport → Houston airport → Houston plant).

               The transportation chain with cross-company-code billing looks like this:

               There are a total of three shipments:

   •    The first shipment is created by the transportation planning point in Japan and ends at the airport in
        Japan. Cost distribution occurs on the shipment cost item level.
   •    The second and third shipment are created by the transportation planning point in Houston. In both
        cases, cost distribution occurs on the shipment cost item level.


       Shipment Types
          Definition


The shipment type contains all the important control features for a shipment, such as the number range,
whether the shipment is inbound or outbound, how leg determination is performed, and which leg indicator has
been set for a shipment of this type. You can also enter a selection variant for the shipment type. The values
defined in the variant appear on the selection screen when you create a shipment document of this type.

The system supports the following shipment types:

   •    Individual shipment

   •    Collective shipment

   •    Transportation chain

          Individual shipment


An individual shipment includes

   •    One or more deliveries

   •    One point of departure

   •    One destination
•   One mode of transport


         Collective shipment


A collective (or milk-run) shipment includes

   •   One or more deliveries

   •   Several points of departure

   •   Several destinations

   •   One mode of transport


         Transportation chain


A transportation chain is useful if you are dealing with deliveries that will be transported using multiple modes
of transportation (and are thus processed by different departments at the transportation planning point).

Transportation Chain
The department responsible for transportation by land organizes truck shipments and another
               department organizes ships and their cargo for goods shipment by sea. Each mode of transport
               (truck and ship) requires individual shipping papers. Each mode of transportation requires
               separate transportation papers, meaning that you need to create a shipment document for the
               overland leg and another for the overseas leg of the journey.


               If shipments use more than one mode of transportation, it is a good idea to create a
               transportation chain. Because you will have a separate shipment document for each mode of
               transportation, you can maintain separate output, texts, statuses, and so on.


Example for using a transportation chain

At shipping points 0001 and 0002 in Germany, a large number of deliveries are to be sent to customers in the
United States by the beginning of December. You and your customers agreed that part of the shipment be sent
carriage paid and the other part carriage, insurance, freight paid to (CIF) New York only (meaning that the end
customer must pay carriage, insurance and freight from New York to the final destination).

The goods are to be transported by land within Germany, by sea from Hamburg to New York, and by land
again in the United States. It is, of course, possible to document the entire process in a shipment document.
However, problems can arise if certain parts of the shipment functions are used:

   •   For instance, data on the shipment status always refers to the entire shipment document (for example,
       the status "Loading finished"). However, in this example loading takes place several times.

   •   For the same reason, an assignment of dates and texts to a handling unit is difficult because these can
       change within the shipment document. The very definition of a handling unit is in itself problematic.

   •   Output to be created in combination with the shipment document contains all data for the entire
       shipment document. When the truck driver leaves the shipping point, his printout also contains data that
       refers to the ship. This is unnecessary and a nuisance. Processing several required preliminary legs at
       different times also requires that output be printed at different times.

In cases like this, it makes more sense to use a transportation chain in which deliveries are passed on in a
series of different shipments. In the above example, you would create several shipment documents in the
system: ten preliminary leg shipments by truck, one main leg by ship, and if necessary, eight subsequent legs
by truck again. That way, you avoid the problem of assigning deadlines, output, or texts to the packaging
material.

With that in mind, you might put together your transportation chain like this:
1. Create a main leg

   At transportation planning point 0001, you create a main leg shipment for all deliveries to be sent by
   ship from Hamburg to New York City at the beginning of December. There should be a special
   shipment type set for this set in Customizing. This could include the following settings:

      o   Set the leg indicator field for the shipment header to Main leg. The system will recognize that
          this shipment must be linked to other shipments.
      o   The leg determination type for this shipment type should be ‘ ‘.This means that no automatic leg
          determination will be carried out. This is reasonable since the Hamburg-to-New York leg does
          not include any points of departure or destinations from the delivery (however, this data will be
          taken into account during leg determination).
      o   Route determination resulting in the Hamburg-to-New York route may have already been
          carried out in the delivery. If you want to copy this route automatically into the main leg
          shipment, you can specify in Customizing that routes must be copied into the shipment
          document. Copying starts as soon as you set the Planned status in the shipment document.
          (Note that the route in the deliveries must be unique.) At the same time, the service agent can
          also be copied automatically from the delivery provided you have made the appropriate settings
          in Customizing and that the same service agent has been assigned to the deliveries.

   When the deliveries were created, they were given transportation planning status A, meaning they were
   ready for transportation planning. Now, after creating the main leg shipment, these deliveries have
   transportation planning status B, meaning that they have been partially planned (since a main leg
   shipment needs preliminary and possibly subsequent legs).


2. Create preliminary legs

   The preliminary leg shipments that are used to send the goods from shipping points 0001 and 0002 to
   the ship in Hamburg can be organized much faster than the ship itself, which is why they are planned at
   this time. You must now combine all deliveries in the main leg shipment into one or more preliminary
   leg shipments. You can do this in the Create Shipment transaction.

   To do this, you must select all deliveries in the main leg shipment. The transportation planning status of
   the delivery may be helpful in determining which deliveries are in the main leg shipment since their
   status is now set to B instead of A. Of course, this is not sufficient as a single selection criterion. He can
   enter further selection criteria that are used during delivery selection for the main leg. This may be
   impractical since you may not now what the selection criteria were or too many deliveries may be
   selected.

   Therefore, it is better to specify the shipment number of the corresponding main leg shipment in the
   Reference to line when selecting deliveries. If you do not know the number, press F4 and a selection
   screen will appear. In this case, a further selection screen for shipment number selection appears. On
   this screen, you can specify the person who created the shipment document, the point of departure,
   and the date in order to determine the number of the main leg shipment.

   You create shipments using the worklist you defined. If each delivery corresponds to exactly one
   truckload, the planner can call up the function Edit → Automatic planning → One dlv. one shipment,
   which creates a separate shipment for each delivery.

   You should use the following settings:

      o   Set the leg indicator to preliminary leg.
o   Set the leg determination type to 1 (leg determination according to pick-up sequence and
              itinerary).
          o   Do not copy the route from the delivery. It may be a good idea to copy the service agent.

       When the Planned status is set, leg determination begins, but the route is not copied from the
       deliveries. It will determine the pick-up sequence. In addition, the system suggests Hamburg as
       destination since the deliveries are part of a main leg shipment that runs from Hamburg to New York.

       When the shipment is saved, the system updates the delivery status. The status for the carriage paid
       deliveries remains B (partially planned), since the second part of the Incoterm was left blank and the
       system assumes that a subsequent leg is required. The status of the deliveries with CIF New York is
       set to C (completely planned) since the second part of the Incoterm has been specified and the system
       assumes that a subsequent leg is not necessary.

   3. Create subsequent legs

       You create subsequent legs the same way you create preliminary legs. Use these settings:

          o   Set the leg indicator to subsequent leg.
          o   Use category 1 for leg determination.
          o   Do not copy the route from the deliveries.

       In order to create these shipments, search for deliveries with a transportation planning status of B. The
       system then finds only those deliveries for which a subsequent leg is to be created. If the Planned
       status is set, it also carries out leg determination. The system automatically suggests ‘New York’ as a
       point of departure, since the main leg shipment ends in New York. The sequence in which the goods
       are delivered (itinerary) is determined by the sequence in which the deliveries are displayed on the
       screen. If the subsequent leg shipments are saved, the transportation planning status of the
       corresponding deliveries is set to C (completely planned) since these deliveries now have preliminary,
       main, and subsequent legs.

       Following these steps ensures that every delivery is included in the transportation chain. In the
       example, there are ten preliminary leg shipments to Hamburg followed by a main leg shipment and
       eight possible subsequent leg shipments in the United States. In this way, a group of deliveries forms a
       network of shipments.

   4. Monitor the transportation chain

       In order to monitor the shipments, choose Environment → Transportation info → Shipment list or
       Environment → Transportation info → Transportat.network depending on whether you are processing
       orders, deliveries, or shipments. Worklists for transportation planning and processing may also provide
       an overview. To generate a worklist, enter one of the shipment numbers that make up the
       transportation network in the Reference to line. The system will then select all shipment documents in
       the network.


Shipment document
         Definition


The shipping document is the central element of transportation planning and shipment completion. It contains
all the information necessary for carrying out transportation.
Use


You create shipment documents using a worklist. Different types of shipment documents have been defined to
enable you to reflect in the system the various forms of transportation used in your organization.

For example, you use the individual shipment document to plan and process the transportation of goods from
one location to another. You use the collective shipment to move goods from one or more points of departure
to one or more destinations. Separate document types deal with inbound and outbound shipments.

You can use shipment documents to:

   •   Combine deliveries into one inbound or outbound shipment

   •   Specify shipment stages

          o     Legs
          o     border crossing points
          o     load transfer points

   •   Assign goods to handling units

   •   Assign service agents

   •   Specify planned transportation deadlines

   •   Record actual transportation deadlines

   •   Specify output required for transportation (such as shipping papers or EDI messages)

   •   Define transport-relevant texts


Information in the Shipment Document
         Use


You can record the following information in the shipment document:

   •   Means of transport

   •   Service agents

   •   Deadlines

   •   Status
   •   Tendering status
   •   Route

   •   Texts

   •   Output
•   Dangerous goods

         Features


Means of transport

The means of transport necessary for a shipment is reflected in the system as a handling unit. These handling
units contain information about tare weight and -volume of the means of transport as well as the weight of the
packed handling unit. Information about the country providing the means of transport, details about the driver
and travel time are also included in these handling units. Handling units that have already been created for
delivery items are copied into the shipment document where they can be packed further, if necessary. Delivery
items that have only been partially packed or not packed at all can be packed in the shipment documents.

See also:

Packing in the Shipment Document

Service agents

You can store information about the service agents (such as forwarding agents or customs agents) who are
involved in the transportation process. You can record this information at the header or stage level of the
shipment document.

See also:

Assigning Service Agents in the Shipment Document

Deadlines

The time required for organizing and performing the various transportation activities is stored as planned and
actual deadlines in the shipment document. This information can be used for monitoring and analysis
purposes.

See also:

Maintaining Planned and Actual Deadlines in the Shipment Document

Transfer of Delivery Dates to Shipment

         Status


Once you have completed the planning activities for a shipment document, you can set the Planned status. As
soon as you set this status, you can no longer carry out planning activities for this shipment document (remove
deliveries from the document or move deliveries within the document, for example). Leg determination is
carried out automatically. You can define which activities take place when you set the status in the Activity
Profiles section.

A traffic light icon indicates the overall status of the shipment document. The icon can be interpreted as
follows:

   •   No traffic light:

               No planning activities have been performed
•    Red light:

               Transportation planning is complete

   •    Yellow light:

               Loading at the plant has either started or is complete

   •    Green light:

               Shipment has been processed and is in route or has arrived

See also:

Maintaining Status in the Shipment Document

Tendering status

The tendering status describes the current status of a shipment with respect to negotiations with a forwarding
agent through the Internet.

Route

If the route and the forwarding agent are the same in all deliveries, they are copied from the deliveries into the
shipment document when you set the status to Planned.

Country-specific restrictions with respect to total weight of the shipment on a particular route require recording
the restriction already at the route level. This upper level can be specified at route level and is then taken into
consideration during shipment processing. If the allowed total weight is exceeded during delivery assignment
to the shipment, the system issues a warning message. The shipment can then be changed accordingly. The
fields are displayed on the planning screen.

During order processing and delivery processing, this check is not taken into consideration.

Further transportation-relevant information is copied into the shipment document if you define the Copying
Routines in the Implementation Guide.

Texts

Additional information that could help the transportation process to run smoothly can be entered as text at
header level in the shipment document. This information can be accessed by all business partners involved in
the process. Shipment text types are defined in Customizing and assigned to text determination procedures.
Text determination procedures are defined in the shipment document type.

Output

Output processing is performed just as it is in other areas of the Sales and Distribution module: using the
condition technique. The types of output that have been set in Customizing for transportation and for which you
have created condition records appear in the shipment document and apply to the entire document. The output
type ALTR has been defined for transportation in the standard SAP System. You can change this output type
to suit your needs.
Copying Information Relevant for Transportation
          Use


When you create shipments, you can use information relevant for transportation as selection criteria. For
example, you can group together outbound deliveries with means-of-transport type "Truck" and means of
transport "Small truck" into one shipment. In sales orders and/or deliveries, you can specify that the following
information is relevant for transportation:

   •   Means of transport
   •   Shipping type
   •   Type of means of transport
   •   Special processing

          Integration


In order to copy proposals for dates and times from the delivery, you must create a connection between the
shipment dates and delivery dates. Copy routines serve this purpose.

          Prerequisites


The system uses the copy routine to copy data from sales orders into deliveries and then into shipments. In
order for the system to do this, you must first carry out the following activities in the Implementation Guide
(IMG):

   •   Specify copy control for deliveries
   •   Define shipment types

          Features


Information relevant for transportation is copied from the order into the header of the outbound delivery, and
thus supplies split criteria for outbound deliveries. For example, two order items with different shipping types,
means of transport or means-of-transport types cannot be combined into the same outbound delivery.

However, information can be copied from the outbound deliveries into the shipment, provided it is unique data.
You create a handling unit in the shipment for the means of transport (likewise only if this is unique). The
copying takes place when you set the status "Planned". Here you must store an appropriate copy routine in
Customizing for the shipment type.

The system also checks the capacity of the mode of transport in the delivery. If this capacity is exceeded, you
will receive a warning message.

Since the means of transport can also be specified on the Pack screen, the means of transport entries in the
sales order, delivery header and the corresponding packing information could vary. Changes made on the
Pack screen have no effect on the transportation-relevant information in sales orders and deliveries.
Shipment Outputs
           Purpose


In addition to printing and faxing, electronic data exchange is becoming increasingly important as a method of
communicating transportation data. Senders (shippers) transmit their shipping orders and transportation
information to their service agents (forwarding agents, ship owners, customs agents). The service agents
organize the transportation process and ensure that it is carried out smoothly. A logistics transportation chain
involving multiple modes of transport and service agents often occurs during the shipment. To ensure
efficiency in such a situation, it is especially important to get all necessary information to all parties involved at
the earliest possible point in the process.

           Process Flow


Sample process flow for electronic data exchange:


Shipping                                              Inbound Processing
   1.     The shipper sends the forwarding            The forwarding agent receives the
        agent a partially- or completely planned      transportation requests and assumes
        shipment (shipping order).                    responsibility for planning the shipment details.
   2.      The forwarding agent sends                 The vendor receives the completely planned
        information about the completely planned      shipments from the forwarding agent.
        shipments back to the shipper.
   3.      The shipper or forwarding agent      The customer receives information about the
        informs the customer about the upcoming upcoming shipment.
        shipment (shipment notification).


For more information on output control, see the Outputsection of the Implementation Guide.
You can find more information about output administration in     Working with Output in Sales and Distribution.

Output Control
         Use


You can use output control to automate either messages or subsequent processing of partner-specific
messages. The application uses interfaces that were predefined in Customizing for conditions to call up output
control.

You can use these interfaces to describe different constellations of data and the processing methods of your
choice. If one of these data constellations occurs in the application, it triggers the corresponding processing
method (either sy n ch ron ously or asynchronously). You can define processing methods in many different
ways (as print output or as a shipping IDoc for EDI, for example).

         Prerequisites


The Logistics Execution application always uses output control for issuing output. You can maintain settings for
output control in Customizing in Message control activity.

         Features


The condition technique is used in the SAP System for formulating data constellation conditions. If the current
application data matches one of the conditions defined in Customizing, output determination was successful and
an output proposal is generated. You can then change this proposal ( edit) and the output will be processed
either immediately or at a specified time. The output's processing status is saved in a status record and a
processing log is created.

See also:

  Message Control Structure

Output control only supports certain transmission media. For more information, see      Transmission media.

         Activities


In Message Control Customizing, you can define rules according to which the system accesses individual
condition records.

You can define concrete messages as condition records in the application:      Message definition in the
application


Determining Output in the Shipment Document
         Use


The output determination function enables you to perform tasks for shipping and transportation output for
delivery and transportation processing with your customers and within your company. You can create shipment
output and output for handling units. Staff members in your company can send messages. For example, the
system automatically finds the message that a bill of lading is to be printed.

          Integration


The output control checks whether the application data matches the condition records (that were defined in
Customizing). If this is the case, one or several messages are "found", and they can then be processed (for
example, sent electronically). The condition records are searched for during output determination on the basis
of a predefined hierarchy.

The Output determination function is used in output control. You can use the output control function to
exchange information with internal and external partners. Output control consists of the following functions that
are described in the cross-application documentation CA – Output Control:

    •     Output Determination
    •     Output Processing
    •     Status Management

          Prerequisites


For output determination, the condition elements and condition records need to be defined since the output
determination runs using the condition technique.

In Customizing, you can define the conditions in which the output types you define will be selected. For more
information on output control, see the Output section of the Implementation Guide.

          Features


The system can propose output automatically for a document. You can change this output in the document.

Output determination occurs when:

    •   Accessing the output screen during shipment processing
    •   Saving a shipment document that is new or has been changed

See also:

For more information on output, refer to the following documentation:


Application                                            Documentation

Basis                                                  BC – SAP Communication: Configuration

Cross-application functions                              Output Control

                                                         SAP Business Workflow


You will find Customizing settings and examples in the above documentation.

          Example
Bill of lading

    1. Output determination starts in V7STRA with output type CMR1 and the assigned access sequence.
    2. The access sequence defines the fields with which the key for the condition table is read. (for example,
       condition table B017: shipment type of the shipment is read)
    3. If the condition record is found, the system proposes an output with the output attributes found in the
       table.
    4. The output proposal (possibly not yet processed) is stored after the document is posted as an output
       status record in the NAST table.


Output Type

           Definition


There are predefined output types for shipments. You can display a list of predefined output types by using the
input help. The output type contains parameters, such as partner functions, that are valid for all outputs that
are assigned to that type.

    •   Shipment outputs include: ALTR general shipment, bill of lading, shipping order, EDI in general (SEDI),
        shipment notification, goods receipt/issue slip.
    •   Delivery outputs include: delivery note, mail (internal output), shipping notification, warehouse order,
        and package labels.

The output type signals the use of a printed form such as a delivery note that will be sent to a customer. An
output type can also be an internal, electronic-mail message that you send to a mail recipient (partner).

           Use


The output type is assigned, per transmission medium, to a form routine in a program that is called up to
process the output (output status record).

For more information, see    Defining Output Types.

           Integration


The output type comes after the procedure in the condition element hierarchy. The output type is assigned
exactly one access sequence (next hierarchical level), which in turn is assigned one or more condition
tables (next and lowest hierarchy level).

  Condition Components: Sample Hierarchy


Output Processing
           Use


Output proposals are presented to you in an application transaction. You can then either change (process) the
proposed output before you save the object (bill of lading, for example).
Features


The output proposal that was created includes, among other things, the output's recipient, the transmission
medium and the processing time for subsequent (automatic) processing. You can change all these
parameters in the application transaction.

When you create an output manually, you can specify the output type, transmission medium, print parameters,
partners, and language.

You can display a determination analysis, which displays the outputs that were found in the procedure. You
can display details for an output that show which application data the condition table was read with.

After you post the document, the processed output proposal is recorded in the NAST table as a        message
status record.


       You create a shipment with forwarding agent 1, and the system proposes a shipping order that is to be
       sent via EDI.

       The determination analysis shows that the Shipment type and Transportation planning point application
       fields were read and a condition record was found.

         Output partners


The output recipient of the output that is sent is defined as the output partner. Use the input help to choose an
output partner (sold-to party, Electronic Data Interchange -EDI mail recipient, forwarding agent, or employee
responsible, for example).

During output determination, the output recipients are determined from the partners listed in the document. In
other words, the partner function is used to determine the recipient (forwarding agent, for example).

You can enter a specific output recipient in this field. Your entry overrides the standard partner that appears.
Output recipients that are entered specifically must also be listed in the document as partners.

         Output's transmission medium


The type of processing is determined by the transmission medium. You can specify, for example, that an
output be printed out or sent by mail, fax or EDI.

Processing status

Possible status values:

Status 0 (not yet processed)

1 (processed - no errors)

2 (processed - with errors)

Dispatch time
The dispatch time is stored in the condition record. You can have the system process and update the output
either immediately or at a later time. You can use the RSNAST00 report or a special application function that
triggers processing in order to process the outputs at a later time. The following are linked to the dispatch time
as follows:

   •   Time 1: Send via periodically-planned jobs (next processing run) or start sending from RSNAST00
       online by using the ABAP/4 Development Workbench
   •   Time 2: send via jobs (as in time 1) with additional time specification of the processing time: start from
       RSNAST00 in the background at a defined time (Tools → Administration, Jobs → Job definition).


       RSNAST00 processes all output status records that meet the selection criteria and whose processing
       times or intervals either include the current date or lie in the past. Processing times or intervals are
       fields in the message status record in the NAST table. These fields are not filled with information in
       the standard system. Please note: The first Time field is different from the second Time field. In order to
       have the system complete these fields, you can define a corresponding routine in a report as an
       attribute of an output type. This routine will then be run for each output determination of this output
       type.

   •   Time 3: Send using an application transaction (specific entry): Call up an application function.

       Print transaction VT70

       Only outputs with the status 0 and the dispatch time 3 are included in initial processing.

       An output can be sent more than once. This is useful, for instance, if technical problems or other
       problems occurred in the first print output. The system copies the output that was selected; you can
       then process and send this copy.

       In repeat processing, only outputs with status 1 or 2 are selected (dispatch time is not taken into
       account). Only outputs with status 2 are selected for error processing (once again, dispatch time is
       not taken into consideration).

       There can be several versions of the same output that only differ in date or time of creation (because of
       repeat processing or multiple sending, for example). During selection, the system always chooses the
       last (chronologically latest) output from a group of similar outputs.

   •   Time 4: Send immediately (during save in the application). The output is processed when the
       document is updated.

         Activities


See also:

Selecting Output Worklist

Changing Data Relevant to Output

Changing Outputs in Document Processing

Sending Internal Mail
Selecting a Worklist for Output

           Use


Before you can process messages, you must first select a worklist.

           Procedure


    1. Call up the respective task:

Function                              Menu Path                        What you should know


Shipping                              Initial Screen Shipping
Processing delivery output            Communication/Printing →
                                      Outbound Delivery Output
Processing loading output             Communication/Printing →
                                      Loading Output
Processing handling unit output       Communication/Printing → HU
                                      output


Shipment                              Initial Screen Transportation
Processing transportation output      Communication/Printing →         You can process transportation output as
                                      Transportation Output            well as output for documents that have a
                                                                       reference to a shipment (for example,
                                                                       billing documents, deliveries). To do this,
                                                                       select the respective field and enter the
                                                                       selection criteria in the appropriate
                                                                       section
With background processing              Tools → ABAP Workbench → Print transactions VT70
                                        Development → ABAP Editor
    2. Enter the output type, the transmission medium, and, if required, further selection parameters. If you
       want to call up a worklist of all outputs that have not been processed successfully, enter 3 in the field
       Processing mode. The system displays all the incorrect outputs, and you can process them once again.
    3. If you wish to look at the worklist first and/or then make changes, choose Program → Execute.

If you wish to process the output as a background job, choose Program → Execute in the background. In this
case, you cannot execute any changes.

    4. If you wish to process output, select the respective output.

       For more information on processing output, refer to the section Processing Existing Output.

    5. Choose Edit → Process.

The system processes the selected output.

    6. If you wish to receive a log after output processing, choose Goto → Log
Changing Data Relevant to Output

           Prerequisites


You must have the worklist created. For more information on creating a worklist, refer to the section       Creating
a Worklist for Output.

           Procedure


Select the respective output and execute the task you require.

Function                              Menu Path                    What you should know
Changing print parameters             Edit → Printer specification Use this task if wish to enter the same print
                                                                   parameters for several outputs.

                                                                   All the selected outputs receive the print
                                                                   parameters from the screen Printer specification
                                                                   if there is 1 ( Print) in the field Transmission
                                                                   medium.
Issuing output (printing, sending     Edit → Process               After processing, output is highlighted as
fax, and so on)                                                    follows:

                                                                      •   green (processed successfully)

                                                                      •   red (processed incorrectly)
Changing details data                 Goto → Communication         Use this task if wish to enter the separate print
                                                                   parameters for each output.

                                                                   You may only change the parameters for the
                                                                   transmission media Printing and Telefax. The
                                                                   parameters are merely displayed for all other
                                                                   transmission media.
Creating screen display               Goto → View                  The system displays the first selected output.
Display processing log                Goto → Log                   The system creates a separate log for each
                                                                   output.


Changing Outputs in Document Processing

           Prerequisites


Normally, the system automatically proposes data for output control in the sales document. If you must process
outputs, choose the following menu path that corresponds to the sales document you are processing:


Document                            Menu Path
Delivery                        Extras → Delivery output → Header or Item

Shipment                        Goto → Output


If you selected several outputs, use Goto → Next detail screen to process the next output.

           Procedure


Function                          Menu Path                       What you should know
Repeating an output               Select an output and choose     An output can be sent more than once. This
                                  Repeat output.                  is useful, for instance, if technical problems
                                                                  or other problems occurred in the first print
                                                                  output.

                                                                  The system copies the output that was
                                                                  selected; you can then process and send
                                                                  this copy.
Sending a change output           Select an output and choose     If you have made changes in a document,
                                  Change output.                  you can create and send change outputs for
                                                                  outputs that are based on this document and
                                                                  have already been sent.

                                                                  The system copies the output that was
                                                                  selected; you can then process and send
                                                                  this copy.

                                                                  An indicator identifying this output as a
                                                                  change output then appears in its Change
                                                                  column.
Changing print parameters         Select an output and choose     The output must be set for printing: for
                                  Communication method.           example, the Medium field must be set to 1 (
                                                                  Print output) or 2 ( Fax).
Changing send data                Select an output and choose     Dispatch time, for example.
                                  Further data.
                                                                  Processing date and status are also
                                                                  displayed here.
Carrying out output determination Goto → Determin. analysis       This function is described in detail in Output
analysis                                                          Determination Analysis.

                                                                  The system displays all accesses. You can
                                                                  display the fields that triggered each
                                                                  individual access by choosing the folder that
                                                                  you want more information about.
Sending Internal Mail

         Use


You can use internal mail to send a message referring to a sales document to the person responsible for that
document. That person can then call up the document directly from your mail in order to check or process it, for
instance.

         Features


The procedure for processing internal mail can be found in    Processing Internal Mails in SD.

You can attach certain criteria to automatic proposals so that you only receive an automatic message from
order processing if the value of an order is greater than $1000, for example. For more information, see
Example Message Determination: Processing Condition Component Hierarchies.

See also:

  Formatting SAPoffice Messages


Processing Internal Mail

         Procedure


To process an internal mail that you have received, proceed as follows:

   1. On the initial screen, choose Office → Inbox.
   2. Select the mail you wish to process and choose Document → Display.

       The system displays information on the created document, such as document number, name of creator,
       and so on. If the creator has entered a text in the mail, this text will also be displayed.

   3. Choose Edit → Process.

You automatically branch to the transaction specified in the mail. After document processing you return to the
mail. You can repeat this process as often as required.


       You can process the mail directly without displaying the content if, after selecting the mail, you choose
       Edit → Process.
Output Determination Analysis

          Use


A determination analysis can be run for outputs. For example, you can find out which keys were used to find
outputs and whether output determination was successful.

          Features


An output determination analysis provides you with the following information:

   •   Origin of the output proposal (via condition record or from the customer master, for example)
   •   Output search results (which outputs were found in the corresponding output procedure and which
       outputs could not be found)
   •   Access information (which accesses occurred for outputs that were found using condition records and
       the results of the accesses)
   •   Key combinations (with which key combinations, or combinations of fields, did the accesses occur?)

          Activities


   1. Change the corresponding document. For a shipment document, for example, you would choose:

           a. Shipment screen
           b. Shipment → Change

   2. Goto → Output
   3. Goto → Determin. analysis

Determination analysis only works if you are in the change or create mode of the shipment document. (In other
words, this function does not work in display mode.)


There is no output determination analysis for the picking list


Printing Output

          Use


You can, for example, print a delivery note for a delivery.

          Prerequisites


The following prerequisites apply:
•   The document must have an output that is designated for printing. The output can be

                          Transmitted directly by the system to the document through Output Determination
                          Entered manually into the document.

If an output is allowed according to the output determination procedure, you can enter this output into the
document manually.

For more information, see        Output Determination Procedure Technique.

To enter an output manually (or display an existing output), choose in the overview screen of the document
Extras → Output → Header or Item → Edit. You must have 1 (Print output) set in the field Transmission
medium for the output to be printed.

For more information on output, refer to the section Output Processing.

    •   In addition the column Status must have the traffic light set to yellow. If the traffic light is set to red, you
        must repeat the print by selecting the output and choosing Repeat output.

           Features


You can print in the following ways:

    •   Through the worklist (online)
    •   Through the worklist (background job)

See also:

For further information on the worklist, refer to the section Selecting Worklist for Output


Printing Outputs from Document Processing

           Prerequisites


The general prerequisites listed in Printing Outputs apply.

Additionally, the following settings must be made on the output screen for the output that you want to print.

    •   In the second Time column: 3

           Procedure


Document                                                 Menu Path
Delivery                                                 (Create/Change) Outbound delivery  Issue delivery
                                                         output
Shipment                                                 (Shipment screen) Goto  Output

Function                                                 Menu Path
Printing an output                                     Specify which printer
Displaying an output on a screen                       Specify which screen


Outbound EDI messages

          Use


Shipment documents are normally sent in one of the following two situations:

    1. The shipper sends the forwarding agent a partially- or completely-planned shipment (transfer order).
    2. The shipper or forwarding agent informs the customer about the upcoming shipment (shipment
       notification).

          Prerequisites


You need to create an output type that you can use to send the shipment document per Electronic Data
Interchange (EDI). Output type SEDI is provided for this purpose. You can also make a copy of this output type
and tailor it to your needs, if necessary. The transmission medium must be set to 6 (EDI).

The following condition components must be maintained:


Condition component                Value

Access sequence                    0001

Output type                        SEDI (or copy of SEDI)

Schema                             V7STRA, for example

Application                        V7

Processing routine                 RSNASTED program, FORM-routine EDI-PROCESSING

General data                       Select Access to conditions and Multiple sending of output. Leave all other
                                   fields blank.

Time                               3 (explicit request), as an example

Transmission medium                6

Partner function                   CR (Carrier) or SH (Ship-to party)

          IDoc interface


You must also enter the following values for outbound partner profiles and any additional outbound parameters
under message control.


Field                                                       Value
Output type                                                 SHPMNT or SHPADV

Partner type                                                LI (vendor/creditor) or KU (customer)

Partner function                                            CR (Carrier) or SH (Ship-to party)

Port                                                        SUBSYSTEM

Output mode                                                 Collect IDocs, for example

Basic type                                                  SHPMNT03

Application                                                 V7

Output type                                                 SEDI, or your modified copy of SEDI

Process code                                                SHPM


       1. Scenario: The shipper sends the forwarding agent a partially- or completely-planned shipment (transfer
          order).

          You create a shipment document that is either partially or fully planned (depending on whether the
          transportation planning details will be carried out by the forwarding agent or if you do it yourself).

          Depending on what point in the process the message determination is set to take place, the EDI is
          triggered immediately after posting (time 4) or when explicitly requested (time 3).

                 Scenario: The shipper or forwarding agent informs the customer about the upcoming shipment
                 (shipment notification).

                 You have a fully-planned shipment document (that you have created and planned yourself, or
                 that the forwarding agent has planned for you).

                 Depending on what point in the process the message determination is set to take place, the EDI
                 is triggered immediately after posting (time 4) or when explicitly requested (time 3).
To improve performance, you should make sure that when you use IDocs for special purposes
               that you only generate segments that include the data you need. You can hide certain segments
               by using a reduction technique.

               To make the necessary settings in Customizing, choose Cross-Application Components →
               Distribution (ALE) → Processing IDocs → Set up segment filtering


Inbound EDI messages

Use

You can create or change shipment using EDI output.

In this way, the following tasks are possible:

Collective Goods Traffic

The forwarding agent picks up deliveries from the vendor during the preliminary leg. Then the agent puts
together the shipment for the main leg and passes on this information to the customer as a shipment
notification. Now the customer can easily post a goods issue for the entire shipment (more precisely, for the
deliveries it contains).

Transportation planning

A vendor supplies the forwarding agent with the outbound deliveries as transfer requirements. The forwarding
agent plans the shipment and informs the vendor of the result, who can then start the appropriate activities for
goods issue of the respective outbound deliveries. To create shipments at the customer site, you can use
message SHPADV (shipment message or shipment notification). To create or change your own shipments,
use message SHPMNT. Both messages are based on IDoc type SHPMNT03; processing is executed through
process code SHPM. You can maintain these parameters within the EDI partner profile. For this purpose,
select Tools ->Business Communication -> IDoc -> Partner profile.

Output for deadline and status

The forwarding agent confirms the planned or actual deadline via EDI, including the status for the end of the
shipment with the respective time.


                The inbound deliveries to which the shipment refers must exist in the system. The reference is
                made through the delivery number of the vendor (collective goods traffic) or directly
                (transportation planning). Therefore, it is necessary to notify the customer of the deliveries
                where collective goods traffic is concerned. You can do this using the DESADV (shipping
                notification) message. It is not possible to create deliveries in the initial processing of shipments,
                as required for direct shipments. Also, no change is made to the delivery (with effects on
                material planning) if there is a change in the shipment (planned arrival date, for example).

          Prerequisites


The deliveries that the shipment refers to must exist in the receiving system.

          Features


Control of IDoc Receipt SHPMNT03

You can control the processing of the receipt of IDoc SHPMNT03 using the specifications in the segment
E1EDT18. For this purpose, you can use the following E1EDT18-QUALF qualifiers:

QUALF          =       ORI          Shipment document is created

QUALF          =       CHA          Shipment document is changed

QUALF          =       PID          Specification of an identification field for
                                    the shipment document.

Processing and copy control

If you use the qualifier ORI or CHA, you can control the data transfer strategy from the IDoc into the shipment
document using the parameter field. Basically, there are four strategies which are indicated by the first
character in the E1EDT18-PARAM field. The respective marker characters are in the second character in the
E1EDT18-PARAM field:

0 IDoc fields are always copied; empty ID fields cause document fields to be deleted (standard case; will be
processed if no specification is made).

1 IDoc fields are only copied if they are empty

2 Similar to strategy 0, but an IDoc field is not transferred if it is filled completely with the marker character.

3 Similar to strategy 1, but an IDoc field is not transferred if it is filled completely with the marker character.
Example of segment E1EDT18:

QUALF      PARAM
ORI        2!               Copy all fields, except those containing a !
CHA        3%               Copy fields that are filled in and delete fields with %%%%... in the document.


Control of identification


You can control the identification link between the IDoc and the shipment document in segment E1EDT18 with
qualifier PID, which can appear up to three times per IDoc.


In most day-to-day cases, the PID qualifier is not present. In this case, the E1EDT20-TKNUM field is copied
into VTTK-EXTI1 during creation. The system assigns the shipment number VTTK-TKNUM internally. If there
is a change, the system searches for a suitable shipment document using the following criteria:

E1EDT20-TKNUM                =       VTTK-EXTI1

and

E1ADRE4-EXTEND_D                 =   VTTK-TDLNR (where you must have E1ADRE4-
                                     EXTEND_Q = 300)


If PID qualifiers are specified in E1EDT18, no data is copied from TKNUM to EXTI1.


If the shipment number is to have external number assignment, you can specify the shipment number as a
primary identification with E1EDT18-QUALF = PID and E1EDT18-PARAM = TKNUM. The shipment is created
using VTTK-TKNUM = E1EDT20-TKNUM, and is searched for with the same condition if you want to change it.

You can use the IDoc fields EXTI1, EXTI2, and TKNUM for the identification.


Examples of segment E1EDT18:

QUALF     PARAM       Function for creating                     Function for changing
None      None        Copy E1EDT20-TKNUM to VTTK-               Search for shipment with VTTK-EXTI1 =
                      EXTI1                                     E1EDT20-TKNUM and VTTK-TDLNR =
                                                                E1ADRE4-EXTEND_D
                      Internal number assignment
PID           TKNUM     External number assignment VTTK-       Search with VTTK-TKNUM = E1EDT20-TKNUM
                        TKNUM = E1EDT20-TKNUM
PID           EXTI1     Internal number assignment             Search with VTTK-EXTI1 = E1EDT20-EXTI1
PID           TKNUM     External number assignment             Search with VTTK-TKNUM = E1EDT20-TKNUM
                                                               and VTTK-EXTI2 = E1EDT20-EXTI2
PID           EXTI2
PID           EXTI1     Internal number assignment             Search with VTTK-EXTI1 = E1EDT20-EXTI1 and
                                                               VTTK-EXTI2 = E1EDT20-EXTI2
PID           EXTI2


          Activities


You must also enter the following values for outbound partner profiles and any additional outbound parameters
under message control.


Field                                                     Value

Output type                                               SHPMNT or SHPADV

Partner type                                              LI (vendor/creditor)

Basic type                                                SHPMNT03

Application                                               V7

Output type                                               SEDI, or your modified copy of SEDI

Process code                                              SHPM


Report: Output for Shipments

          Use


You can use this report to create a list of outputs that meet your selection criteria. You can specify whether
your list should include outputs related to shipments, deliveries, handling units, or invoices. You can then
display or process the output of your choice from the list.

          Features


You can enter shipment numbers, planned shipment completion dates, transportation planning points or
partners as selection criteria. You can also specify that you want to see only those outputs relating to
shipments or deliveries, for example. Use output type, transmission medium and processing mode to further
limit the search.

From the list of outputs that appears, you can start immediate processing, make changes to the processing
parameters, or display either the output itself or its corresponding log. The log records how often the output is
processed or printed.


               This report only lists outputs that have been found via output determination or defined manually
               in the selected documents (shipments, deliveries, or invoices, for example). Output
               determination is not carried out in this report.


See also:

Creating Output Lists


Creating Output Lists

          Procedure


To create an output list, proceed as follows:

   1. Choose Logistics Execution → Goods Issue for Outbound Delivery → Communication/Printing →
      Transportation Output.

       The Output for Shipments screen appears.

   2. To use other selection criteria, choose Edit → All selections.

       To define reoccurring selection criteria, you can create a variant for the selection screen using Goto →
       Variants → Save as variant. You can then retrieve these variants with Goto → Variants → Get.

   3. Enter the criteria you want to use for selecting the output.
   4. Choose Program → Execute.

       The system then gives you a list of all the outputs that match the selection criteria.


Freight Codes and Freight Code Sets; Freight Classes
          Definition


Forwarding agents or railroads use freight codes (and sets of freight codes) to classify the goods they
transport. Freight codes are specified in the transportation papers, and some are specific to rail or road
transportation.
These are compiled in freight code sets published by forwarding agents and the railroad authorities and are
used specifically when referring to rail or road transport. Specific freight codes are defined in each freight code
set.


Freight code                    Description

4001                            Methyl alcohol

4002                            Glycol

4003                            Alcohol

4004                            Formaldehyde


Freight classes are made up of one or more freight codes and are one of the criteria for shipment costing.


Determining the Freight Code
          Process Flow


Determining the freight code is carried out in two steps:

          Step 1


Automatic freight code determination uses the following criteria:

   •   Country of origin
   •   Shipping type (truck, rail, etc.)
   •   Forwarding agent (forwarding agent freight group in the vendor master)

If an external transportation planning system is being used, then the freight code set can also be defined by the
route.

          Step 2


Automatic freight code determination uses the following criteria:

   •   Freight code set
   •   Material (material freight group in the material master)

This allows you to determine the freight codes of all materials in a shipment.


The following illustration shows an example of freight code determination.
Freight classes
          Definition


A freight class is a group of freight codes used to calculate shipment costs.

          Use


The freight class can be used as one of the criteria for figuring shipment costs. For example, you could enter
condition records for freight rates that specifically refer to a combination of tariff zone and freight class. The
freight code is used if the material that is being shipped should figure into the shipment costs.

          Integration


One or more freight codes are assigned to a freight class within a freight code set.

The following illustration is an example of how freight code set, freight code and freight class are interrelated.
Transportation Processing Reports
          Use


The following reports are available in transportation processing:

Select Shipments: Planning

Select Shipments: Utilization of Capacity

Select Shipments: Free Capacity

Select Shipments: Shipment Completion

Select Shipments: Check-in

Displaying Transportation Change Documents
Report: Output for Shipments

Scales List

Shipment Costs List: Calculation

Shipment Costs List: Settlement


Editing Shipment Lists

There are various functions which you can perform in both the transportation planning and shipment
completion worklists to help you locate the documents you want to edit.

          Transportation List Views


To switch from the normal to the status view of the transportation list and vice versa, choose Edit → Change
view.

          Search Function


To find documents with a particular characteristic (for example, you want to find all documents with a specific
forwarding agent), proceed as follows:

    1. Choose Edit → Find → Find delivery.

        The screen Delivery selection view appears where you can specify characteristics of the delivery you
        are looking for.

    2. Enter one or more delivery characteristics.
    3. Choose Program → Execute.

        The system finds all deliveries that match your selection criteria.

          Sort Function


You can navigate within the transportation list much easier by sorting it according to criteria such as shipment
type or planned loading date. To do this, proceed as follows:

    1. Place your cursor on the column heading according to which you want to sort your list.
    2. Choose Edit → Sort → Ascending order to sort the list in ascending order. If you want to sort the list in
       descending order, choose Edit → Sort → Descending.

        The system sorts the list based on the column header on which you placed your cursor and, depending
        on the menu option you select, in either descending or ascending order.

          List Viewer Functions
Some lists are managed with a special tool, the ABAP List Viewer. The List Viewer features various functions
that you can use to tailor the list to your needs. This tool allows you to make settings such as which columns
appear in what order, for example. For more information, see ABAP List Viewer.

Searching for Deliveries in a Transportation List

To locate specific deliveries within a transportation list, proceed as follows:

   1. Choose Edit → Find → Find delivery.
   2. Enter your selection criteria (for example, the number of the ship-to party).
   3. Choose Program → Execute.

       The system issues a list of all the shipment documents in the list which contain deliveries that match
       your selection criteria.


Transportation Planning
          Use


Transportation planning involves all the activities that must be performed before the shipment leaves the
shipping point. These activities include:

Acquiring the services of a forwarding agent

Organizing the means of transport

Specifying the route for the shipment

Defining the stages for covering this route in the most efficient way.

There are different types of shipment document types to deal with the various forms of transportation (for
example, individual shipments or collective shipments). The shipment documents are used as a basis for
carrying out transportation planning. This includes, among other things, the execution of the above activities.

          Prerequisites


Before you can carry out transportation planning, the following requirements must be met:

       For outbound shipments

                Specify in Customizing for Transportation that a delivery type for the shipping notification is
                relevant for transportation planning and shipment completion.

                Specify a route in the deliveries.

                Specify in Customizing for Transportation that the routes in the deliveries are relevant for
                transportation planning and shipment completion.

                Make sure the ShpmtBlReason (shipment blocking reason) field is blank. You can find this field
                in the delivery header on the transportation screen.
Once these requirements have been met, the system automatically sets the transportation planning status to A
(Not yet planned) in the Trns.plan.status field in the delivery header.

       For inbound shipments

               Specify in Customizing for Transportation that a delivery type for the inbound delivery is relevant
               for transportation planning and shipment completion.

               Assign all items to the same plant in the inbound delivery. The system carries out a
               corresponding check.

         Features


There are different types of worklists and lists you can use to perform various tasks in transportation planning:

       Shipment list

       You use the shipment list to establish which inbound or outbound deliveries are due for shipment. After
       you have created the list, you can

       – Create the necessary shipment documents for particular inbound or outbound deliveries

       – Specify the order in which the inbound or outbound deliveries (or shipment items) are to be
       delivered

       Transportation planning list

       When you are creating the shipment due list, you do not usually have all the information you need to
       complete transportation planning. For instance, you probably do not know which forwarding agent will
       take care of goods shipment at this stage. You could also decide not to finish the entire planning for a
       shipment in the shipment list because the capacity for this shipment is not yet used to the full. Once you
       have the information you require or once there are enough deliveries to fill the shipment, you can use
       the transportation-planning list to locate these documents and complete transportation planning.

       This list contains shipment documents for which planning activities still have to be completed and which
       match selection criteria that you define. You can use the list as a basis for performing transportation
       planning activities, such as organizing a means of transport, scheduling loading activities and acquiring
       the services of forwarding agents.

       Besides this "normal" transportation planning list, there are additional lists that you can use to find
       shipments according to certain categories. For instance, in the Utilization list, you could enter the
       shipment’s degree of utilization as a percent, according to weight and volume, as one of the selection
       criteria.

         Activities


You must first determine which inbound or outbound deliveries are due for transport. A worklist for this purpose
is created using selection criteria. Deliveries or outbound deliveries are then assigned automatically or
manually to shipment documents. Relevant data, such as shipping points and destinations, is then used to
determine the route and to break it into stages.
The route in the delivery can be used as one of the criteria for selecting deliveries due for
               shipment. It is not, however, copied into the shipment document. More information is available
               in the following sections.

               You can make the appropriate settings in Customizing so that routes and service agents are
               copied from the deliveries into the shipment documents.

         Using the Route as Selection Criterion


The route in the delivery can represent:

       One or more legs

A link between the point of departure and the destination

       The destination region

The route in the shipment document differs from the route in the delivery. The following examples should
illustrate the difference between a route in the delivery and a route in the shipment document.

Example of a route as a link between departure and destination locations

The following graphic shows the route as a link between the point of departure and the destination.
In the delivery document, the route NA indicates that both deliveries are to be transported across the North
Atlantic.

During transportation planning, you select all deliveries with the route NA and then look for a ship that can
transport the deliveries at the required time. You find a ship that sails from Antwerp to New York and enter the
route NA1 in the shipment document header.

Example of a route as a target area:

Routes can also be destination regions. The following graphic shows routes R5, R6, R7, and so on as
destination regions.


During transportation planning, you select all deliveries with route R5. You notice that there is still room in the
truck. To make use of this capacity, the deliveries with route R6 are selected as well


Creating Shipments
          Purpose


When you create shipments, you can choose deliveries according to certain selection criteria and then assign
them to the new shipment.
On the overview screen you can, for example, assign deliveries to the shipment manually or automatically, or
also remove deliveries from the shipments. On the selection screen that is within the overview screen you can
also enter selection criteria for the relevant deliveries or inbound deliveries.

         Process Flow


1. Activities on the Selection Screen

On the selection screen, you can enter selection criteria for the documents (inbound or outbound deliveries)
that you want to assign to a shipment. You define the selection criteria that are displayed on the selection
screen beforehand. You can use selection variants to specify these criteria. On the selection screen, you
specify whether you want the documents due for shipment to be assigned automatically to a shipment
document or whether you want to assign them manually once the shipment has been created. There are
separate selection screens for inbound and outbound shipments. The selection screen for creating an inbound
shipment contains, for example, the selection criteria Vendor and Destination point: Plant; in the case of an
outbound shipment, the criteria are Ordering party and Destination point: Shipping point.

2. Activities on the Selection Screen

The overview screen is divided into two sections: One section contains one or several shipment documents,
and the other section lists the deliveries that have not yet been assigned to shipment documents. If the
documents have not been assigned automatically to a shipment document, you can do this manually on the
overview screen. You can also create new shipment documents and move shipment items (inbound or
outbound deliveries) within a shipment or from one shipment to another. In addition, you can remove shipment
items from the shipment if, for example, you run out of room on a truck. If you decide that you do have the
capacity to select additional deliveries or inbound deliveries for additional shipments, you can create a new
shipment from the overview screen.

Two views are possible: For example, one view displays the address of the ship-to party, and the other
displays the name of the ship-to party. Different data is made available for shipments and shipment items
(delivery, inbound delivery).

The settings can be changed through trees and table controls.


               You cannot place outbound deliveries and inbound deliveries together in the same shipment
               document. Nor is it possible to assign Items from a delivery or an inbound delivery to different
               shipment documents. You must decide at the delivery stage whether order items can be
               shipped together in one delivery and therefore require only one shipment.

See also:

Creating Shipment Worklist


Creating Shipments
         Procedure


To create a shipment, proceed as follows:
1. From shipment, choose Create → Single Documents.

       The Create Shipment: Initial Screen appears.

   2. Enter a transportation planning point.
   3. Choose the required shipment type from the list field.
   4. Enter a selection variant, if necessary.


              You can assign a selection variant to each shipment type in Customizing. When you create a
              shipment list for the document type to which a variant has been assigned, the system
              automatically proposes these values on the selection screen.

   5. Choose Edit → Select further deliveries.

       Depending on the type of shipment you enter, the selection screen for inbound or outbound shipments
       will appear. Enter your selection criteria for creating a shipment. If you have specified a selection
       variant or if one has already been assigned to the shipment type, the system will automatically propose
       these values in the relevant selection fields.

       For further information on delivery selection, refer to the section Screen Info for Delivery Selection.

   6. Enter the selection criteria you require.


              The system automatically resets the Trns. plan. status field from value A (not yet processed) to
              B (Partially processed) and the Total gds mvt stat. field to value A (not yet processed). Based
              on these values, the system selects all deliveries that need shipment documents. The system
              defines deliveries that need shipment documents as all deliveries with either no transportation
              planning or only partial transportation planning (because certain shipment stages still need to be
              defined, for instance).

   7. If you want the deliveries selected to be assigned automatically to a shipment document, you must
      select the Include deliveries in processed shipment field.
   8. Choose Enter.

       The system returns a list of deliveries that match your selection criteria. The system automatically
       creates a shipment document and assigns the selected deliveries to it if you have selected the Include
       deliveries in processed shipment field. If you have not set the indicator, you must make the necessary
       assignments manually.

   9. By choosing Edit → Selection log, you can obtain information on the selection run such as the total
       number of deliveries and items selected, the selection criteria used, and any problems that occurred.
   10. If you still have room in the shipment, you can repeat the selection procedure and fill the shipment with
       more deliveries. To repeat the selection procedure, choose Edit → Select further deliveries.

For information on processing the worklist, see:

Defining Selection Variants for Shipments

Creating Additional Shipment Documents
Moving Deliveries

Removing Deliveries from a Shipment

Creating Shipment Documents for Individual Deliveries

See also:

Shipment Types

Screen Info for Delivery Selection

On this screen you define the selection criteria for selecting deliveries that are to be assigned to a shipment.

You can select deliveries, for example, according to geographical factors, due date, and status of the delivery.

The general term "Delivery" stands for deliveries, return deliveries, or inbound deliveries.

How the Delivery Selection Works

When you create or change a delivery, the shipment planning status of the delivery is queried. The shipment
planning status indicates the current processing status of the delivery, that is, how far processing has
developed so far.

The shipment planning status can have the following settings:

        ''          Not transportation-relevant
        A           Transportation-relevant, but not yet processed
        B           Transportation-relevant, partially processed
        C           Transportation-relevant, completely processed

For the user to be able to select the delivery, the shipment planning status must have the setting
"transportation-relevant".

You can display the shipment planning status as follows:

   1. In the Shipping Screen, select the activity Change outbound delivery.
   2. Select a delivery.
   3. Choose Goto → Header → Shipment.

On the detailed screen for Change Outbound Delivery, you see the status on the tab page Shipment in the
field TranspPlngStat.

For more information on the field for the shipment planning status, refer to the F1 help.

If the shipment planning status is "transportation-relevant", you can select the delivery through the Shipping
Screen → Create Shipment..

If you cannot select a particular delivery, go through the items in the checklist.
Checklist


   •   If the shipment planning status of the delivery is not "transportation-relevant", check the following items:

           o   If the delivery type is marked as transportation-relevant, proceed to the Implementation Guide,
               and, under Logistics Execution → Transportation → Shipments → Maintain Transportation
               Relevance, choose the activity Maintain transportation relevance for delivery types.
           o   If a route is entered in the delivery, and the route is marked as relevant for transportation,
               proceed in the Implementation Guide under Logistics Execution → Transportation → Shipments
               → Maintain Transportation Relevance and choose the activity Maintain transportation
               relevance for routes.


           o   No transportation blocking reason may be set in the delivery!
               Choose Change Delivery, and proceed to the detailed screen through the path Header →
               Shipment. Under the tab page Shipment, you can see whether the field TrBlckResn is filled.

           o   If a transportation blocking reason is set in the delivery, you can change this in the
               Implementation Guide by calling up the activity Logistics Execution → Transportation →
               Shipments → Maintain transportation relevance → Maintain transportation relevance for
               delivery types.
           o   If you have an inbound delivery (delivery type EL), the delivery type must be marked in the
               Implementation Guide as relevant for transportation.
           o   If you change the Customizing setting after you have created a delivery, you must change and
               save the delivery. Then the system calculates the status on the basis of the new Customizing
               setting. Now call up the function Change delivery and save the delivery.

   •   As soon as you have checked that the transportation planning status is set to "relevant for
       transportation", you can choose the function Select delivery when creating or changing the shipment.

Check the following points:

           o   You can assign either deliveries / return deliveries or inbound deliveries to a shipment. A
               mixture of documents, however, is not possible.
               On the basis of the shipment type that is assigned to a shipment, the system recognizes
               whether the shipment is incoming or outgoing. To do so, it uses the indicator Completion type,
               which you can specify in Customizing for shipment type under the following activity: Logistics
               Execution → Transportation → Shipments → Define Shipment Types. On the detailed screen
               of a shipment type, you can set the following processing types through the field Completion
               type:
               '1' means Outbound shipment loaded
               You can select deliveries / return deliveries for this shipment.
               2 means Loaded incoming shipment
               You can select inbound deliveries.

           o   You can define selection criteria for a shipment type. In the Implementation Guide, choose
               Logistics Execution -> Transportation -> Shipments -> Define Shipment Types, and then
               select the field Selection variant in the screen section Proposal on the details screen for
               Change shipment.
In a selection variant, you can enter values in certain fields and also make them invisible on the
               screen. This can be useful, for example, if you select deliveries from shipping point 0001. Note
               that with the selection variant in the example above you cannot select deliveries from shipping
               point 0002.

           o   Note that the screens for deliveries / return deliveries and inbound deliveries differ from one
               another.
           o   Make sure that the transportation planning status is specified correctly. The standard values are
               A and B. If you wish to select deliveries that are already fully planned, you must choose the
               status Transportation-relevant fully processed. Deliveries with the transportation planning status
               Not relevant for transportation are not selected.
           o   Make sure that you have maintained the goods movement status correctly. If you wish to select
               deliveries that are already fully planned, you must choose the status Transportation-relevant
               fully processed.
           o   If you wish to select return deliveries, deliveries, or both, select the respective radio button in the
               type of delivery.
           o   Make sure when you specify several selection criteria that these are linked by an AND
               condition, not an OR condition.
               Example 1: You have specified ship-to party XY and also entered shipping condition 01. In the
               system, however, there are no deliveries with this ship-to party and this shipping condition. With
               the criteria you have entered, the system has not found any delivery.
               Example 2: In the section "Reference" you have entered shipment number A and order number
               B. Through these specifications you want to select all deliveries that are included both in
               shipment A and in order B. The system does not select any deliveries that are in order B, but
               not in shipment A.

   •   If the system was not able to select deliveries during creation of a shipment, you can display the
       selection log. On the overview screen Shipments and Deliveries, choose the activity Edit → Selection
       log.

The following can be possible reasons:

           o   The delivery is blocked by another user.
           o   The delivery does not contain any items.
           o   The delivery does not contain any items relevant for transportation. You can set the
               transportation relevance for delivery items in Customizing under the following activity: Logistics
               Execution → Transportation → Shipments → Maintain Transportation Relevance → Maintain
               transportation relevance for delivery item types.
           o   The delivery is a return delivery, but (also) contains outbound delivery items. Since the point of
               departure and destination are no longer uniquely defined, these deliveries can no longer be
               processed in the transportation system.
               In the case of return deliveries with reference to an order, note that in the copy control function
               in Customizing a copy routine is stored that also copies this indicator from the order item into
               the delivery item.

       For this purpose, proceed to the Implementation Guide and choose the activity          Specify Copy Control
       for Deliveries under Logistics Execution → Shipping → Copying control.

           o   The delivery contains return items.
           o   If you have an inbound delivery, the plant in the items must be unique.

         Example


Special selection options for outbound deliveries:
•    Selection by status of credit limit check in the delivery selection

During delivery selection you can only select deliveries where the credit limit has not been exceeded. You can
also define a selection variant for this selection.

   •    Selection by picking status

You can define that only deliveries where picking is not yet complete are selected.

Defining Selection Variants for Shipments
          Procedure


In the shipment document:

   1.   Enter the selection criteria that you want to save as a variant on the selection screen.
   2.   Choose the button for selection options and select the required variant from the list.
   3.   Enter a code and name for the selection variant.
   4.   Save your data.

        The system informs you that the selection variant with the code you specified in Step 3 has been
        saved. You can now use this selection variant when you create shipment documents.


In the shipment lists for transportation planning and processing (Transp. Planning, Utilization, Free Capacity,
Check-in, Shipment Completion):

   1.   Enter the selection criteria that you want to save as a variant on the selection screen.
   2.   Choose Goto → Variants → Save as variant.
   3.   Enter a code and name for the selection variant.
   4.   Save your data.


Creating Additional Shipment Documents
          Procedure


If you wish to assign the selected deliveries to several different shipment documents, for example, for capacity
reasons, you can create additional shipment documents on the overview screen Shipments and Deliveries.
Proceed as follows:

   1. Select the deliveries and choose Sie Edit → Automatic planning → Shipment per delivery.

        A message appears informing you that a new shipment document with a provisional number has been
        created.

   2. Assign the deliveries to the new shipment document, as required.
   3. Save the new shipment document. The system displays the number that it assigned to this document,
      according to the number range defined for shipment documents.
Moving Deliveries
          Use


As long as you have not set the Planned status in a shipment document, you can move deliveries

   •   From one shipment to another

   •   Within a shipment

   •   From a shipment to the screen section

          Procedure


Moving Deliveries From One Shipment to Another

To move a delivery from one shipment document to another, you can use the drag-and-drop function or the
appropriate pushbutton on the overview screen.


                If items or handling units of a delivery are packed into a handling unit of a shipment, the delivery
                can no longer be removed from the shipment. In such a case, the items or handling units in the
                delivery must first be unpacked from the handling unit of the shipment.
                See also: Packing in the Shipment Document


Removing Deliveries from a Shipment
          Use

You can remove deliveries from a shipment document as long as the Planned status has not been set for that shipment
document. There are no restrictions for removing deliveries from the Deliveries not assigned section of the overview
screen. When a delivery is removed from a shipment due list, the system determines the transportation planning status
anew. Depending on this status, you can select the delivery when you create a new shipment.


                Your customer postpones the delivery date for a certain delivery. The delivery has already been assigned
                to a shipment. The planned status has not yet been set for the shipment, so you can remove it from the
                shipment. The transportation planning status is reset to A (not yet planned). The delivery is included in a
                later shipment.


          Procedure

To remove a delivery from a shipment, use the Drag & Drop operation or press the key Remove delivery from shipment.
Result

The deliveries are removed from the shipment. The transportation planning status for this delivery is determined anew by
the system.


Creating Shipment Documents for Individual Deliveries
          Use


To plan and process individual deliveries in a shipment using separate shipment documents (FTL (full truck
load) or FCL (full container load) transactions, for example):

          Procedure


    1. Select the deliveries for which you wish to create a separate shipment document.
    2. Choose Edit → Automatic planning → One dlv.one shipment.

        A message appears informing you how many new shipments have been created and what provisional
        numbers have been assigned to them.

    3. Save your data.

        The new shipment documents are saved and assigned numbers


Planning Proposal
          Use


The planning proposal enables you as the material requirements planning (MRP) controller to simplify your
manual planning. As you create or change shipments manually, the planning proposal gives you default
profiles, which include "rules" that automatically create shipments and fill them with data. You can still make
manual changes to the planning proposal during processing, unlike collective processing for shipment creation,
where you cannot influence processing manually.

          Features


You can save the selection criteria that you use for collective processing for shipment creation as a selection
variant. You can also save combination criteria that you have maintained as a combination profile and save the
data that is used to fill the shipment as a data profile. You can then access these profiles as you carry out
collective processing for the automatic creation of shipments, for example. You can also save settings,
selection criteria, combination criteria and data together in one planning profile. Technically , the planning
profile is a variant of collective processing for shipment creation. A planning profile can be assigned to a
shipment type.
If you select a planning proposal while you are creating shipments manually, a dialog box containing that
planning proposal with its corresponding data appears, provided a planning proposal was assigned to the
shipment type. All default values in the dialog box can be changed except for the basic data (transportation
planning location and shipment type), since you just entered that data in the initial screen for creating a
shipment. When you choose Execute, the selected deliveries are automatically put together in a shipment and
filled in with data, according to the specifications you just made. If errors or warnings occur, they are recorded
in a log.


Subsequent Delivery Split in Shipments
          Use


During shipment processing it is often necessary to split a delivery up into two or more shipments because
they do not all fit on to one truck, for example. However, since it is not possible to assign deliveries to
shipments item by item, there is a special function called Subsequent Delivery Split. You can carry out a
subsequent split either in outbound deliveries or in shipments. The following are a few examples in which a
delivery split would be necessary:

   •   A customer's purchase order cannot be transported in a single shipment (for example, 100 tons of coal
       per truck; delivery would have fitted into a 30 foot container, but there is only a 20 foot container
       available).
   •   No suitable means of transport is available when transportation planning takes place.
   •   Estimates based on SAP System calculations are not appropriate for the actual situation.

In the first example, the delivery split could take place as the delivery is being created; in the second and third
examples, the delivery split would happen after the delivery was created (during loading or transportation
planning).

          Prerequisites


So that you can use the functionality of the subsequent delivery split, you need to configure the respective
settings for the activity subsequent delivery split in the Implementation Guide under the path Logistics
Execution → Shipping → Deliveries. Pay attention to the conditions that are listed under the heading
"Prerequisites".

A delivery split is only allowed, for example, if the delivery has a particular status. This means that, for
example, no goods movement, no invoice, and not pick quantity pending confirmation (at least for the split
quantity of an item) may exist. The shipment must also be fully processed already.

The type of split is controlled through a Split Profile that you define in Customizing and assign to the shipment
type. You store a profile for the delivery split before planning and after planning. Whether or not the split
deliveries remain in the shipment depends on your Customizing settings:

   •   before planning: Already when you are making up the shipment, you know that the delivery needs
       splitting. The split results and the split remainder remain in the shipment.
   •   after planning: Already when you are loading up the means of transport you determine that the delivery
       needs splitting. In the case of a loading ramp split, the split results are removed from the shipment.
SAP - Transportation Module Study material

Contenu connexe

Tendances

Stock transfer using stock transport order
Stock transfer using stock transport orderStock transfer using stock transport order
Stock transfer using stock transport orderSanthana Kishore
 
Sap sd important interview concepts
Sap sd important interview concepts Sap sd important interview concepts
Sap sd important interview concepts Mohit Amitabh
 
STO process with config 4th method
STO process with config 4th methodSTO process with config 4th method
STO process with config 4th methodMohammed Azhad
 
Item category for a service item SAP SD
Item category for a service item SAP SDItem category for a service item SAP SD
Item category for a service item SAP SDHarsha Halyal
 
SAP ATP check for Sales Order
SAP ATP check for Sales OrderSAP ATP check for Sales Order
SAP ATP check for Sales OrderLee Scott
 
Vendor consignment configuration doc
Vendor consignment configuration docVendor consignment configuration doc
Vendor consignment configuration docLokesh Modem
 
Quick Walk Through -SAP Transportation Management.How It Is Beneficial?
Quick Walk Through -SAP Transportation Management.How It Is Beneficial?Quick Walk Through -SAP Transportation Management.How It Is Beneficial?
Quick Walk Through -SAP Transportation Management.How It Is Beneficial?Anjali Rao
 
Important tables for sap sd
Important tables for sap sd Important tables for sap sd
Important tables for sap sd Roshan Prasad
 
Inter company STO
Inter company STOInter company STO
Inter company STOsfaiz418
 
SAP MM Business Scenarios
SAP MM  Business ScenariosSAP MM  Business Scenarios
SAP MM Business ScenariosLokesh Modem
 
SAP SD Sales Deal & promotion
SAP SD Sales Deal & promotionSAP SD Sales Deal & promotion
SAP SD Sales Deal & promotionarun_bala1
 

Tendances (20)

Stock transfer using stock transport order
Stock transfer using stock transport orderStock transfer using stock transport order
Stock transfer using stock transport order
 
STO movement Type
STO movement TypeSTO movement Type
STO movement Type
 
Availability Check in SAP SD
Availability Check in SAP SDAvailability Check in SAP SD
Availability Check in SAP SD
 
Sap sd important interview concepts
Sap sd important interview concepts Sap sd important interview concepts
Sap sd important interview concepts
 
Le tra sap
Le tra sapLe tra sap
Le tra sap
 
STO process with config 4th method
STO process with config 4th methodSTO process with config 4th method
STO process with config 4th method
 
Item category for a service item SAP SD
Item category for a service item SAP SDItem category for a service item SAP SD
Item category for a service item SAP SD
 
SAP ATP check for Sales Order
SAP ATP check for Sales OrderSAP ATP check for Sales Order
SAP ATP check for Sales Order
 
Vendor consignment configuration doc
Vendor consignment configuration docVendor consignment configuration doc
Vendor consignment configuration doc
 
Quick Walk Through -SAP Transportation Management.How It Is Beneficial?
Quick Walk Through -SAP Transportation Management.How It Is Beneficial?Quick Walk Through -SAP Transportation Management.How It Is Beneficial?
Quick Walk Through -SAP Transportation Management.How It Is Beneficial?
 
Sap configuration-guide
Sap configuration-guideSap configuration-guide
Sap configuration-guide
 
Important tables for sap sd
Important tables for sap sd Important tables for sap sd
Important tables for sap sd
 
STO
STOSTO
STO
 
Inter company STO
Inter company STOInter company STO
Inter company STO
 
SAP MM Business Scenarios
SAP MM  Business ScenariosSAP MM  Business Scenarios
SAP MM Business Scenarios
 
Text determination
Text determinationText determination
Text determination
 
SAP SD Sales Deal & promotion
SAP SD Sales Deal & promotionSAP SD Sales Deal & promotion
SAP SD Sales Deal & promotion
 
Availability Check in SAP SD
Availability Check in SAP SDAvailability Check in SAP SD
Availability Check in SAP SD
 
Third Party SAP
Third Party SAPThird Party SAP
Third Party SAP
 
Valuation & Split valuation in MM
Valuation & Split valuation in MMValuation & Split valuation in MM
Valuation & Split valuation in MM
 

Similaire à SAP - Transportation Module Study material

Shipmment PPT.pptx
Shipmment PPT.pptxShipmment PPT.pptx
Shipmment PPT.pptxMurali452411
 
How to track shipping expenditure with shipping reports
How to track shipping expenditure with shipping reportsHow to track shipping expenditure with shipping reports
How to track shipping expenditure with shipping reportsSharmilaYeduru
 
JDA Transportation and Logistics Management-1.pptx
JDA Transportation and Logistics Management-1.pptxJDA Transportation and Logistics Management-1.pptx
JDA Transportation and Logistics Management-1.pptxssuser8028db1
 
presentation transport in general
presentation transport in generalpresentation transport in general
presentation transport in generalBastiaan Bernart
 
Fleet management in Oracle Transport Management(otm)
Fleet management in Oracle Transport Management(otm)Fleet management in Oracle Transport Management(otm)
Fleet management in Oracle Transport Management(otm)Satyam Rai
 
DhiLogics Transportation Management System
DhiLogics Transportation Management SystemDhiLogics Transportation Management System
DhiLogics Transportation Management SystemDhiLogics India Pvt Ltd
 
VM (Ocean export import)
VM (Ocean export import)VM (Ocean export import)
VM (Ocean export import)vikas maini
 
To Be Presentation -SAP Sales and distribution
To Be Presentation -SAP Sales and distributionTo Be Presentation -SAP Sales and distribution
To Be Presentation -SAP Sales and distributionamlansarkar
 
Transwide Appointment Scheduling Solutions
Transwide Appointment Scheduling SolutionsTranswide Appointment Scheduling Solutions
Transwide Appointment Scheduling SolutionsElie_Hiller
 
Process - VLS LCL Correction - Beginner level
Process - VLS LCL Correction - Beginner levelProcess - VLS LCL Correction - Beginner level
Process - VLS LCL Correction - Beginner levelUploadFiles2
 
Agt&L Presentation
Agt&L PresentationAgt&L Presentation
Agt&L Presentationange927
 
How to auto create trip in oracle order management
How to auto create trip in oracle order managementHow to auto create trip in oracle order management
How to auto create trip in oracle order managementshravan kumar chelika
 
Freight management
Freight managementFreight management
Freight managementDSV
 
Bi for tpt & lgs company
Bi for tpt & lgs companyBi for tpt & lgs company
Bi for tpt & lgs companyGurtej Gill
 
Sap sd configuration
Sap sd configurationSap sd configuration
Sap sd configurationjo.gill2010
 
Ad Techs Ltl Shipping Guide
Ad Techs Ltl Shipping GuideAd Techs Ltl Shipping Guide
Ad Techs Ltl Shipping GuideMichael Hudson
 
Logistics, Getting Your Goods To Your Customers Efficiently
Logistics, Getting Your Goods To Your Customers EfficientlyLogistics, Getting Your Goods To Your Customers Efficiently
Logistics, Getting Your Goods To Your Customers EfficientlyWJ
 

Similaire à SAP - Transportation Module Study material (20)

Shipmment PPT.pptx
Shipmment PPT.pptxShipmment PPT.pptx
Shipmment PPT.pptx
 
How to track shipping expenditure with shipping reports
How to track shipping expenditure with shipping reportsHow to track shipping expenditure with shipping reports
How to track shipping expenditure with shipping reports
 
JDA Transportation and Logistics Management-1.pptx
JDA Transportation and Logistics Management-1.pptxJDA Transportation and Logistics Management-1.pptx
JDA Transportation and Logistics Management-1.pptx
 
presentation transport in general
presentation transport in generalpresentation transport in general
presentation transport in general
 
Fleet management in Oracle Transport Management(otm)
Fleet management in Oracle Transport Management(otm)Fleet management in Oracle Transport Management(otm)
Fleet management in Oracle Transport Management(otm)
 
DhiLogics Transportation Management System
DhiLogics Transportation Management SystemDhiLogics Transportation Management System
DhiLogics Transportation Management System
 
VM (Ocean export import)
VM (Ocean export import)VM (Ocean export import)
VM (Ocean export import)
 
To Be Presentation -SAP Sales and distribution
To Be Presentation -SAP Sales and distributionTo Be Presentation -SAP Sales and distribution
To Be Presentation -SAP Sales and distribution
 
Caferaa pharma web demo
Caferaa pharma web demoCaferaa pharma web demo
Caferaa pharma web demo
 
Transwide Appointment Scheduling Solutions
Transwide Appointment Scheduling SolutionsTranswide Appointment Scheduling Solutions
Transwide Appointment Scheduling Solutions
 
Process - VLS LCL Correction - Beginner level
Process - VLS LCL Correction - Beginner levelProcess - VLS LCL Correction - Beginner level
Process - VLS LCL Correction - Beginner level
 
Agt&L Presentation
Agt&L PresentationAgt&L Presentation
Agt&L Presentation
 
How to auto create trip in oracle order management
How to auto create trip in oracle order managementHow to auto create trip in oracle order management
How to auto create trip in oracle order management
 
Organizational framework
Organizational frameworkOrganizational framework
Organizational framework
 
Freight management
Freight managementFreight management
Freight management
 
Bi for tpt & lgs company
Bi for tpt & lgs companyBi for tpt & lgs company
Bi for tpt & lgs company
 
ODOO Logistics
ODOO LogisticsODOO Logistics
ODOO Logistics
 
Sap sd configuration
Sap sd configurationSap sd configuration
Sap sd configuration
 
Ad Techs Ltl Shipping Guide
Ad Techs Ltl Shipping GuideAd Techs Ltl Shipping Guide
Ad Techs Ltl Shipping Guide
 
Logistics, Getting Your Goods To Your Customers Efficiently
Logistics, Getting Your Goods To Your Customers EfficientlyLogistics, Getting Your Goods To Your Customers Efficiently
Logistics, Getting Your Goods To Your Customers Efficiently
 

Dernier

Welcome to Auto Know University Orientation
Welcome to Auto Know University OrientationWelcome to Auto Know University Orientation
Welcome to Auto Know University Orientationxlr8sales
 
ABOUT REGENERATIVE BRAKING SYSTEM ON AUTOMOBILES
ABOUT REGENERATIVE BRAKING SYSTEM ON AUTOMOBILESABOUT REGENERATIVE BRAKING SYSTEM ON AUTOMOBILES
ABOUT REGENERATIVE BRAKING SYSTEM ON AUTOMOBILESsriharshaganjam1
 
Can't Roll Up Your Audi A4 Power Window Let's Uncover the Issue!
Can't Roll Up Your Audi A4 Power Window Let's Uncover the Issue!Can't Roll Up Your Audi A4 Power Window Let's Uncover the Issue!
Can't Roll Up Your Audi A4 Power Window Let's Uncover the Issue!Mint Automotive
 
A Comprehensive Exploration of the Components and Parts Found in Diesel Engines
A Comprehensive Exploration of the Components and Parts Found in Diesel EnginesA Comprehensive Exploration of the Components and Parts Found in Diesel Engines
A Comprehensive Exploration of the Components and Parts Found in Diesel EnginesROJANE BERNAS, PhD.
 
Lighting the Way Understanding Jaguar Car Check Engine Light Service
Lighting the Way Understanding Jaguar Car Check Engine Light ServiceLighting the Way Understanding Jaguar Car Check Engine Light Service
Lighting the Way Understanding Jaguar Car Check Engine Light ServiceImport Car Center
 
Control-Plan-Training.pptx for the Automotive standard AIAG
Control-Plan-Training.pptx for the Automotive standard AIAGControl-Plan-Training.pptx for the Automotive standard AIAG
Control-Plan-Training.pptx for the Automotive standard AIAGVikrantPawar37
 
怎么办理美国UCONN毕业证康涅狄格大学学位证书一手渠道
怎么办理美国UCONN毕业证康涅狄格大学学位证书一手渠道怎么办理美国UCONN毕业证康涅狄格大学学位证书一手渠道
怎么办理美国UCONN毕业证康涅狄格大学学位证书一手渠道7283h7lh
 
Mastering Mercedes Engine Care Top Tips for Rowlett, TX Residents
Mastering Mercedes Engine Care Top Tips for Rowlett, TX ResidentsMastering Mercedes Engine Care Top Tips for Rowlett, TX Residents
Mastering Mercedes Engine Care Top Tips for Rowlett, TX ResidentsRowlett Motorwerks
 
Human Resource Practices TATA MOTORS.pdf
Human Resource Practices TATA MOTORS.pdfHuman Resource Practices TATA MOTORS.pdf
Human Resource Practices TATA MOTORS.pdfAditiMishra247289
 
Pros and cons of buying used fleet vehicles.pptx
Pros and cons of buying used fleet vehicles.pptxPros and cons of buying used fleet vehicles.pptx
Pros and cons of buying used fleet vehicles.pptxjennifermiller8137
 

Dernier (10)

Welcome to Auto Know University Orientation
Welcome to Auto Know University OrientationWelcome to Auto Know University Orientation
Welcome to Auto Know University Orientation
 
ABOUT REGENERATIVE BRAKING SYSTEM ON AUTOMOBILES
ABOUT REGENERATIVE BRAKING SYSTEM ON AUTOMOBILESABOUT REGENERATIVE BRAKING SYSTEM ON AUTOMOBILES
ABOUT REGENERATIVE BRAKING SYSTEM ON AUTOMOBILES
 
Can't Roll Up Your Audi A4 Power Window Let's Uncover the Issue!
Can't Roll Up Your Audi A4 Power Window Let's Uncover the Issue!Can't Roll Up Your Audi A4 Power Window Let's Uncover the Issue!
Can't Roll Up Your Audi A4 Power Window Let's Uncover the Issue!
 
A Comprehensive Exploration of the Components and Parts Found in Diesel Engines
A Comprehensive Exploration of the Components and Parts Found in Diesel EnginesA Comprehensive Exploration of the Components and Parts Found in Diesel Engines
A Comprehensive Exploration of the Components and Parts Found in Diesel Engines
 
Lighting the Way Understanding Jaguar Car Check Engine Light Service
Lighting the Way Understanding Jaguar Car Check Engine Light ServiceLighting the Way Understanding Jaguar Car Check Engine Light Service
Lighting the Way Understanding Jaguar Car Check Engine Light Service
 
Control-Plan-Training.pptx for the Automotive standard AIAG
Control-Plan-Training.pptx for the Automotive standard AIAGControl-Plan-Training.pptx for the Automotive standard AIAG
Control-Plan-Training.pptx for the Automotive standard AIAG
 
怎么办理美国UCONN毕业证康涅狄格大学学位证书一手渠道
怎么办理美国UCONN毕业证康涅狄格大学学位证书一手渠道怎么办理美国UCONN毕业证康涅狄格大学学位证书一手渠道
怎么办理美国UCONN毕业证康涅狄格大学学位证书一手渠道
 
Mastering Mercedes Engine Care Top Tips for Rowlett, TX Residents
Mastering Mercedes Engine Care Top Tips for Rowlett, TX ResidentsMastering Mercedes Engine Care Top Tips for Rowlett, TX Residents
Mastering Mercedes Engine Care Top Tips for Rowlett, TX Residents
 
Human Resource Practices TATA MOTORS.pdf
Human Resource Practices TATA MOTORS.pdfHuman Resource Practices TATA MOTORS.pdf
Human Resource Practices TATA MOTORS.pdf
 
Pros and cons of buying used fleet vehicles.pptx
Pros and cons of buying used fleet vehicles.pptxPros and cons of buying used fleet vehicles.pptx
Pros and cons of buying used fleet vehicles.pptx
 

SAP - Transportation Module Study material

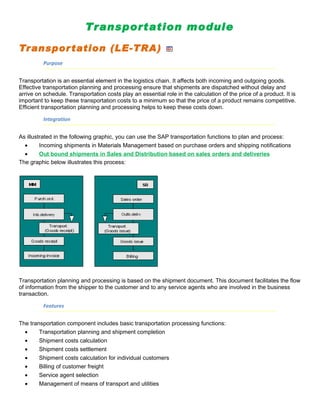
  • 1. Transportation module Transpor tation (LE-TRA) Purpose Transportation is an essential element in the logistics chain. It affects both incoming and outgoing goods. Effective transportation planning and processing ensure that shipments are dispatched without delay and arrive on schedule. Transportation costs play an essential role in the calculation of the price of a product. It is important to keep these transportation costs to a minimum so that the price of a product remains competitive. Efficient transportation planning and processing helps to keep these costs down. Integration As illustrated in the following graphic, you can use the SAP transportation functions to plan and process: • Incoming shipments in Materials Management based on purchase orders and shipping notifications • Out bound shipments in Sales and Distribution based on sales orders and deliveries The graphic below illustrates this process: Transportation planning and processing is based on the shipment document. This document facilitates the flow of information from the shipper to the customer and to any service agents who are involved in the business transaction. Features The transportation component includes basic transportation processing functions: • Transportation planning and shipment completion • Shipment costs calculation • Shipment costs settlement • Shipment costs calculation for individual customers • Billing of customer freight • Service agent selection • Management of means of transport and utilities
  • 2. Follow-up and supervision of shipments • Management of shipment costs These transportation functions can handle planning and processing for both inbound and outbound shipments. You can control and monitor the entire transportation process from the planning stage to goods issue at your shipping point (for outbound shipments) or vendor location (for inbound shipments), through to goods receipt at the customer location or your plant. Other available functions include: shipment costs calculation and settlement with the service agent, transfer to accounting, credit memo creation and invoice verification. This documentation describes procedures in outbound shipment processing. Unless specifically stated otherwise, the information here also applies to inbound shipment processing. Differences between the two will be pointed out where necessary. For more information about creating and processing inbound deliveries, see the Confirmations section of the documentation for Purchasing (MM-PUR). About Transportation The following text describes basic elements of shipment processing, which also include: • the function of the organizational unit of transportation planning point • the function of the shipment document • output determination • a compilation of the reports available in shipment processing Transportation Planning Point Definition You can now carry out transportation planning and shipment completion using a new organizational unit, the transportation planning point. Basically, the transportation planning point consists of a group of employees responsible for organizing transportation activities. Each shipment is assigned to a specific transportation planning point for transportation planning and shipment completion. You must define the various transportation planning points used in your organization in Customizing for Corporate Structure before they can be used to perform transportation functions. You can define this organizational unit according to your company’s needs, for example, according to geographical location or mode of transport. The transportation planning point is assigned to a company code, but is otherwise independent of other organizational units. Procedures Valid for Entire Company Codes Use It is not necessary to assign the transportation planning point to a company code for transportation planning purposes. However, company code assignment is necessary for shipment costing and settlement. Internal offsetting of costs between company codes (one company code takes care of transportation processing for all
  • 3. the firm’s company codes, for example) is presently not available. These must be manually entered in the financial accounting ledgers. Prerequisites In order for this cross-company-code manual processing to be possible in financial accounting, cost distribution for shipment costs must occur on the shipment cost item level rather than delivery level or delivery item level, since in the latter two cases, the delivery’s company code would be adapted to the transportation planning point’s company code. A company’s plant in Japan delivers goods to a plant in Houston. The plant in Japan takes care of the shipment costs until the goods reach the airport in Japan, and the Houston plant pays the rest of the shipment costs (Japan airport → Houston airport → Houston plant). The transportation chain with cross-company-code billing looks like this: There are a total of three shipments: • The first shipment is created by the transportation planning point in Japan and ends at the airport in Japan. Cost distribution occurs on the shipment cost item level. • The second and third shipment are created by the transportation planning point in Houston. In both cases, cost distribution occurs on the shipment cost item level. Shipment Types Definition The shipment type contains all the important control features for a shipment, such as the number range, whether the shipment is inbound or outbound, how leg determination is performed, and which leg indicator has been set for a shipment of this type. You can also enter a selection variant for the shipment type. The values defined in the variant appear on the selection screen when you create a shipment document of this type. The system supports the following shipment types: • Individual shipment • Collective shipment • Transportation chain Individual shipment An individual shipment includes • One or more deliveries • One point of departure • One destination
  • 4. One mode of transport Collective shipment A collective (or milk-run) shipment includes • One or more deliveries • Several points of departure • Several destinations • One mode of transport Transportation chain A transportation chain is useful if you are dealing with deliveries that will be transported using multiple modes of transportation (and are thus processed by different departments at the transportation planning point). Transportation Chain
  • 5. The department responsible for transportation by land organizes truck shipments and another department organizes ships and their cargo for goods shipment by sea. Each mode of transport (truck and ship) requires individual shipping papers. Each mode of transportation requires separate transportation papers, meaning that you need to create a shipment document for the overland leg and another for the overseas leg of the journey. If shipments use more than one mode of transportation, it is a good idea to create a transportation chain. Because you will have a separate shipment document for each mode of transportation, you can maintain separate output, texts, statuses, and so on. Example for using a transportation chain At shipping points 0001 and 0002 in Germany, a large number of deliveries are to be sent to customers in the United States by the beginning of December. You and your customers agreed that part of the shipment be sent carriage paid and the other part carriage, insurance, freight paid to (CIF) New York only (meaning that the end customer must pay carriage, insurance and freight from New York to the final destination). The goods are to be transported by land within Germany, by sea from Hamburg to New York, and by land again in the United States. It is, of course, possible to document the entire process in a shipment document. However, problems can arise if certain parts of the shipment functions are used: • For instance, data on the shipment status always refers to the entire shipment document (for example, the status "Loading finished"). However, in this example loading takes place several times. • For the same reason, an assignment of dates and texts to a handling unit is difficult because these can change within the shipment document. The very definition of a handling unit is in itself problematic. • Output to be created in combination with the shipment document contains all data for the entire shipment document. When the truck driver leaves the shipping point, his printout also contains data that refers to the ship. This is unnecessary and a nuisance. Processing several required preliminary legs at different times also requires that output be printed at different times. In cases like this, it makes more sense to use a transportation chain in which deliveries are passed on in a series of different shipments. In the above example, you would create several shipment documents in the system: ten preliminary leg shipments by truck, one main leg by ship, and if necessary, eight subsequent legs by truck again. That way, you avoid the problem of assigning deadlines, output, or texts to the packaging material. With that in mind, you might put together your transportation chain like this:
  • 6. 1. Create a main leg At transportation planning point 0001, you create a main leg shipment for all deliveries to be sent by ship from Hamburg to New York City at the beginning of December. There should be a special shipment type set for this set in Customizing. This could include the following settings: o Set the leg indicator field for the shipment header to Main leg. The system will recognize that this shipment must be linked to other shipments. o The leg determination type for this shipment type should be ‘ ‘.This means that no automatic leg determination will be carried out. This is reasonable since the Hamburg-to-New York leg does not include any points of departure or destinations from the delivery (however, this data will be taken into account during leg determination). o Route determination resulting in the Hamburg-to-New York route may have already been carried out in the delivery. If you want to copy this route automatically into the main leg shipment, you can specify in Customizing that routes must be copied into the shipment document. Copying starts as soon as you set the Planned status in the shipment document. (Note that the route in the deliveries must be unique.) At the same time, the service agent can also be copied automatically from the delivery provided you have made the appropriate settings in Customizing and that the same service agent has been assigned to the deliveries. When the deliveries were created, they were given transportation planning status A, meaning they were ready for transportation planning. Now, after creating the main leg shipment, these deliveries have transportation planning status B, meaning that they have been partially planned (since a main leg shipment needs preliminary and possibly subsequent legs). 2. Create preliminary legs The preliminary leg shipments that are used to send the goods from shipping points 0001 and 0002 to the ship in Hamburg can be organized much faster than the ship itself, which is why they are planned at this time. You must now combine all deliveries in the main leg shipment into one or more preliminary leg shipments. You can do this in the Create Shipment transaction. To do this, you must select all deliveries in the main leg shipment. The transportation planning status of the delivery may be helpful in determining which deliveries are in the main leg shipment since their status is now set to B instead of A. Of course, this is not sufficient as a single selection criterion. He can enter further selection criteria that are used during delivery selection for the main leg. This may be impractical since you may not now what the selection criteria were or too many deliveries may be selected. Therefore, it is better to specify the shipment number of the corresponding main leg shipment in the Reference to line when selecting deliveries. If you do not know the number, press F4 and a selection screen will appear. In this case, a further selection screen for shipment number selection appears. On this screen, you can specify the person who created the shipment document, the point of departure, and the date in order to determine the number of the main leg shipment. You create shipments using the worklist you defined. If each delivery corresponds to exactly one truckload, the planner can call up the function Edit → Automatic planning → One dlv. one shipment, which creates a separate shipment for each delivery. You should use the following settings: o Set the leg indicator to preliminary leg.
  • 7. o Set the leg determination type to 1 (leg determination according to pick-up sequence and itinerary). o Do not copy the route from the delivery. It may be a good idea to copy the service agent. When the Planned status is set, leg determination begins, but the route is not copied from the deliveries. It will determine the pick-up sequence. In addition, the system suggests Hamburg as destination since the deliveries are part of a main leg shipment that runs from Hamburg to New York. When the shipment is saved, the system updates the delivery status. The status for the carriage paid deliveries remains B (partially planned), since the second part of the Incoterm was left blank and the system assumes that a subsequent leg is required. The status of the deliveries with CIF New York is set to C (completely planned) since the second part of the Incoterm has been specified and the system assumes that a subsequent leg is not necessary. 3. Create subsequent legs You create subsequent legs the same way you create preliminary legs. Use these settings: o Set the leg indicator to subsequent leg. o Use category 1 for leg determination. o Do not copy the route from the deliveries. In order to create these shipments, search for deliveries with a transportation planning status of B. The system then finds only those deliveries for which a subsequent leg is to be created. If the Planned status is set, it also carries out leg determination. The system automatically suggests ‘New York’ as a point of departure, since the main leg shipment ends in New York. The sequence in which the goods are delivered (itinerary) is determined by the sequence in which the deliveries are displayed on the screen. If the subsequent leg shipments are saved, the transportation planning status of the corresponding deliveries is set to C (completely planned) since these deliveries now have preliminary, main, and subsequent legs. Following these steps ensures that every delivery is included in the transportation chain. In the example, there are ten preliminary leg shipments to Hamburg followed by a main leg shipment and eight possible subsequent leg shipments in the United States. In this way, a group of deliveries forms a network of shipments. 4. Monitor the transportation chain In order to monitor the shipments, choose Environment → Transportation info → Shipment list or Environment → Transportation info → Transportat.network depending on whether you are processing orders, deliveries, or shipments. Worklists for transportation planning and processing may also provide an overview. To generate a worklist, enter one of the shipment numbers that make up the transportation network in the Reference to line. The system will then select all shipment documents in the network. Shipment document Definition The shipping document is the central element of transportation planning and shipment completion. It contains all the information necessary for carrying out transportation.
  • 8. Use You create shipment documents using a worklist. Different types of shipment documents have been defined to enable you to reflect in the system the various forms of transportation used in your organization. For example, you use the individual shipment document to plan and process the transportation of goods from one location to another. You use the collective shipment to move goods from one or more points of departure to one or more destinations. Separate document types deal with inbound and outbound shipments. You can use shipment documents to: • Combine deliveries into one inbound or outbound shipment • Specify shipment stages o Legs o border crossing points o load transfer points • Assign goods to handling units • Assign service agents • Specify planned transportation deadlines • Record actual transportation deadlines • Specify output required for transportation (such as shipping papers or EDI messages) • Define transport-relevant texts Information in the Shipment Document Use You can record the following information in the shipment document: • Means of transport • Service agents • Deadlines • Status • Tendering status • Route • Texts • Output
  • 9. Dangerous goods Features Means of transport The means of transport necessary for a shipment is reflected in the system as a handling unit. These handling units contain information about tare weight and -volume of the means of transport as well as the weight of the packed handling unit. Information about the country providing the means of transport, details about the driver and travel time are also included in these handling units. Handling units that have already been created for delivery items are copied into the shipment document where they can be packed further, if necessary. Delivery items that have only been partially packed or not packed at all can be packed in the shipment documents. See also: Packing in the Shipment Document Service agents You can store information about the service agents (such as forwarding agents or customs agents) who are involved in the transportation process. You can record this information at the header or stage level of the shipment document. See also: Assigning Service Agents in the Shipment Document Deadlines The time required for organizing and performing the various transportation activities is stored as planned and actual deadlines in the shipment document. This information can be used for monitoring and analysis purposes. See also: Maintaining Planned and Actual Deadlines in the Shipment Document Transfer of Delivery Dates to Shipment Status Once you have completed the planning activities for a shipment document, you can set the Planned status. As soon as you set this status, you can no longer carry out planning activities for this shipment document (remove deliveries from the document or move deliveries within the document, for example). Leg determination is carried out automatically. You can define which activities take place when you set the status in the Activity Profiles section. A traffic light icon indicates the overall status of the shipment document. The icon can be interpreted as follows: • No traffic light: No planning activities have been performed
  • 10. Red light: Transportation planning is complete • Yellow light: Loading at the plant has either started or is complete • Green light: Shipment has been processed and is in route or has arrived See also: Maintaining Status in the Shipment Document Tendering status The tendering status describes the current status of a shipment with respect to negotiations with a forwarding agent through the Internet. Route If the route and the forwarding agent are the same in all deliveries, they are copied from the deliveries into the shipment document when you set the status to Planned. Country-specific restrictions with respect to total weight of the shipment on a particular route require recording the restriction already at the route level. This upper level can be specified at route level and is then taken into consideration during shipment processing. If the allowed total weight is exceeded during delivery assignment to the shipment, the system issues a warning message. The shipment can then be changed accordingly. The fields are displayed on the planning screen. During order processing and delivery processing, this check is not taken into consideration. Further transportation-relevant information is copied into the shipment document if you define the Copying Routines in the Implementation Guide. Texts Additional information that could help the transportation process to run smoothly can be entered as text at header level in the shipment document. This information can be accessed by all business partners involved in the process. Shipment text types are defined in Customizing and assigned to text determination procedures. Text determination procedures are defined in the shipment document type. Output Output processing is performed just as it is in other areas of the Sales and Distribution module: using the condition technique. The types of output that have been set in Customizing for transportation and for which you have created condition records appear in the shipment document and apply to the entire document. The output type ALTR has been defined for transportation in the standard SAP System. You can change this output type to suit your needs.
  • 11. Copying Information Relevant for Transportation Use When you create shipments, you can use information relevant for transportation as selection criteria. For example, you can group together outbound deliveries with means-of-transport type "Truck" and means of transport "Small truck" into one shipment. In sales orders and/or deliveries, you can specify that the following information is relevant for transportation: • Means of transport • Shipping type • Type of means of transport • Special processing Integration In order to copy proposals for dates and times from the delivery, you must create a connection between the shipment dates and delivery dates. Copy routines serve this purpose. Prerequisites The system uses the copy routine to copy data from sales orders into deliveries and then into shipments. In order for the system to do this, you must first carry out the following activities in the Implementation Guide (IMG): • Specify copy control for deliveries • Define shipment types Features Information relevant for transportation is copied from the order into the header of the outbound delivery, and thus supplies split criteria for outbound deliveries. For example, two order items with different shipping types, means of transport or means-of-transport types cannot be combined into the same outbound delivery. However, information can be copied from the outbound deliveries into the shipment, provided it is unique data. You create a handling unit in the shipment for the means of transport (likewise only if this is unique). The copying takes place when you set the status "Planned". Here you must store an appropriate copy routine in Customizing for the shipment type. The system also checks the capacity of the mode of transport in the delivery. If this capacity is exceeded, you will receive a warning message. Since the means of transport can also be specified on the Pack screen, the means of transport entries in the sales order, delivery header and the corresponding packing information could vary. Changes made on the Pack screen have no effect on the transportation-relevant information in sales orders and deliveries.
  • 12. Shipment Outputs Purpose In addition to printing and faxing, electronic data exchange is becoming increasingly important as a method of communicating transportation data. Senders (shippers) transmit their shipping orders and transportation information to their service agents (forwarding agents, ship owners, customs agents). The service agents organize the transportation process and ensure that it is carried out smoothly. A logistics transportation chain involving multiple modes of transport and service agents often occurs during the shipment. To ensure efficiency in such a situation, it is especially important to get all necessary information to all parties involved at the earliest possible point in the process. Process Flow Sample process flow for electronic data exchange: Shipping Inbound Processing 1. The shipper sends the forwarding The forwarding agent receives the agent a partially- or completely planned transportation requests and assumes shipment (shipping order). responsibility for planning the shipment details. 2. The forwarding agent sends The vendor receives the completely planned information about the completely planned shipments from the forwarding agent. shipments back to the shipper. 3. The shipper or forwarding agent The customer receives information about the informs the customer about the upcoming upcoming shipment. shipment (shipment notification). For more information on output control, see the Outputsection of the Implementation Guide.
  • 13. You can find more information about output administration in Working with Output in Sales and Distribution. Output Control Use You can use output control to automate either messages or subsequent processing of partner-specific messages. The application uses interfaces that were predefined in Customizing for conditions to call up output control. You can use these interfaces to describe different constellations of data and the processing methods of your choice. If one of these data constellations occurs in the application, it triggers the corresponding processing method (either sy n ch ron ously or asynchronously). You can define processing methods in many different ways (as print output or as a shipping IDoc for EDI, for example). Prerequisites The Logistics Execution application always uses output control for issuing output. You can maintain settings for output control in Customizing in Message control activity. Features The condition technique is used in the SAP System for formulating data constellation conditions. If the current application data matches one of the conditions defined in Customizing, output determination was successful and an output proposal is generated. You can then change this proposal ( edit) and the output will be processed either immediately or at a specified time. The output's processing status is saved in a status record and a processing log is created. See also: Message Control Structure Output control only supports certain transmission media. For more information, see Transmission media. Activities In Message Control Customizing, you can define rules according to which the system accesses individual condition records. You can define concrete messages as condition records in the application: Message definition in the application Determining Output in the Shipment Document Use The output determination function enables you to perform tasks for shipping and transportation output for delivery and transportation processing with your customers and within your company. You can create shipment
  • 14. output and output for handling units. Staff members in your company can send messages. For example, the system automatically finds the message that a bill of lading is to be printed. Integration The output control checks whether the application data matches the condition records (that were defined in Customizing). If this is the case, one or several messages are "found", and they can then be processed (for example, sent electronically). The condition records are searched for during output determination on the basis of a predefined hierarchy. The Output determination function is used in output control. You can use the output control function to exchange information with internal and external partners. Output control consists of the following functions that are described in the cross-application documentation CA – Output Control: • Output Determination • Output Processing • Status Management Prerequisites For output determination, the condition elements and condition records need to be defined since the output determination runs using the condition technique. In Customizing, you can define the conditions in which the output types you define will be selected. For more information on output control, see the Output section of the Implementation Guide. Features The system can propose output automatically for a document. You can change this output in the document. Output determination occurs when: • Accessing the output screen during shipment processing • Saving a shipment document that is new or has been changed See also: For more information on output, refer to the following documentation: Application Documentation Basis BC – SAP Communication: Configuration Cross-application functions Output Control SAP Business Workflow You will find Customizing settings and examples in the above documentation. Example
  • 15. Bill of lading 1. Output determination starts in V7STRA with output type CMR1 and the assigned access sequence. 2. The access sequence defines the fields with which the key for the condition table is read. (for example, condition table B017: shipment type of the shipment is read) 3. If the condition record is found, the system proposes an output with the output attributes found in the table. 4. The output proposal (possibly not yet processed) is stored after the document is posted as an output status record in the NAST table. Output Type Definition There are predefined output types for shipments. You can display a list of predefined output types by using the input help. The output type contains parameters, such as partner functions, that are valid for all outputs that are assigned to that type. • Shipment outputs include: ALTR general shipment, bill of lading, shipping order, EDI in general (SEDI), shipment notification, goods receipt/issue slip. • Delivery outputs include: delivery note, mail (internal output), shipping notification, warehouse order, and package labels. The output type signals the use of a printed form such as a delivery note that will be sent to a customer. An output type can also be an internal, electronic-mail message that you send to a mail recipient (partner). Use The output type is assigned, per transmission medium, to a form routine in a program that is called up to process the output (output status record). For more information, see Defining Output Types. Integration The output type comes after the procedure in the condition element hierarchy. The output type is assigned exactly one access sequence (next hierarchical level), which in turn is assigned one or more condition tables (next and lowest hierarchy level). Condition Components: Sample Hierarchy Output Processing Use Output proposals are presented to you in an application transaction. You can then either change (process) the proposed output before you save the object (bill of lading, for example).
  • 16. Features The output proposal that was created includes, among other things, the output's recipient, the transmission medium and the processing time for subsequent (automatic) processing. You can change all these parameters in the application transaction. When you create an output manually, you can specify the output type, transmission medium, print parameters, partners, and language. You can display a determination analysis, which displays the outputs that were found in the procedure. You can display details for an output that show which application data the condition table was read with. After you post the document, the processed output proposal is recorded in the NAST table as a message status record. You create a shipment with forwarding agent 1, and the system proposes a shipping order that is to be sent via EDI. The determination analysis shows that the Shipment type and Transportation planning point application fields were read and a condition record was found. Output partners The output recipient of the output that is sent is defined as the output partner. Use the input help to choose an output partner (sold-to party, Electronic Data Interchange -EDI mail recipient, forwarding agent, or employee responsible, for example). During output determination, the output recipients are determined from the partners listed in the document. In other words, the partner function is used to determine the recipient (forwarding agent, for example). You can enter a specific output recipient in this field. Your entry overrides the standard partner that appears. Output recipients that are entered specifically must also be listed in the document as partners. Output's transmission medium The type of processing is determined by the transmission medium. You can specify, for example, that an output be printed out or sent by mail, fax or EDI. Processing status Possible status values: Status 0 (not yet processed) 1 (processed - no errors) 2 (processed - with errors) Dispatch time
  • 17. The dispatch time is stored in the condition record. You can have the system process and update the output either immediately or at a later time. You can use the RSNAST00 report or a special application function that triggers processing in order to process the outputs at a later time. The following are linked to the dispatch time as follows: • Time 1: Send via periodically-planned jobs (next processing run) or start sending from RSNAST00 online by using the ABAP/4 Development Workbench • Time 2: send via jobs (as in time 1) with additional time specification of the processing time: start from RSNAST00 in the background at a defined time (Tools → Administration, Jobs → Job definition). RSNAST00 processes all output status records that meet the selection criteria and whose processing times or intervals either include the current date or lie in the past. Processing times or intervals are fields in the message status record in the NAST table. These fields are not filled with information in the standard system. Please note: The first Time field is different from the second Time field. In order to have the system complete these fields, you can define a corresponding routine in a report as an attribute of an output type. This routine will then be run for each output determination of this output type. • Time 3: Send using an application transaction (specific entry): Call up an application function. Print transaction VT70 Only outputs with the status 0 and the dispatch time 3 are included in initial processing. An output can be sent more than once. This is useful, for instance, if technical problems or other problems occurred in the first print output. The system copies the output that was selected; you can then process and send this copy. In repeat processing, only outputs with status 1 or 2 are selected (dispatch time is not taken into account). Only outputs with status 2 are selected for error processing (once again, dispatch time is not taken into consideration). There can be several versions of the same output that only differ in date or time of creation (because of repeat processing or multiple sending, for example). During selection, the system always chooses the last (chronologically latest) output from a group of similar outputs. • Time 4: Send immediately (during save in the application). The output is processed when the document is updated. Activities See also: Selecting Output Worklist Changing Data Relevant to Output Changing Outputs in Document Processing Sending Internal Mail
  • 18. Selecting a Worklist for Output Use Before you can process messages, you must first select a worklist. Procedure 1. Call up the respective task: Function Menu Path What you should know Shipping Initial Screen Shipping Processing delivery output Communication/Printing → Outbound Delivery Output Processing loading output Communication/Printing → Loading Output Processing handling unit output Communication/Printing → HU output Shipment Initial Screen Transportation Processing transportation output Communication/Printing → You can process transportation output as Transportation Output well as output for documents that have a reference to a shipment (for example, billing documents, deliveries). To do this, select the respective field and enter the selection criteria in the appropriate section With background processing Tools → ABAP Workbench → Print transactions VT70 Development → ABAP Editor 2. Enter the output type, the transmission medium, and, if required, further selection parameters. If you want to call up a worklist of all outputs that have not been processed successfully, enter 3 in the field Processing mode. The system displays all the incorrect outputs, and you can process them once again. 3. If you wish to look at the worklist first and/or then make changes, choose Program → Execute. If you wish to process the output as a background job, choose Program → Execute in the background. In this case, you cannot execute any changes. 4. If you wish to process output, select the respective output. For more information on processing output, refer to the section Processing Existing Output. 5. Choose Edit → Process. The system processes the selected output. 6. If you wish to receive a log after output processing, choose Goto → Log
  • 19. Changing Data Relevant to Output Prerequisites You must have the worklist created. For more information on creating a worklist, refer to the section Creating a Worklist for Output. Procedure Select the respective output and execute the task you require. Function Menu Path What you should know Changing print parameters Edit → Printer specification Use this task if wish to enter the same print parameters for several outputs. All the selected outputs receive the print parameters from the screen Printer specification if there is 1 ( Print) in the field Transmission medium. Issuing output (printing, sending Edit → Process After processing, output is highlighted as fax, and so on) follows: • green (processed successfully) • red (processed incorrectly) Changing details data Goto → Communication Use this task if wish to enter the separate print parameters for each output. You may only change the parameters for the transmission media Printing and Telefax. The parameters are merely displayed for all other transmission media. Creating screen display Goto → View The system displays the first selected output. Display processing log Goto → Log The system creates a separate log for each output. Changing Outputs in Document Processing Prerequisites Normally, the system automatically proposes data for output control in the sales document. If you must process outputs, choose the following menu path that corresponds to the sales document you are processing: Document Menu Path
  • 20. Delivery Extras → Delivery output → Header or Item Shipment Goto → Output If you selected several outputs, use Goto → Next detail screen to process the next output. Procedure Function Menu Path What you should know Repeating an output Select an output and choose An output can be sent more than once. This Repeat output. is useful, for instance, if technical problems or other problems occurred in the first print output. The system copies the output that was selected; you can then process and send this copy. Sending a change output Select an output and choose If you have made changes in a document, Change output. you can create and send change outputs for outputs that are based on this document and have already been sent. The system copies the output that was selected; you can then process and send this copy. An indicator identifying this output as a change output then appears in its Change column. Changing print parameters Select an output and choose The output must be set for printing: for Communication method. example, the Medium field must be set to 1 ( Print output) or 2 ( Fax). Changing send data Select an output and choose Dispatch time, for example. Further data. Processing date and status are also displayed here. Carrying out output determination Goto → Determin. analysis This function is described in detail in Output analysis Determination Analysis. The system displays all accesses. You can display the fields that triggered each individual access by choosing the folder that you want more information about.
  • 21. Sending Internal Mail Use You can use internal mail to send a message referring to a sales document to the person responsible for that document. That person can then call up the document directly from your mail in order to check or process it, for instance. Features The procedure for processing internal mail can be found in Processing Internal Mails in SD. You can attach certain criteria to automatic proposals so that you only receive an automatic message from order processing if the value of an order is greater than $1000, for example. For more information, see Example Message Determination: Processing Condition Component Hierarchies. See also: Formatting SAPoffice Messages Processing Internal Mail Procedure To process an internal mail that you have received, proceed as follows: 1. On the initial screen, choose Office → Inbox. 2. Select the mail you wish to process and choose Document → Display. The system displays information on the created document, such as document number, name of creator, and so on. If the creator has entered a text in the mail, this text will also be displayed. 3. Choose Edit → Process. You automatically branch to the transaction specified in the mail. After document processing you return to the mail. You can repeat this process as often as required. You can process the mail directly without displaying the content if, after selecting the mail, you choose Edit → Process.
  • 22. Output Determination Analysis Use A determination analysis can be run for outputs. For example, you can find out which keys were used to find outputs and whether output determination was successful. Features An output determination analysis provides you with the following information: • Origin of the output proposal (via condition record or from the customer master, for example) • Output search results (which outputs were found in the corresponding output procedure and which outputs could not be found) • Access information (which accesses occurred for outputs that were found using condition records and the results of the accesses) • Key combinations (with which key combinations, or combinations of fields, did the accesses occur?) Activities 1. Change the corresponding document. For a shipment document, for example, you would choose: a. Shipment screen b. Shipment → Change 2. Goto → Output 3. Goto → Determin. analysis Determination analysis only works if you are in the change or create mode of the shipment document. (In other words, this function does not work in display mode.) There is no output determination analysis for the picking list Printing Output Use You can, for example, print a delivery note for a delivery. Prerequisites The following prerequisites apply:
  • 23. The document must have an output that is designated for printing. The output can be  Transmitted directly by the system to the document through Output Determination  Entered manually into the document. If an output is allowed according to the output determination procedure, you can enter this output into the document manually. For more information, see Output Determination Procedure Technique. To enter an output manually (or display an existing output), choose in the overview screen of the document Extras → Output → Header or Item → Edit. You must have 1 (Print output) set in the field Transmission medium for the output to be printed. For more information on output, refer to the section Output Processing. • In addition the column Status must have the traffic light set to yellow. If the traffic light is set to red, you must repeat the print by selecting the output and choosing Repeat output. Features You can print in the following ways: • Through the worklist (online) • Through the worklist (background job) See also: For further information on the worklist, refer to the section Selecting Worklist for Output Printing Outputs from Document Processing Prerequisites The general prerequisites listed in Printing Outputs apply. Additionally, the following settings must be made on the output screen for the output that you want to print. • In the second Time column: 3 Procedure Document Menu Path Delivery (Create/Change) Outbound delivery  Issue delivery output Shipment (Shipment screen) Goto  Output Function Menu Path
  • 24. Printing an output Specify which printer Displaying an output on a screen Specify which screen Outbound EDI messages Use Shipment documents are normally sent in one of the following two situations: 1. The shipper sends the forwarding agent a partially- or completely-planned shipment (transfer order). 2. The shipper or forwarding agent informs the customer about the upcoming shipment (shipment notification). Prerequisites You need to create an output type that you can use to send the shipment document per Electronic Data Interchange (EDI). Output type SEDI is provided for this purpose. You can also make a copy of this output type and tailor it to your needs, if necessary. The transmission medium must be set to 6 (EDI). The following condition components must be maintained: Condition component Value Access sequence 0001 Output type SEDI (or copy of SEDI) Schema V7STRA, for example Application V7 Processing routine RSNASTED program, FORM-routine EDI-PROCESSING General data Select Access to conditions and Multiple sending of output. Leave all other fields blank. Time 3 (explicit request), as an example Transmission medium 6 Partner function CR (Carrier) or SH (Ship-to party) IDoc interface You must also enter the following values for outbound partner profiles and any additional outbound parameters under message control. Field Value
  • 25. Output type SHPMNT or SHPADV Partner type LI (vendor/creditor) or KU (customer) Partner function CR (Carrier) or SH (Ship-to party) Port SUBSYSTEM Output mode Collect IDocs, for example Basic type SHPMNT03 Application V7 Output type SEDI, or your modified copy of SEDI Process code SHPM 1. Scenario: The shipper sends the forwarding agent a partially- or completely-planned shipment (transfer order). You create a shipment document that is either partially or fully planned (depending on whether the transportation planning details will be carried out by the forwarding agent or if you do it yourself). Depending on what point in the process the message determination is set to take place, the EDI is triggered immediately after posting (time 4) or when explicitly requested (time 3). Scenario: The shipper or forwarding agent informs the customer about the upcoming shipment (shipment notification). You have a fully-planned shipment document (that you have created and planned yourself, or that the forwarding agent has planned for you). Depending on what point in the process the message determination is set to take place, the EDI is triggered immediately after posting (time 4) or when explicitly requested (time 3).
  • 26. To improve performance, you should make sure that when you use IDocs for special purposes that you only generate segments that include the data you need. You can hide certain segments by using a reduction technique. To make the necessary settings in Customizing, choose Cross-Application Components → Distribution (ALE) → Processing IDocs → Set up segment filtering Inbound EDI messages Use You can create or change shipment using EDI output. In this way, the following tasks are possible: Collective Goods Traffic The forwarding agent picks up deliveries from the vendor during the preliminary leg. Then the agent puts together the shipment for the main leg and passes on this information to the customer as a shipment notification. Now the customer can easily post a goods issue for the entire shipment (more precisely, for the deliveries it contains). Transportation planning A vendor supplies the forwarding agent with the outbound deliveries as transfer requirements. The forwarding agent plans the shipment and informs the vendor of the result, who can then start the appropriate activities for goods issue of the respective outbound deliveries. To create shipments at the customer site, you can use message SHPADV (shipment message or shipment notification). To create or change your own shipments, use message SHPMNT. Both messages are based on IDoc type SHPMNT03; processing is executed through
  • 27. process code SHPM. You can maintain these parameters within the EDI partner profile. For this purpose, select Tools ->Business Communication -> IDoc -> Partner profile. Output for deadline and status The forwarding agent confirms the planned or actual deadline via EDI, including the status for the end of the shipment with the respective time. The inbound deliveries to which the shipment refers must exist in the system. The reference is made through the delivery number of the vendor (collective goods traffic) or directly (transportation planning). Therefore, it is necessary to notify the customer of the deliveries where collective goods traffic is concerned. You can do this using the DESADV (shipping notification) message. It is not possible to create deliveries in the initial processing of shipments, as required for direct shipments. Also, no change is made to the delivery (with effects on material planning) if there is a change in the shipment (planned arrival date, for example). Prerequisites The deliveries that the shipment refers to must exist in the receiving system. Features Control of IDoc Receipt SHPMNT03 You can control the processing of the receipt of IDoc SHPMNT03 using the specifications in the segment E1EDT18. For this purpose, you can use the following E1EDT18-QUALF qualifiers: QUALF = ORI Shipment document is created QUALF = CHA Shipment document is changed QUALF = PID Specification of an identification field for the shipment document. Processing and copy control If you use the qualifier ORI or CHA, you can control the data transfer strategy from the IDoc into the shipment document using the parameter field. Basically, there are four strategies which are indicated by the first character in the E1EDT18-PARAM field. The respective marker characters are in the second character in the E1EDT18-PARAM field: 0 IDoc fields are always copied; empty ID fields cause document fields to be deleted (standard case; will be processed if no specification is made). 1 IDoc fields are only copied if they are empty 2 Similar to strategy 0, but an IDoc field is not transferred if it is filled completely with the marker character. 3 Similar to strategy 1, but an IDoc field is not transferred if it is filled completely with the marker character.
  • 28. Example of segment E1EDT18: QUALF PARAM ORI 2! Copy all fields, except those containing a ! CHA 3% Copy fields that are filled in and delete fields with %%%%... in the document. Control of identification You can control the identification link between the IDoc and the shipment document in segment E1EDT18 with qualifier PID, which can appear up to three times per IDoc. In most day-to-day cases, the PID qualifier is not present. In this case, the E1EDT20-TKNUM field is copied into VTTK-EXTI1 during creation. The system assigns the shipment number VTTK-TKNUM internally. If there is a change, the system searches for a suitable shipment document using the following criteria: E1EDT20-TKNUM = VTTK-EXTI1 and E1ADRE4-EXTEND_D = VTTK-TDLNR (where you must have E1ADRE4- EXTEND_Q = 300) If PID qualifiers are specified in E1EDT18, no data is copied from TKNUM to EXTI1. If the shipment number is to have external number assignment, you can specify the shipment number as a primary identification with E1EDT18-QUALF = PID and E1EDT18-PARAM = TKNUM. The shipment is created using VTTK-TKNUM = E1EDT20-TKNUM, and is searched for with the same condition if you want to change it. You can use the IDoc fields EXTI1, EXTI2, and TKNUM for the identification. Examples of segment E1EDT18: QUALF PARAM Function for creating Function for changing None None Copy E1EDT20-TKNUM to VTTK- Search for shipment with VTTK-EXTI1 = EXTI1 E1EDT20-TKNUM and VTTK-TDLNR = E1ADRE4-EXTEND_D Internal number assignment
  • 29. PID TKNUM External number assignment VTTK- Search with VTTK-TKNUM = E1EDT20-TKNUM TKNUM = E1EDT20-TKNUM PID EXTI1 Internal number assignment Search with VTTK-EXTI1 = E1EDT20-EXTI1 PID TKNUM External number assignment Search with VTTK-TKNUM = E1EDT20-TKNUM and VTTK-EXTI2 = E1EDT20-EXTI2 PID EXTI2 PID EXTI1 Internal number assignment Search with VTTK-EXTI1 = E1EDT20-EXTI1 and VTTK-EXTI2 = E1EDT20-EXTI2 PID EXTI2 Activities You must also enter the following values for outbound partner profiles and any additional outbound parameters under message control. Field Value Output type SHPMNT or SHPADV Partner type LI (vendor/creditor) Basic type SHPMNT03 Application V7 Output type SEDI, or your modified copy of SEDI Process code SHPM Report: Output for Shipments Use You can use this report to create a list of outputs that meet your selection criteria. You can specify whether your list should include outputs related to shipments, deliveries, handling units, or invoices. You can then display or process the output of your choice from the list. Features You can enter shipment numbers, planned shipment completion dates, transportation planning points or partners as selection criteria. You can also specify that you want to see only those outputs relating to
  • 30. shipments or deliveries, for example. Use output type, transmission medium and processing mode to further limit the search. From the list of outputs that appears, you can start immediate processing, make changes to the processing parameters, or display either the output itself or its corresponding log. The log records how often the output is processed or printed. This report only lists outputs that have been found via output determination or defined manually in the selected documents (shipments, deliveries, or invoices, for example). Output determination is not carried out in this report. See also: Creating Output Lists Creating Output Lists Procedure To create an output list, proceed as follows: 1. Choose Logistics Execution → Goods Issue for Outbound Delivery → Communication/Printing → Transportation Output. The Output for Shipments screen appears. 2. To use other selection criteria, choose Edit → All selections. To define reoccurring selection criteria, you can create a variant for the selection screen using Goto → Variants → Save as variant. You can then retrieve these variants with Goto → Variants → Get. 3. Enter the criteria you want to use for selecting the output. 4. Choose Program → Execute. The system then gives you a list of all the outputs that match the selection criteria. Freight Codes and Freight Code Sets; Freight Classes Definition Forwarding agents or railroads use freight codes (and sets of freight codes) to classify the goods they transport. Freight codes are specified in the transportation papers, and some are specific to rail or road transportation.
  • 31. These are compiled in freight code sets published by forwarding agents and the railroad authorities and are used specifically when referring to rail or road transport. Specific freight codes are defined in each freight code set. Freight code Description 4001 Methyl alcohol 4002 Glycol 4003 Alcohol 4004 Formaldehyde Freight classes are made up of one or more freight codes and are one of the criteria for shipment costing. Determining the Freight Code Process Flow Determining the freight code is carried out in two steps: Step 1 Automatic freight code determination uses the following criteria: • Country of origin • Shipping type (truck, rail, etc.) • Forwarding agent (forwarding agent freight group in the vendor master) If an external transportation planning system is being used, then the freight code set can also be defined by the route. Step 2 Automatic freight code determination uses the following criteria: • Freight code set • Material (material freight group in the material master) This allows you to determine the freight codes of all materials in a shipment. The following illustration shows an example of freight code determination.
  • 32. Freight classes Definition A freight class is a group of freight codes used to calculate shipment costs. Use The freight class can be used as one of the criteria for figuring shipment costs. For example, you could enter condition records for freight rates that specifically refer to a combination of tariff zone and freight class. The freight code is used if the material that is being shipped should figure into the shipment costs. Integration One or more freight codes are assigned to a freight class within a freight code set. The following illustration is an example of how freight code set, freight code and freight class are interrelated.
  • 33. Transportation Processing Reports Use The following reports are available in transportation processing: Select Shipments: Planning Select Shipments: Utilization of Capacity Select Shipments: Free Capacity Select Shipments: Shipment Completion Select Shipments: Check-in Displaying Transportation Change Documents
  • 34. Report: Output for Shipments Scales List Shipment Costs List: Calculation Shipment Costs List: Settlement Editing Shipment Lists There are various functions which you can perform in both the transportation planning and shipment completion worklists to help you locate the documents you want to edit. Transportation List Views To switch from the normal to the status view of the transportation list and vice versa, choose Edit → Change view. Search Function To find documents with a particular characteristic (for example, you want to find all documents with a specific forwarding agent), proceed as follows: 1. Choose Edit → Find → Find delivery. The screen Delivery selection view appears where you can specify characteristics of the delivery you are looking for. 2. Enter one or more delivery characteristics. 3. Choose Program → Execute. The system finds all deliveries that match your selection criteria. Sort Function You can navigate within the transportation list much easier by sorting it according to criteria such as shipment type or planned loading date. To do this, proceed as follows: 1. Place your cursor on the column heading according to which you want to sort your list. 2. Choose Edit → Sort → Ascending order to sort the list in ascending order. If you want to sort the list in descending order, choose Edit → Sort → Descending. The system sorts the list based on the column header on which you placed your cursor and, depending on the menu option you select, in either descending or ascending order. List Viewer Functions
  • 35. Some lists are managed with a special tool, the ABAP List Viewer. The List Viewer features various functions that you can use to tailor the list to your needs. This tool allows you to make settings such as which columns appear in what order, for example. For more information, see ABAP List Viewer. Searching for Deliveries in a Transportation List To locate specific deliveries within a transportation list, proceed as follows: 1. Choose Edit → Find → Find delivery. 2. Enter your selection criteria (for example, the number of the ship-to party). 3. Choose Program → Execute. The system issues a list of all the shipment documents in the list which contain deliveries that match your selection criteria. Transportation Planning Use Transportation planning involves all the activities that must be performed before the shipment leaves the shipping point. These activities include: Acquiring the services of a forwarding agent Organizing the means of transport Specifying the route for the shipment Defining the stages for covering this route in the most efficient way. There are different types of shipment document types to deal with the various forms of transportation (for example, individual shipments or collective shipments). The shipment documents are used as a basis for carrying out transportation planning. This includes, among other things, the execution of the above activities. Prerequisites Before you can carry out transportation planning, the following requirements must be met: For outbound shipments Specify in Customizing for Transportation that a delivery type for the shipping notification is relevant for transportation planning and shipment completion. Specify a route in the deliveries. Specify in Customizing for Transportation that the routes in the deliveries are relevant for transportation planning and shipment completion. Make sure the ShpmtBlReason (shipment blocking reason) field is blank. You can find this field in the delivery header on the transportation screen.
  • 36. Once these requirements have been met, the system automatically sets the transportation planning status to A (Not yet planned) in the Trns.plan.status field in the delivery header. For inbound shipments Specify in Customizing for Transportation that a delivery type for the inbound delivery is relevant for transportation planning and shipment completion. Assign all items to the same plant in the inbound delivery. The system carries out a corresponding check. Features There are different types of worklists and lists you can use to perform various tasks in transportation planning: Shipment list You use the shipment list to establish which inbound or outbound deliveries are due for shipment. After you have created the list, you can – Create the necessary shipment documents for particular inbound or outbound deliveries – Specify the order in which the inbound or outbound deliveries (or shipment items) are to be delivered Transportation planning list When you are creating the shipment due list, you do not usually have all the information you need to complete transportation planning. For instance, you probably do not know which forwarding agent will take care of goods shipment at this stage. You could also decide not to finish the entire planning for a shipment in the shipment list because the capacity for this shipment is not yet used to the full. Once you have the information you require or once there are enough deliveries to fill the shipment, you can use the transportation-planning list to locate these documents and complete transportation planning. This list contains shipment documents for which planning activities still have to be completed and which match selection criteria that you define. You can use the list as a basis for performing transportation planning activities, such as organizing a means of transport, scheduling loading activities and acquiring the services of forwarding agents. Besides this "normal" transportation planning list, there are additional lists that you can use to find shipments according to certain categories. For instance, in the Utilization list, you could enter the shipment’s degree of utilization as a percent, according to weight and volume, as one of the selection criteria. Activities You must first determine which inbound or outbound deliveries are due for transport. A worklist for this purpose is created using selection criteria. Deliveries or outbound deliveries are then assigned automatically or manually to shipment documents. Relevant data, such as shipping points and destinations, is then used to determine the route and to break it into stages.
  • 37. The route in the delivery can be used as one of the criteria for selecting deliveries due for shipment. It is not, however, copied into the shipment document. More information is available in the following sections. You can make the appropriate settings in Customizing so that routes and service agents are copied from the deliveries into the shipment documents. Using the Route as Selection Criterion The route in the delivery can represent: One or more legs A link between the point of departure and the destination The destination region The route in the shipment document differs from the route in the delivery. The following examples should illustrate the difference between a route in the delivery and a route in the shipment document. Example of a route as a link between departure and destination locations The following graphic shows the route as a link between the point of departure and the destination.
  • 38. In the delivery document, the route NA indicates that both deliveries are to be transported across the North Atlantic. During transportation planning, you select all deliveries with the route NA and then look for a ship that can transport the deliveries at the required time. You find a ship that sails from Antwerp to New York and enter the route NA1 in the shipment document header. Example of a route as a target area: Routes can also be destination regions. The following graphic shows routes R5, R6, R7, and so on as destination regions. During transportation planning, you select all deliveries with route R5. You notice that there is still room in the truck. To make use of this capacity, the deliveries with route R6 are selected as well Creating Shipments Purpose When you create shipments, you can choose deliveries according to certain selection criteria and then assign them to the new shipment.
  • 39. On the overview screen you can, for example, assign deliveries to the shipment manually or automatically, or also remove deliveries from the shipments. On the selection screen that is within the overview screen you can also enter selection criteria for the relevant deliveries or inbound deliveries. Process Flow 1. Activities on the Selection Screen On the selection screen, you can enter selection criteria for the documents (inbound or outbound deliveries) that you want to assign to a shipment. You define the selection criteria that are displayed on the selection screen beforehand. You can use selection variants to specify these criteria. On the selection screen, you specify whether you want the documents due for shipment to be assigned automatically to a shipment document or whether you want to assign them manually once the shipment has been created. There are separate selection screens for inbound and outbound shipments. The selection screen for creating an inbound shipment contains, for example, the selection criteria Vendor and Destination point: Plant; in the case of an outbound shipment, the criteria are Ordering party and Destination point: Shipping point. 2. Activities on the Selection Screen The overview screen is divided into two sections: One section contains one or several shipment documents, and the other section lists the deliveries that have not yet been assigned to shipment documents. If the documents have not been assigned automatically to a shipment document, you can do this manually on the overview screen. You can also create new shipment documents and move shipment items (inbound or outbound deliveries) within a shipment or from one shipment to another. In addition, you can remove shipment items from the shipment if, for example, you run out of room on a truck. If you decide that you do have the capacity to select additional deliveries or inbound deliveries for additional shipments, you can create a new shipment from the overview screen. Two views are possible: For example, one view displays the address of the ship-to party, and the other displays the name of the ship-to party. Different data is made available for shipments and shipment items (delivery, inbound delivery). The settings can be changed through trees and table controls. You cannot place outbound deliveries and inbound deliveries together in the same shipment document. Nor is it possible to assign Items from a delivery or an inbound delivery to different shipment documents. You must decide at the delivery stage whether order items can be shipped together in one delivery and therefore require only one shipment. See also: Creating Shipment Worklist Creating Shipments Procedure To create a shipment, proceed as follows:
  • 40. 1. From shipment, choose Create → Single Documents. The Create Shipment: Initial Screen appears. 2. Enter a transportation planning point. 3. Choose the required shipment type from the list field. 4. Enter a selection variant, if necessary. You can assign a selection variant to each shipment type in Customizing. When you create a shipment list for the document type to which a variant has been assigned, the system automatically proposes these values on the selection screen. 5. Choose Edit → Select further deliveries. Depending on the type of shipment you enter, the selection screen for inbound or outbound shipments will appear. Enter your selection criteria for creating a shipment. If you have specified a selection variant or if one has already been assigned to the shipment type, the system will automatically propose these values in the relevant selection fields. For further information on delivery selection, refer to the section Screen Info for Delivery Selection. 6. Enter the selection criteria you require. The system automatically resets the Trns. plan. status field from value A (not yet processed) to B (Partially processed) and the Total gds mvt stat. field to value A (not yet processed). Based on these values, the system selects all deliveries that need shipment documents. The system defines deliveries that need shipment documents as all deliveries with either no transportation planning or only partial transportation planning (because certain shipment stages still need to be defined, for instance). 7. If you want the deliveries selected to be assigned automatically to a shipment document, you must select the Include deliveries in processed shipment field. 8. Choose Enter. The system returns a list of deliveries that match your selection criteria. The system automatically creates a shipment document and assigns the selected deliveries to it if you have selected the Include deliveries in processed shipment field. If you have not set the indicator, you must make the necessary assignments manually. 9. By choosing Edit → Selection log, you can obtain information on the selection run such as the total number of deliveries and items selected, the selection criteria used, and any problems that occurred. 10. If you still have room in the shipment, you can repeat the selection procedure and fill the shipment with more deliveries. To repeat the selection procedure, choose Edit → Select further deliveries. For information on processing the worklist, see: Defining Selection Variants for Shipments Creating Additional Shipment Documents
  • 41. Moving Deliveries Removing Deliveries from a Shipment Creating Shipment Documents for Individual Deliveries See also: Shipment Types Screen Info for Delivery Selection On this screen you define the selection criteria for selecting deliveries that are to be assigned to a shipment. You can select deliveries, for example, according to geographical factors, due date, and status of the delivery. The general term "Delivery" stands for deliveries, return deliveries, or inbound deliveries. How the Delivery Selection Works When you create or change a delivery, the shipment planning status of the delivery is queried. The shipment planning status indicates the current processing status of the delivery, that is, how far processing has developed so far. The shipment planning status can have the following settings: '' Not transportation-relevant A Transportation-relevant, but not yet processed B Transportation-relevant, partially processed C Transportation-relevant, completely processed For the user to be able to select the delivery, the shipment planning status must have the setting "transportation-relevant". You can display the shipment planning status as follows: 1. In the Shipping Screen, select the activity Change outbound delivery. 2. Select a delivery. 3. Choose Goto → Header → Shipment. On the detailed screen for Change Outbound Delivery, you see the status on the tab page Shipment in the field TranspPlngStat. For more information on the field for the shipment planning status, refer to the F1 help. If the shipment planning status is "transportation-relevant", you can select the delivery through the Shipping Screen → Create Shipment.. If you cannot select a particular delivery, go through the items in the checklist.
  • 42. Checklist • If the shipment planning status of the delivery is not "transportation-relevant", check the following items: o If the delivery type is marked as transportation-relevant, proceed to the Implementation Guide, and, under Logistics Execution → Transportation → Shipments → Maintain Transportation Relevance, choose the activity Maintain transportation relevance for delivery types. o If a route is entered in the delivery, and the route is marked as relevant for transportation, proceed in the Implementation Guide under Logistics Execution → Transportation → Shipments → Maintain Transportation Relevance and choose the activity Maintain transportation relevance for routes. o No transportation blocking reason may be set in the delivery! Choose Change Delivery, and proceed to the detailed screen through the path Header → Shipment. Under the tab page Shipment, you can see whether the field TrBlckResn is filled. o If a transportation blocking reason is set in the delivery, you can change this in the Implementation Guide by calling up the activity Logistics Execution → Transportation → Shipments → Maintain transportation relevance → Maintain transportation relevance for delivery types. o If you have an inbound delivery (delivery type EL), the delivery type must be marked in the Implementation Guide as relevant for transportation. o If you change the Customizing setting after you have created a delivery, you must change and save the delivery. Then the system calculates the status on the basis of the new Customizing setting. Now call up the function Change delivery and save the delivery. • As soon as you have checked that the transportation planning status is set to "relevant for transportation", you can choose the function Select delivery when creating or changing the shipment. Check the following points: o You can assign either deliveries / return deliveries or inbound deliveries to a shipment. A mixture of documents, however, is not possible. On the basis of the shipment type that is assigned to a shipment, the system recognizes whether the shipment is incoming or outgoing. To do so, it uses the indicator Completion type, which you can specify in Customizing for shipment type under the following activity: Logistics Execution → Transportation → Shipments → Define Shipment Types. On the detailed screen of a shipment type, you can set the following processing types through the field Completion type: '1' means Outbound shipment loaded You can select deliveries / return deliveries for this shipment. 2 means Loaded incoming shipment You can select inbound deliveries. o You can define selection criteria for a shipment type. In the Implementation Guide, choose Logistics Execution -> Transportation -> Shipments -> Define Shipment Types, and then select the field Selection variant in the screen section Proposal on the details screen for Change shipment.
  • 43. In a selection variant, you can enter values in certain fields and also make them invisible on the screen. This can be useful, for example, if you select deliveries from shipping point 0001. Note that with the selection variant in the example above you cannot select deliveries from shipping point 0002. o Note that the screens for deliveries / return deliveries and inbound deliveries differ from one another. o Make sure that the transportation planning status is specified correctly. The standard values are A and B. If you wish to select deliveries that are already fully planned, you must choose the status Transportation-relevant fully processed. Deliveries with the transportation planning status Not relevant for transportation are not selected. o Make sure that you have maintained the goods movement status correctly. If you wish to select deliveries that are already fully planned, you must choose the status Transportation-relevant fully processed. o If you wish to select return deliveries, deliveries, or both, select the respective radio button in the type of delivery. o Make sure when you specify several selection criteria that these are linked by an AND condition, not an OR condition. Example 1: You have specified ship-to party XY and also entered shipping condition 01. In the system, however, there are no deliveries with this ship-to party and this shipping condition. With the criteria you have entered, the system has not found any delivery. Example 2: In the section "Reference" you have entered shipment number A and order number B. Through these specifications you want to select all deliveries that are included both in shipment A and in order B. The system does not select any deliveries that are in order B, but not in shipment A. • If the system was not able to select deliveries during creation of a shipment, you can display the selection log. On the overview screen Shipments and Deliveries, choose the activity Edit → Selection log. The following can be possible reasons: o The delivery is blocked by another user. o The delivery does not contain any items. o The delivery does not contain any items relevant for transportation. You can set the transportation relevance for delivery items in Customizing under the following activity: Logistics Execution → Transportation → Shipments → Maintain Transportation Relevance → Maintain transportation relevance for delivery item types. o The delivery is a return delivery, but (also) contains outbound delivery items. Since the point of departure and destination are no longer uniquely defined, these deliveries can no longer be processed in the transportation system. In the case of return deliveries with reference to an order, note that in the copy control function in Customizing a copy routine is stored that also copies this indicator from the order item into the delivery item. For this purpose, proceed to the Implementation Guide and choose the activity Specify Copy Control for Deliveries under Logistics Execution → Shipping → Copying control. o The delivery contains return items. o If you have an inbound delivery, the plant in the items must be unique. Example Special selection options for outbound deliveries:
  • 44. Selection by status of credit limit check in the delivery selection During delivery selection you can only select deliveries where the credit limit has not been exceeded. You can also define a selection variant for this selection. • Selection by picking status You can define that only deliveries where picking is not yet complete are selected. Defining Selection Variants for Shipments Procedure In the shipment document: 1. Enter the selection criteria that you want to save as a variant on the selection screen. 2. Choose the button for selection options and select the required variant from the list. 3. Enter a code and name for the selection variant. 4. Save your data. The system informs you that the selection variant with the code you specified in Step 3 has been saved. You can now use this selection variant when you create shipment documents. In the shipment lists for transportation planning and processing (Transp. Planning, Utilization, Free Capacity, Check-in, Shipment Completion): 1. Enter the selection criteria that you want to save as a variant on the selection screen. 2. Choose Goto → Variants → Save as variant. 3. Enter a code and name for the selection variant. 4. Save your data. Creating Additional Shipment Documents Procedure If you wish to assign the selected deliveries to several different shipment documents, for example, for capacity reasons, you can create additional shipment documents on the overview screen Shipments and Deliveries. Proceed as follows: 1. Select the deliveries and choose Sie Edit → Automatic planning → Shipment per delivery. A message appears informing you that a new shipment document with a provisional number has been created. 2. Assign the deliveries to the new shipment document, as required. 3. Save the new shipment document. The system displays the number that it assigned to this document, according to the number range defined for shipment documents.
  • 45. Moving Deliveries Use As long as you have not set the Planned status in a shipment document, you can move deliveries • From one shipment to another • Within a shipment • From a shipment to the screen section Procedure Moving Deliveries From One Shipment to Another To move a delivery from one shipment document to another, you can use the drag-and-drop function or the appropriate pushbutton on the overview screen. If items or handling units of a delivery are packed into a handling unit of a shipment, the delivery can no longer be removed from the shipment. In such a case, the items or handling units in the delivery must first be unpacked from the handling unit of the shipment. See also: Packing in the Shipment Document Removing Deliveries from a Shipment Use You can remove deliveries from a shipment document as long as the Planned status has not been set for that shipment document. There are no restrictions for removing deliveries from the Deliveries not assigned section of the overview screen. When a delivery is removed from a shipment due list, the system determines the transportation planning status anew. Depending on this status, you can select the delivery when you create a new shipment. Your customer postpones the delivery date for a certain delivery. The delivery has already been assigned to a shipment. The planned status has not yet been set for the shipment, so you can remove it from the shipment. The transportation planning status is reset to A (not yet planned). The delivery is included in a later shipment. Procedure To remove a delivery from a shipment, use the Drag & Drop operation or press the key Remove delivery from shipment.
  • 46. Result The deliveries are removed from the shipment. The transportation planning status for this delivery is determined anew by the system. Creating Shipment Documents for Individual Deliveries Use To plan and process individual deliveries in a shipment using separate shipment documents (FTL (full truck load) or FCL (full container load) transactions, for example): Procedure 1. Select the deliveries for which you wish to create a separate shipment document. 2. Choose Edit → Automatic planning → One dlv.one shipment. A message appears informing you how many new shipments have been created and what provisional numbers have been assigned to them. 3. Save your data. The new shipment documents are saved and assigned numbers Planning Proposal Use The planning proposal enables you as the material requirements planning (MRP) controller to simplify your manual planning. As you create or change shipments manually, the planning proposal gives you default profiles, which include "rules" that automatically create shipments and fill them with data. You can still make manual changes to the planning proposal during processing, unlike collective processing for shipment creation, where you cannot influence processing manually. Features You can save the selection criteria that you use for collective processing for shipment creation as a selection variant. You can also save combination criteria that you have maintained as a combination profile and save the data that is used to fill the shipment as a data profile. You can then access these profiles as you carry out collective processing for the automatic creation of shipments, for example. You can also save settings, selection criteria, combination criteria and data together in one planning profile. Technically , the planning profile is a variant of collective processing for shipment creation. A planning profile can be assigned to a shipment type.
  • 47. If you select a planning proposal while you are creating shipments manually, a dialog box containing that planning proposal with its corresponding data appears, provided a planning proposal was assigned to the shipment type. All default values in the dialog box can be changed except for the basic data (transportation planning location and shipment type), since you just entered that data in the initial screen for creating a shipment. When you choose Execute, the selected deliveries are automatically put together in a shipment and filled in with data, according to the specifications you just made. If errors or warnings occur, they are recorded in a log. Subsequent Delivery Split in Shipments Use During shipment processing it is often necessary to split a delivery up into two or more shipments because they do not all fit on to one truck, for example. However, since it is not possible to assign deliveries to shipments item by item, there is a special function called Subsequent Delivery Split. You can carry out a subsequent split either in outbound deliveries or in shipments. The following are a few examples in which a delivery split would be necessary: • A customer's purchase order cannot be transported in a single shipment (for example, 100 tons of coal per truck; delivery would have fitted into a 30 foot container, but there is only a 20 foot container available). • No suitable means of transport is available when transportation planning takes place. • Estimates based on SAP System calculations are not appropriate for the actual situation. In the first example, the delivery split could take place as the delivery is being created; in the second and third examples, the delivery split would happen after the delivery was created (during loading or transportation planning). Prerequisites So that you can use the functionality of the subsequent delivery split, you need to configure the respective settings for the activity subsequent delivery split in the Implementation Guide under the path Logistics Execution → Shipping → Deliveries. Pay attention to the conditions that are listed under the heading "Prerequisites". A delivery split is only allowed, for example, if the delivery has a particular status. This means that, for example, no goods movement, no invoice, and not pick quantity pending confirmation (at least for the split quantity of an item) may exist. The shipment must also be fully processed already. The type of split is controlled through a Split Profile that you define in Customizing and assign to the shipment type. You store a profile for the delivery split before planning and after planning. Whether or not the split deliveries remain in the shipment depends on your Customizing settings: • before planning: Already when you are making up the shipment, you know that the delivery needs splitting. The split results and the split remainder remain in the shipment. • after planning: Already when you are loading up the means of transport you determine that the delivery needs splitting. In the case of a loading ramp split, the split results are removed from the shipment.